
A month or so back I overheard a conversation in my F3 Wheaton exercise group about a failed portable hard drive. The owner is a professor who has traveled as much as I have, has kids like me with priceless photos on that disk, and has ten years of PhD work and life on the disk. I had to sit down and ask if I could help! If that was my data, I’d do anything to get it back!
Here’s how, over the span of 59 days, I got most of it back.
Sure enough, the professor took me up on the offer and delivered the drive to my house the next day.
I know, I know, people should make backups and/or use cloud storage. But sometimes you don’t, and you just have to make the best of it. He’s been hearing the lecture on backups for the past year since the disk died. But as my grandfather-in-law would say, “If wishes were fishes, we’d all have a fry.” Life is not a Douglas Adams novel: you can’t go back in time. But you can try to do something about it. The disk spins and shows a directory listing but none of the files are readable. Some of it must be readable, right?
with all that padding around two spinning platters, how could it ever fail?
This is the story of how I helped get it back! I am not a hard drive recovery professional (and no, I did not stay at a Holiday Inn Express last night.) I have been taking computer hard drives apart since I was about ten years old. In high school & college I went through a spree of dodgy 60GB hard drives which were fortunately in a RAID5 and I learned about freezer tricks, heat sinks+ice cubes, and the power of patient persistence. I’ve learned a few tricks since then that help: a sprinkle of microelectronics, and a dash of AI. Years of proximity to system administration taught me some tricks too; volume snapshots and copy-on-write filesystems and a sixth sense for failure modes.
The Impossible Job: a decade’s worth of PhD life on a failing 2TB drive
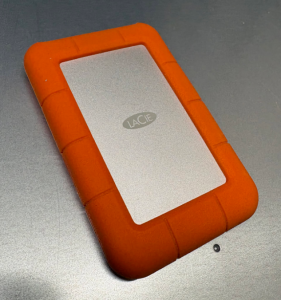
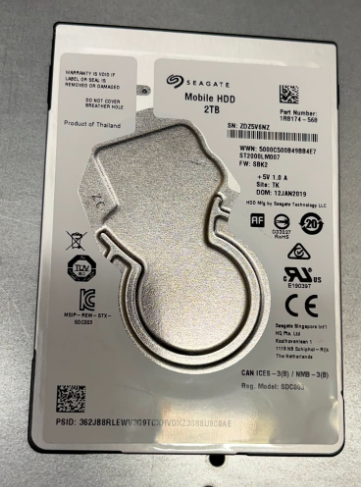
The packaged disk is a LaCie 2TB portable USB hard drive. Inside is a standard 2.5″ SATA disk, a Seagate ST2000LM007 which has two spinning platters inside of it.
I plugged the USB enclosure in, got a directory listing, and the minute I tried to read anything it stopped. That’s not a good sign! I moaned when I saw it was HFS+, but in retrospect, that was not a problem. Every time I tried something, I had to unplug and replug the disk to get it to respond again. Using the USB enclosure vs SATA directly didn’t change the behavior either.
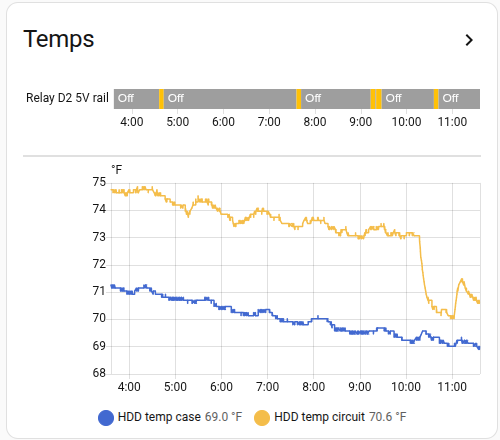
I tried some fans to cool the disk to no effect, to the point of attaching some DS18B20 temperature sensors to each side of the disk to see if it was getting dangerously hot – it was not. But the graphs (in Home Assistant of course) proved useful later on.
First Contact: Why did dd keep dying at 40GB?
I suppose a hard drive expert can answer that question better than me!
My next step was to try cloning the disk with dd on linux. Uncle Mintel left me a small cache of big 3.5″ old 2TB disks, and after some quick smartctl verification tests, I picked a couple that looked fit for the job. I set up the disks on my workbench in the basement in an old PC that I use for GPU experiments, and started to try to clone the disk with dd. Every time: it hit 40GB, the disk stopped, and the SATA link reset. It needed a power cycle. I clearly couldn’t afford to spend time re-reading the same blocks on the disk, so I needed a new plan.
ddrescue to the rescue!
ddrescue is dd but for recovery from a dying disk. I’d never used it before, but it is exactly what I needed.
You point it at a source and destination disk, it tries to read, and keeps a map of every block it’s tried, what was copied successfully to the target disk, and what produced read errors. You can run it iteratively, as many times as you want.
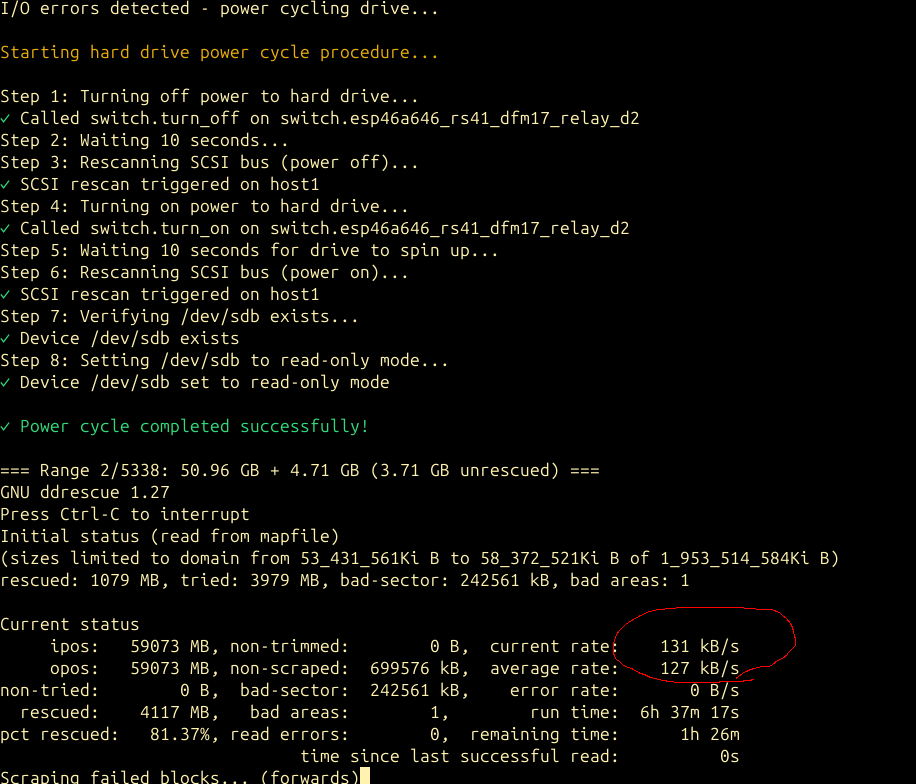
My disk was special: it never actually returned read errors; the disk simply performed so slowly that the host never saw a series of read errors – it just saw the disk time out and go away. The useful part: you can restart ddrescue ad nauseum, at any arbitrary point on the disk, and it will focus on that area of the disk. I quickly found that jumping ahead to 60GB that I could read the next 20-30GB cleanly. However I’d eventually run into one of two problems: the disk would timeout and reset and need a power cycle, or a second failure mode emerged: the disk would read at 131kB/sec. Mysterious? Probably not – 131kB/sec is exactly 1000x slower than the “normal” read rate of the disk. Presumably the disk was moving slowly because it was having to retry reads 1000x and using conservative error correction (which should be a pretty good indication of a physical failure, but I persisted!)
The problem with power cycling the disk all the time
I mean sure it’s annoying. But what was really annoying to me was that it was in my basement; on top of which we have a newly-walking 1-year old baby. I had to open the gate, go down; she’d want to come with so I’d grab her. Pulling a cable out of a disk is a two handed operation, so I’d set her down on the basement floor, do the cable dance, pull out my SSH client on my phone, and tell the OS to refresh the SATA host. Then grab the baby, go back upstairs, close the basement gate, set the baby down. This got tiring quickly.
I’d learned a few years back that SATA host ports on Linux can be listed:
for host in /sys/class/scsi_host/host*; do
 h=$(basename $host)
 ata=$(readlink $host | grep -oP 'ata\d+')
 if [ -e $host/device/target* ]; then
  blk=$(ls $host/device/target*/*/block/)
  model=$(cat $host/device/target*/*/model)
 else
  blk="<none>"
  model="<none>"
 fi
 echo "$ata -> $h -> $blk -> $model"
done
For example, my file server:
root@minor:~# ./list-sata-devices
ata1 -> host0 -> sda -> Samsung SSD 850
ata2 -> host1 -> sdb -> Samsung SSD 850
ata3 -> host2 -> <none> -> <none>
ata4 -> host3 -> <none> -> <none>
ata5 -> host4 -> sdc -> Samsung SSD 850
ata6 -> host5 -> sdd -> Samsung SSD 850
You can then tell the scsi host to refresh a port that you just hotplugged:
echo "- - -" > /sys/class/scsi_host/host4/scan
I’ve yet to find a consumer grade SATA host which doesn’t tolerate hotplugging.
I had that – but I needed an automated way to power cycle the disk and save both me and the 1-year old the trips to the basement.
ESPHome ESP8266 + relay on the 5V Rail
Because hey, why not? I have north of 30 esp8266 MCUs that I’ve built stuff on, all plugged into Home Assistant. I borrowed a relay node that I use to power cycle DFM radiosondes when on the bench and wired it up to the 5V rail on a SATA power adapter (I left 12V unplugged given that little disks don’t even use the 12V rail from what I’ve read.) A HASS auth token and a bit of curl later, and I had a script that did an end-to-end power cycle of the disk:
- Power off the disk and wait a few seconds.
- Refresh the SCSI (SATA) port to make sure the kernel sees the disk is gone
- Power on the disk and wait a few seconds
- Refresh the SCSI port again.
- If the disk didn’t come back, sleep for 60 seconds and try once more, and if it still doesn’t work, print a big error on the screen and wait for user input.
This setup was the key. I left the basement one day, and didn’t touch the host for an entire month afterwards as I slowly worked on it.
Timeouts as a Strategy: Skipping the Tar Pits
F3 AO pun not intended
Now that I had a working power cycle procedure, I could try reading the entire disk in segments. I wrote a simple wrapper which ran ddrescue at 10GB increments, wrapped in a bash “timeout 120” which meant that if I hit one of those 131kB/sec slow spots, or the disk timed out and needed a power cycle, that ddrescue would exit out. The loop turned into:
- For x in (10GB segments up to 2000GB)
timeout 120ddrescueread as much as you can- Test the disk. Is it offline? If so, power cycle it with the procedure above.
This was gold. In a couple of days, I had recovered 724GB of the disk’s total 2000GB area.
Making it Visible: Writing ddrescue log visualizers & HA graphs
The log file is a long machine-readable text file not meant for humans. It has one block range per line, so on every ddrescue run it got longer. The ddrescuelog CLI tool didn’t work for me for some reason. I threw this one at Claude Code which wrote a CLI and HTML visualizer:

I already had the relay switch visible on Home Assistant, which yielded a history graph showing if the disk was powered on or off and the corresponding temperature sensors below it, so you can glance at what was happening autonomously while you were sleeping:
I went further – as regular readers may know, I am obsessed with getting every bit of my data into Home Assistant…read on!
Zooming In: From 10G to 1G to 100M resolution passes
I revised my wrapper script to then do 1G segment passes, with a correspondingly shorter timeout, and eventually I went on to 100M segments. Smaller segments took much longer; a lot of the remaining data surface area was reading at the slow 131kB/sec rate. Every now and again, my power cycle controller would hang – I’ve found that a Home Assistant server hang has weird knock-on effects for my esp8266 nodes. OneWire temperature sensors start returning 80C like parasitic power problems and my relay GPIO would stop toggling, and I’d have to power cycle the node! Still unresolved.
At the completion of the 100M chunk pass, I had a lot more of the data, but I estimated that if I let it run on every block, it would take another 45 days to read it all at 131kB/sec – and that’s not counting power cycles (which became so numerous I stopped paying attention and just kept hoping that the next power cycle would not be the disk’s last.)
Tangent: proof of life (and an excuse to use another hard drive)
I needed to see if I was getting anywhere. I took a few hours’ pause from ddrescue and cloned my recovery target disk over to a second spare online 2TB disk. Pro tip: hotplug disk names like /dev/sdd are not stable across reboots! You knew that. Check your serial numbers or disk device IDs; fortunately in this entire process I never rebooted once (nor did the mains so much as flicker) until the process was complete.
Once my dd to the spare disk was complete, I wanted to mount the volume and run fsck_hfs but I also wanted to snapshot and work with a copy-on-write (CoW) image of the disk. The underlying partition was 100% the size of the physical disk, so the CoW store needed to live elsewhere. My OS disk is a mostly empty 1TB lvm volume which unhelpfully is 100% allocated and I didn’t want to go offline just to lvresize.
I asked Claude. It’s a pretty good sysadmin! I created my CoW store as a file on the OS disk, made a loopback device, and used the dm-snapshot method. Worked perfectly.
I ran fsck and mounted the volume. I clicked around. My jaw hit the floor. Even with many GB still to recover, I had tons of photos and sent the owner some proof-of-life photos! Needless to say, he was excited!
The Breakthrough: Reading the HFS+ allocation file (aka bitmap)
Big thank you to Matthijs Kooijman for their article Recovering data from a failing hard disk with HFS+
This article described a lot of the same challenges I had, and coincidentally also the same filesystem. The power cycling tricks described there never worked for me, but the HFS+ pointers absolutely did: HFS+ maintains an allocation file which gives a map of which blocks on the disk were in use. Cross-reference this with the ddrescue log file, and I was in business. I knew exactly which blocks to focus on recovering!
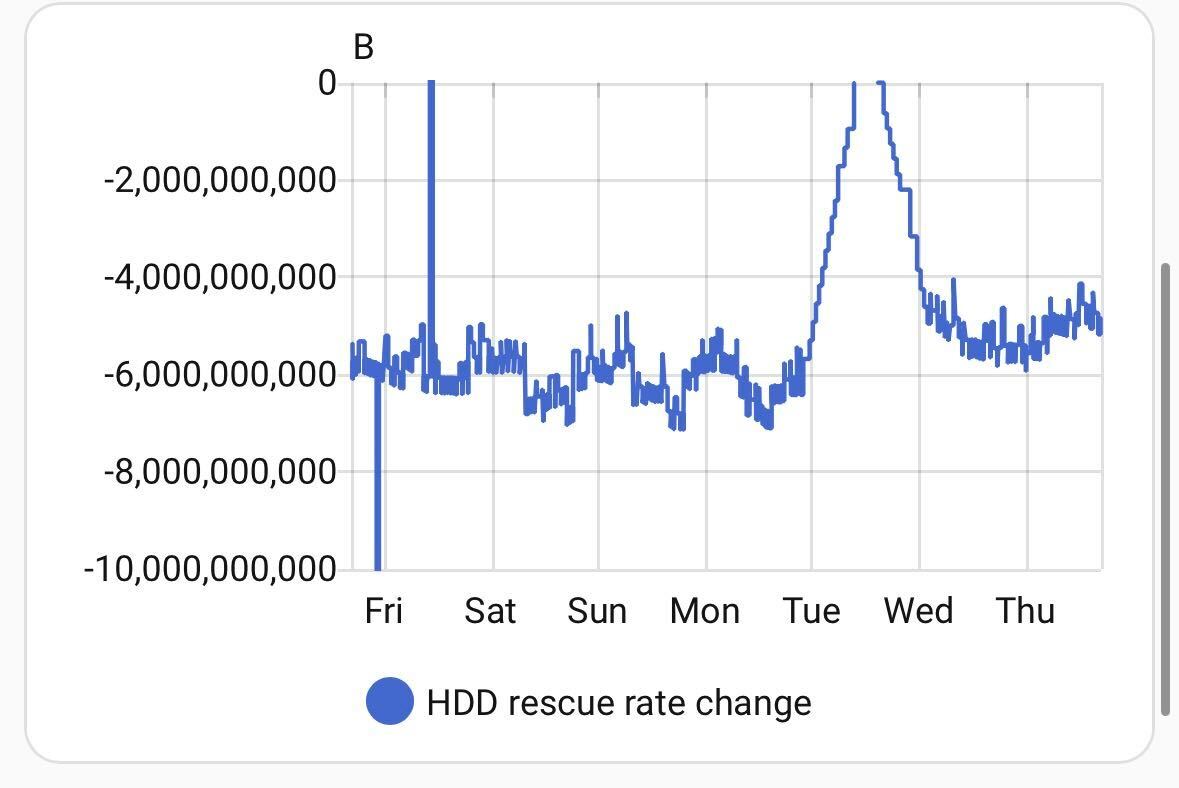
I prompted Claude Code to write a hfsplus_priority.py script to generate 16,000 arbitrarily-sized ddrescue commands for all the remaining blocks, and also publish this to MQTT. The generated bash script would run for days; the MQTT publish I ran hourly to make me my pretty graph. This was fun – I could post to the F3 Slack on occasion for people to cheer for the little hard disk that could:
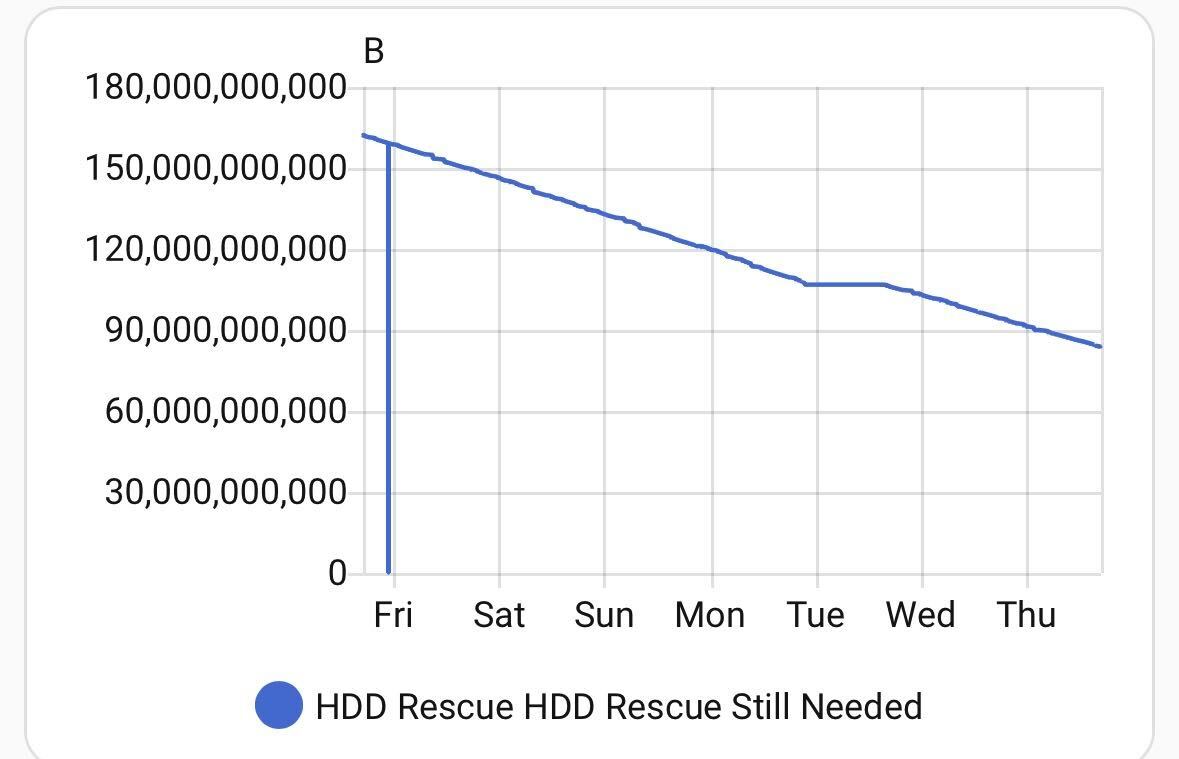
This took another week or so. At which point my graph levelled out at 40G to go. Only a few segments in the ~16,000 had failed to read and weighed mere megabytes each – what did I miss? The ddrecover master process said it was complete!
Trust, but Verify: The day Claude admitted to “helpfully” skipping blocks under 1MB
I teach classes on Claude Code. I teach people to find ways to verify what it comes up with. I’m well beyond Spicy Autocomplete; I’m often the FSD driver asleep at the wheel except instead of sleeping, I am parenting. I should have expected this. In the hfsplus_priority.py script, Claude Code helpfully added a --min-size flag which defaulted to skipping blocks smaller than 1MB. Claude’s context at this point in the project was huge, and full of references to iteratively trying to recover the largest ranges of data I could assuming that the disk would eventually crash. It didn’t take long to find the problem (I asked Claude!) and I was on my way. This last recovery sweep added another few days and thousands more segments to cover, most of which were tiny, but added up to 40GB.
Almost there…
The “bytes to recover” graph in Home Assistant marched on to nearly zero. A few megabytes were truly unreadable no matter how many times I tried, and every time I tried the disk needed a power cycle. I was done. I’d recovered all I needed to.

Integrity audit & reporting
I did the same dm-snapshot CoW setup, this time for the primary recovery disk. Browsing around the volume was like living in a dream: it all worked! But did it? There are 600,000 files on the volume. Let’s be systematic.
I prompted Claude Code to work up an auditor script which attempted to open every file and see if its file type and detected mime type (using the file command mime-info magic database) matched, and then I extended it to actually attempt to open every single file that it could using a Python library to see if the input data was sensible. Reality hit: loads of files were unreadable, about 1/6 of the total count of files. A bit of heuristic analysis showed that most of the unreadable files were auto-generated iPhoto thumbnails.
That said: a darn good result given that the data owner had already written it all off.
I took counts of file types, broken down by recovered vs lost, and had Claude Code write a little user-friendly report summary. I packaged the 800G of data (now some of it gibberish, left in-place) and copied it to the user’s new scratch disk, a solid-state disk, which he said was bound for iCloud. A good move for important data! (I have since confirmed the data has made it to iCloud! Long live the data!)
Fin. Done. I shut down the recovery computer. Uptime: 59 days elapsed from start to finish.
Lessons from an Impossible Project
“No problem can withstand the assault of sustained thinking.” – Voltaire
“Nothing is impossible, except skiing through a revolving door.” – Woody Allen
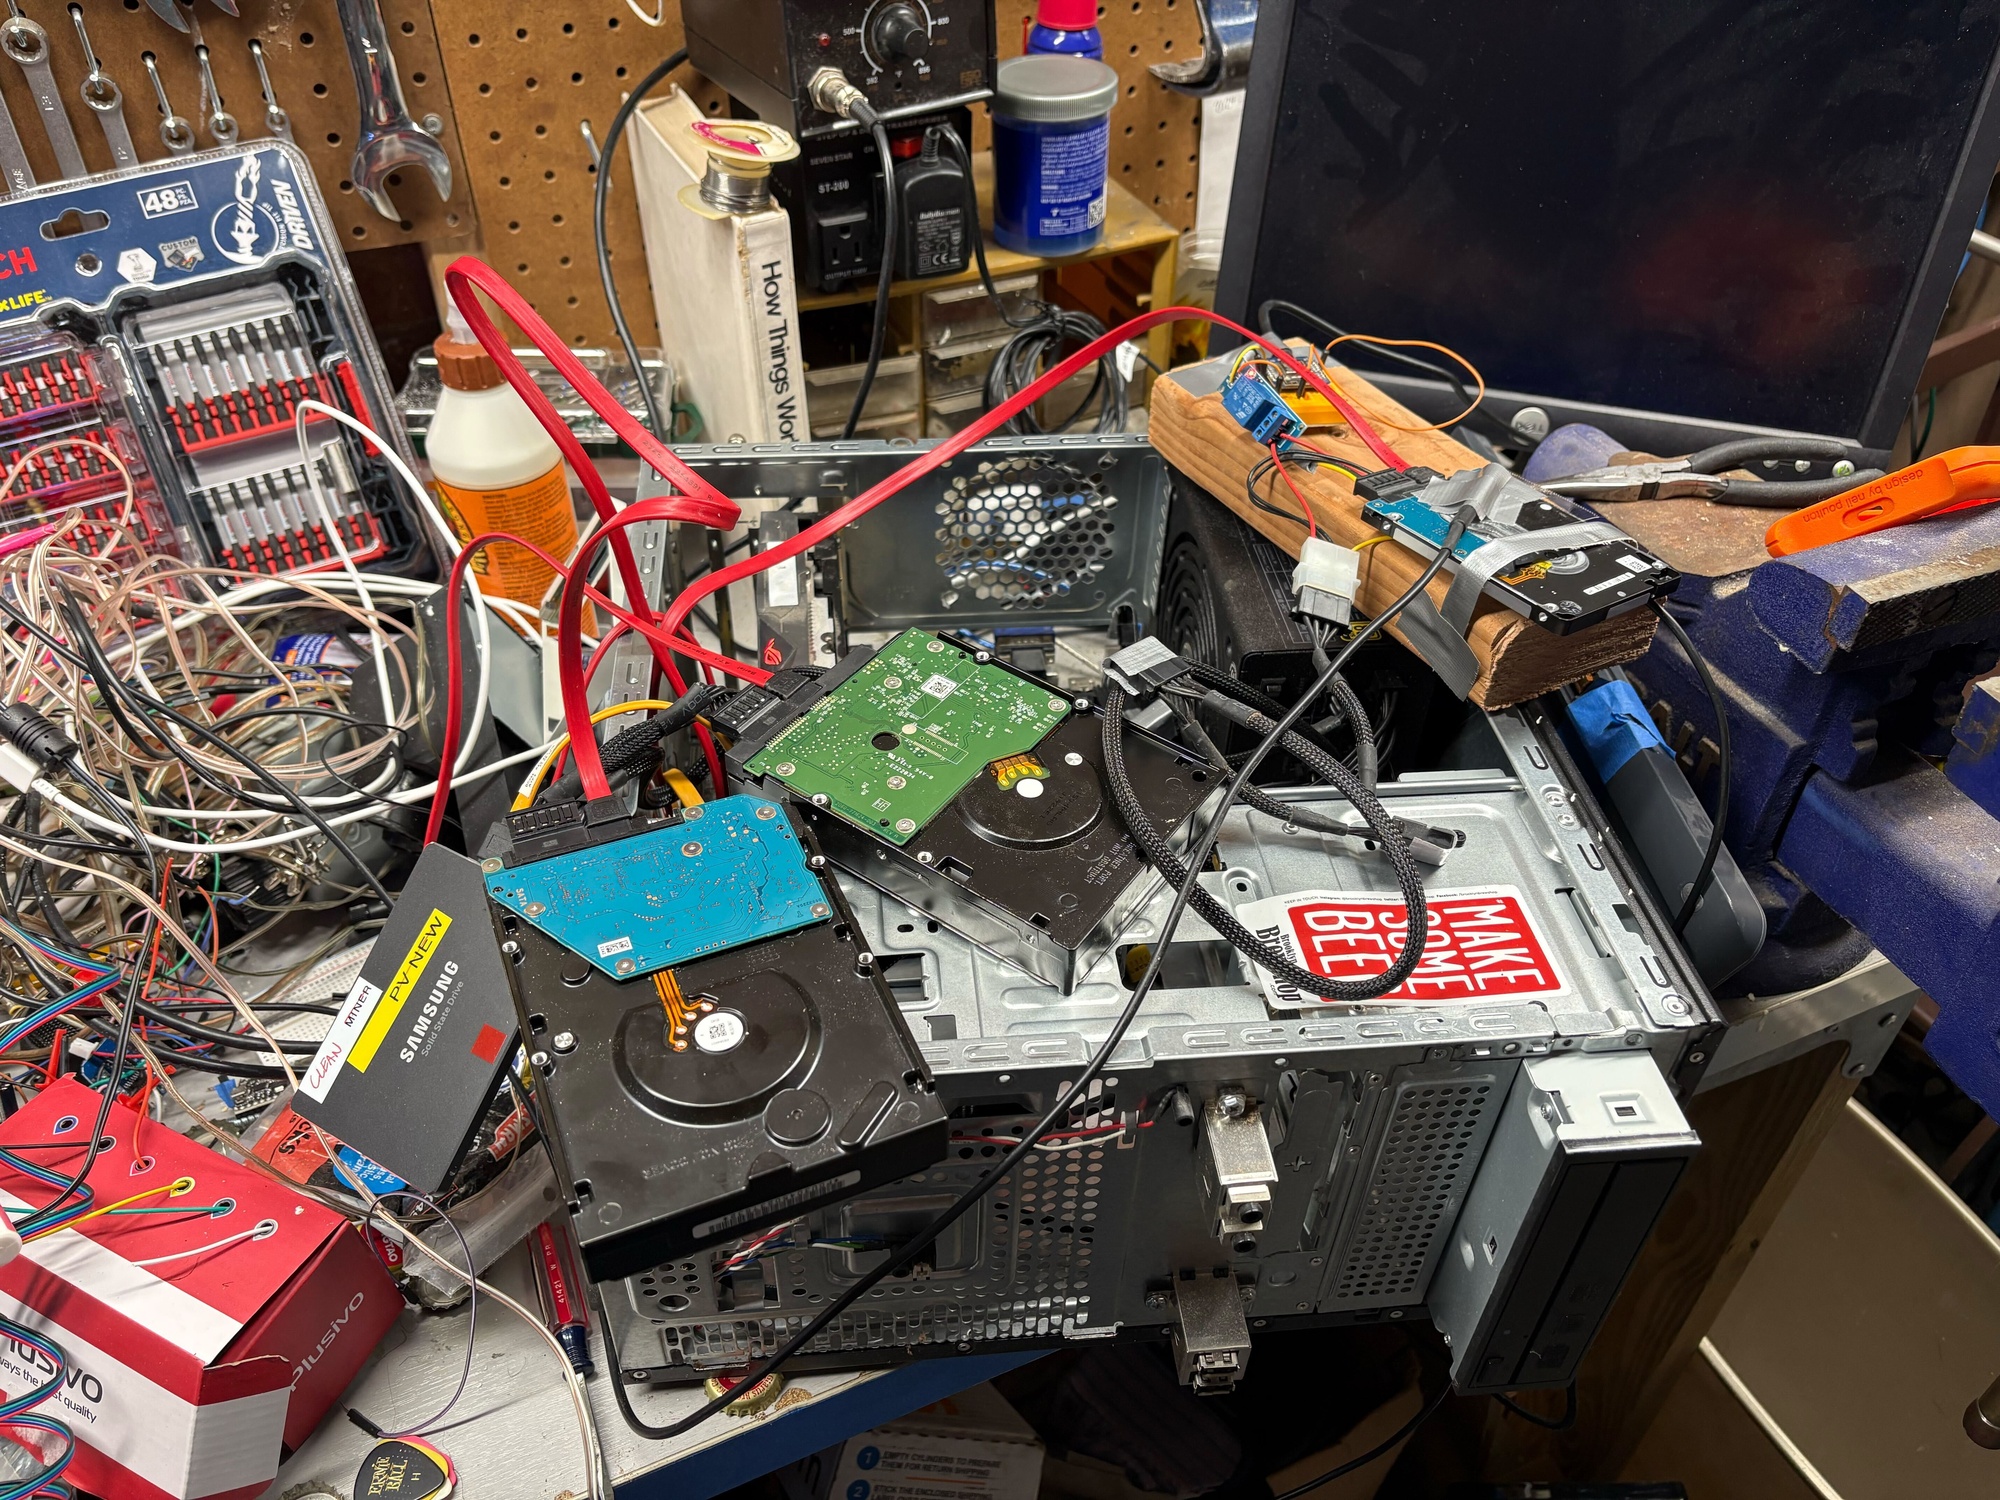
the “rig” with the hard drive under examination in the upper-right on a piece of wood
A bit of AI and experience sure helps.
This is one of the joys of being self-employed: the idea that my effort, my drive, is all mine. I volunteered for a seemingly impossible job, one which I would not normally pick up. I said yes, expecting to lose and get nothing in return. When the going got tough, I still said “what else” and used a lot of tools. AI was helpful, not just for technical coding, but also as a consult. How many platters does this hard drive have? Why is it pulling data so slowly? Why is it timing out from the SATA bus? How do I power cycle a disk on Linux? Is there anything I can do about the speed? Can I tell the firmware to stop retrying so hard? What’s the syntax for smartctl? I can’t count on two hands the number of disparate chat threads I’ve made across Claude and ChatGPT and Gemini about this. I’ve made so many on Claude that it now has a memory of the model of disk, and every now and again guesses that I’m talking about this disk when I ask an unrelated linux block device question!
Next World Backup Day, I’ve got a story to tell.