
Earlier this year I caught my first three DFM17 radiosondes and shortly thereafter discovered gx1400’s dfm_hamradio project (which I’ve been working on) and the Recessim wiki page covering basics for how to hack the device. I “dead bug” soldered wires to the debug port on the board, connected it up to my ST-Link V2, and voila: I had control to program the device!
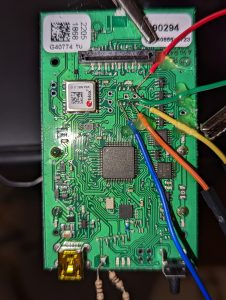
As you can see from my photos, soldering wires to these tiny pads is treacherous. Trust me….they won’t stay. The header is for a Cortex Debug connector, which would be well served to just buy and solder an Adafruit Mini SWD header as others have done. But can it be even simpler? What if you wanted to program and fly one of these…easily and quickly?
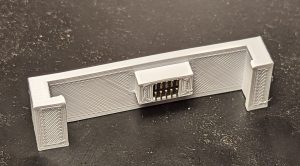
3d printed clip
I designed a little 3d printed clip you can use to hold a Mini SWD header into place on your DFM17 board. It works!
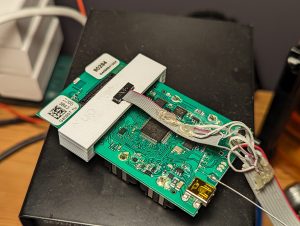
The clip fits just below the sensor plug; this is the reference point for how to line it up. Fit the SWD header into the box with the notch facing towards the top:
…and then fit a 10-pin IDC 1.27mm plug into it from the top, and clip it around the board. The PLA will bend slightly but hopefully doesn’t break for you.
The Result
I actually did do some soldering for the last step, but this time just to make a cable. I’m sure you can buy an adapter from Cortex Debug to ST-Link (both of which are 10 pin box connectors! With different pinouts!) but I decided to fashion myself a simple adapter of my own. Success:
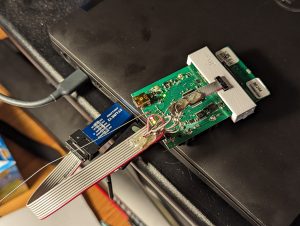
With this I should be able to wipe and flash a newly caught DFM17 in just minutes of work.
How to print
Grab the STL on printables.com and print away. I’ve been using PLA. PETG might be a good choice since it’s more flexible.
The design is in an OnShape public repository if you want to tinker with the design. It’s far from perfect. As of this writing the clip pictured here and tested has a “v6” label on the side of it but any later version I make there should be an improvement.
Print with any old PLA. Must have supports to hold the clip “teeth” up.
Troubleshooting
Clip broke? Sorry about that. It really is a tight fit. I cracked one when I printed with some cheap crappy silk PLA which is known for being brittle, but my go-to hatchbox PLA has fared fine.
If you do have questions or want to chat, I recommend the #Balloonchase channel on SecKC discord where some other hackers (myself included, trickv) can be found.
Good luck!