hey.com email, a nice experiment, but I’m back to Google Workspace

A couple of years back I got fed up with email (as I perpetually do in waves throughout my life) and decided to try something other than Google Workspace / paid GMail. 37signals had just released hey.com for domains so I could bring my trick@vanstaveren.us email name over there, so I gave it a go.

At first I was stoked!  In fact I was, for about the first year.  Main advantages:

  1. New senders didn’t make it to your inbox; they made it to basically a quarantine box for new senders which you had to whitelist.  This is great!  At first.  Something hitting your inbox is a momentous occasion – a real person with something you want to read!
  2. Automatic filing boxes for “The Feed” (newsletter-type things that are optional to read) and “Paper Trail” (receipts, etc).  These are great.  Probably about 80% of email by count is one of these two; and having these as baked-in concepts keeps email simple.
  3. It’s on my domain!
  4. It’s different!

The not so nice:

  1. Offline never really worked.  I don’t use it much, but I learned that if I wanted to use it offline, it wasn’t worth trying.
  2. Spam filtering is there but isn’t great.  1/3 of new senders were spam.  While you can filter them out as spam, I found myself skimming a lot of spam to realize I was about to hit the “junk it” button.
  3. Plus addresses don’t work as you’d expect; if I want trick+blah@vanstaveren.us in my inbox, I have to go add it as an alias.  Most of these ended up in the Catch All box, which I never looked at, because it’s full of junk.
  4. The calendar.  There’s nothing wrong with taking a stab at your own calendar app, but manually copy/pasting Google Meet links from my free @gmail.com account into hey calendar made me crazy.  The calendar also was not sharable with my spouse nor my DakBoard display screen in my kitchen, nor any general view on my mobile phone, so events in there lived and died in there.  I kinda liked hey.com more without the calendar, because I would just forward invitations to my free @gmail.com account and deal with the confusion from there.
  5. What is this notes cover thing for? To stop me from getting distracted by all the email I’ve read, I guess?  I literally wrote “ahoy” on a note on day 1 and never used it and was only ever annoyed to find the feature was still there and I’d accidentally clicked on it.


My inbox never actually looked this clean.

What really drove me away:

  1. The search.  Keyword searching was awful because I get a lot of newsletters that go into The Feed and are full of every word ever.  Don’t search for “QuickBooks” if you expect to find that email from a real human last week about QuickBooks because Money Stuff mentioned Intuit and QuickBooks half a dozen times in the last week, and that real human email is a page down or more.  Mistakenly hit enter on the quick search pullout?  You’re now reading the first, and wrong, email – not looking at a longer list of search results.  Best bet? Search for the person who sent you the email and scan through it.  This is faster.
  2. The iOS app supports notifications, but no red dot / bubble to show me an unread count.  I’ve come to rely on this in my move to iOS.  If I have something unread, it needs to show a red bubble.  The app does not.  (Why?!)
  3. Don’t try to reclassify a sender to go to The Feed if they start sending you junk – you’ll get lost in the maze of settings for what a sender is classified as.  Did you know you can also classify an entire domain name?  Of course you can!  But you’ll forever confuse yourself with layers of settings for where stuff should land.  It’s not intuitive.  The end result? Often when junk landed in my inbox, I started to feel it was faster just to mark it as read and forget about the seconds I just lost, rather than losing minutes to figure out how to reclassify something.  I knew I was going to move away from this email so I lost faith in the system that was supposed to save me time.
  4. Mailing list classification does not exist.  I’m on a few Google Group-type mailing lists and writing a filter for these in any modern email client is a sinch; hey.com does not support them.  You have to Yes/No the individual people you want to hear from.  You can’t send them all to The Feed where they probably belong.

The end result?  Email is annoying – it has been annoying for decades, but after a year on hey.com, it became annoying again.  I just couldn’t get over some of this stuff.  It took me another year to convince myself to migrate away.

This month I’ve done it – exported all my data, gone and re-started my Google Workspace subscription, and I’m finishing up the import now.  My inbox has never been cleaner (it helps that OpenClaw is monitoring my inbox for me daily and suggesting junk filters I should add!)

</hey.com>

Thanks for all the fish.

Posted in Uncategorized | Tagged , , , | Comments Off on hey.com email, a nice experiment, but I’m back to Google Workspace

Home Assistant integration: Claude Usage

If you’re like me and constantly running up your Claude subscription usage to its limits, you want a graph. Anthropic has two rate limit windows; one which is five hours long and one which is a week. Go beyond either and you need to put in a credit card for extra usage, upgrade to Max, or – wait! What kind of AI charged engineer wants to wait?

I do more than half of my usage on my mobile phone, so I wanted the best and easiest graph platform a mobile user can get: Home Assistant.

Check out the open sourced code: https://github.com/trickv/hass-claude-usage

Installation with HACS is easy:

    1. Add the repository as a custom repository in HACS
    2. Restart Home Assistant
    3. Install “Claude Usage”
    4. Restart Home Assistant
    5. Go to Settings → Devices & Services → Add Integration → “Claude Usage”

Once it starts collecting data, make a History Graph with the data points and the window you find this useful for; I usually look at the 24 hour window. See the README for an example dashboard.

Let me know if you find this useful or are managing your usage in other ways?

How I built it – iteratively

Building this little tool was certainly different to how I would have approached this in the pre-AI past.  I would have defined not just the end goal but also the methods clearly and worked straight towards it, optimizing to spend as little time coding as possible.  Given that this is a hobby project, I probably never would have finished it!  The API was elusive at first and I couldn’t find examples for how to use it.  But the AI-enabled engineer approach lends us to an iterative approach, where code is cheap, and making something that works is important to justify spending more time on.  My iterations looked something like this:

  1. First version which used the HA API to create sensors, and used Claude Code CLI in a tmux session to get usage data. It would run Claude Code, wait a few seconds, type /usage, and grep the output.  It worked, albeit running claude code periodically contributed to usage!  But it gave me a graph, and it was useful.
  2. Refactored to run Claude Code and keep it open in a persistent tmux
    1. Somewhere in here I learned about Anthropic’s rate limits on the usage endpoints which block you for 24 hours when you hit them too much!
  3. Learned how to use the APIs directly to fetch usage status, but this approach had to steal Claude Code’s session token (which expires every few hours).
  4. Moved from HA API to MQTT integration to get better data into Home Assistant. This was a surprisingly easy refactor for Sonnet 4.5!
  5. Refactored to standalone OAuth (first time I used Opus 4.5 on this code)
  6. Now refactored into this Home Assistant custom integration, installable by HACS

How are you managing usage?

I’m curious to hear how others on low usage plans like mine (Pro) are managing their usage.  Let me know if  you find this useful!

Posted in Uncategorized | Comments Off on Home Assistant integration: Claude Usage

Chasing AI: Vibe coding a New Years Resolution tracker app

I follow the AI Daily Brief podcast and decided to take on their New Year’s challenge to complete an AI challenge/exercise each week as a way to learn different AI tools. For week one, “build a new years resolution tracker”, I went to my good friend Claude Code, but got ambitious – to code an iOS app.

Prior Work

I’ve been working on a few apps in the past year:

  • Porting rdzSonde, a radiosonde on-the-go tracking app which talks to hardware, from Android to iOS
  • A baby monitor app (coming – soon!)
  • Now this!

Having done a bit of Android development over the years and being more of a Linux head, I’ve found the iOS learning curve to be a challenge, but I’m finally getting to grips with it. So while this is the second app I’ve side loaded to my iPhone, it’s a decent size jump for me.

Approach

My initial goal was to prompt Claude Code to take some of what I’ve spent tokens on before (a GitHub Actions workflow which builds an unsigned IPA package file, and a corresponding AltStore repository definition json to make it convenient for me to sideload and test).  Get a “hello world” app working end to end, and then start building features.  It went well!  I wrote the original prompt for project framework on my laptop during a brief bit of free time between wrangling kids; almost all of the rest of this project continued with Claude Code in a SSH/Mosh session on my phone, nibbling away at it when I had time.

Step 1 – Initial Prompt

Here’s my initial prompt to build an iOS app, to use my baby monitor project Actions as examples, to build no features other than a hello world, and to produce an AltStore source json as a GitHub artifact.

This worked pretty well.  This was my first time building specifications for AltStore so this required some trial and error which is not surprising.  I steered the agent a bit with a decision to use React Native and played some back and forth with errors coming from AltStore.  It’s fun to be able to push a git tag, wait for it to build, and refresh AltStore, walk by my Mac and lift the lid (so the signing AltServer is awake) and install the latest version.

It worked!

Interesting stuff I learned along the way:

  1. Keep hitting Esc whenever you have something to say.  Don’t just queue your message and wait for the agent to finish what it’s doing; this is Claude Code – it might work for minutes only for you to redirect what it just did.  If you hit Esc on accident, just say “continue”, it’ll happily move on.
  2. Tailing build logs with Opus 4.5 on repeatedly failing builds with the Pro $20/month subscription is a great way to waste most of your tokens.  Switch to Haiku (hit Esc and interrupt!) or better yet, ask the agent to build a quick script which tails the logs, waits for completion, and only returns when there’s something interesting to show.
  3. You can, in fact, never open a Mac to build apps for a Mac!  This is not entirely true; I did have to lift the lid 30° to awake it so AltServer would run, but I never opened Xcode once.

Step 2 – the features prompt

I’m not kidding when I say I did this part from my phone, over SSH, with no autocorrect:

1) title and deacription; target date(s) for milestones if applicable…a resolution might have a single milestone. a simple checklist for each milestone and if all are conplete, confetti animation and the resolution gets crissed off. (2) progress: a journal entry log format. no expectation about how often; no promptijg the user, i may never use it. a single line question below the Resolution where you enter “Whats Next?” to ebcourage baby step thinking. user journey – list view of all resolutions, basic indicatioj of done/not done/ some milestones done, tap the resolution for details, show all milestones, recent journal entries, and the ability to edit. yes separate screen for creating a new resolution. (4) data – local. i dint know what AsyncStorage is but if thats your go-to its fine by me. use a data format that lets me make wild changes and keep some amount of data preserved as ling as the features for them are preserved. (5) screens: home screen eith list, resolution detail page which shiws Whats Next, list of milestones with checkboxes by them, and then journal entries for each; finally a resolution Edit page which shows a lot of the same stuff as in view mode but its all editable. vision; i expect to use this myself and for no one else, and jusr dir 2026. borrow some theme from my 42 project since im 42 this year (/home/trick/src/github.com/trickv/42) give it a HHGTG-inspired icon, maybe a pixelated bowl of petunias.

The actual transcript is here, but this is my one-shot explanation of features.

I’ve been using SSH from mobile devices for years and miss the days of my HTC Dream with it’s slide-out keyboard for accurate text input on SSH, but LLMs are incredible at understanding my typos so much that you can see I don’t bother to correct all kinds of ridiculous typos.

This yielded an…interesting result:

I got distracted working on the launcher icon and didn’t notice me running up against the five-hour session limit which I hit right as I was figuring out how to get a screenshot copied onto my dev host to show Claude Code.  It’s terrible at handling the session limit; since it was half way through a task list, it spammed pages upon pages of /rate-limit-options before I hit Esc and went to bed.

Step 3 – the fix

The model was quick to find the issue, which was a font size issue, and et voila!

I also went over to Nano Banana Pro and followed on my HHGTG theme and came up with a bowl of petunias icon for the launcher:

Result

Check out the live demo:

I should be blown away – but actually, this all makes sense to me.  It’s exciting, but it’s not surprising.  Based on my experience in the past half year, that I can expect Claude Code to be this good.  The only question is – what on earth to do with this capability?

Bugs I’ve Found

  • The giant “D” font thing.  Fixed.
  • The “What’s Next” text input box had a bug where it was storing input immediately and causing the UI to glitch when I typed too fast.  Fixed.
  • There was no scrolling when the keyboard popped up.  Easy enough to explain.  Fixed.

What’s Next

This gives me more fuel on the fire to run with other mobile app development ideas.  While this app isn’t a product worth much itself, the experience, and the open-sourced examples here are great for the next idea.  Much like I borrowed from the Baby Monitor project repository for Github Actions configurations, I can now borrow from this project (which I did earlier today on rdzSonde – I borrowed a feature from this app!

Something Interesting

Writing down my New Years Resolutions in this app has made me think and set some personal goals for myself that I otherwise would not have.  If nothing else, this little experience has helped me focus on some self improvement.

Got questions?  Reach out – I love talking about this stuff.  I work part-time as a freelance contractor and dad of three which means I love talking to adults.

Until next time – may your models be grounded, and your prompts be precise!

📧 Chasing AI: Get notified of new posts

Enter your email to be notified when I publish something new:


I’ll only email you about new blog posts. No spam.

Posted in Uncategorized | Tagged | Comments Off on Chasing AI: Vibe coding a New Years Resolution tracker app

42

The answer to life, the universe, and everything.

(But what, you say, is the question?!)

I’ve done a lot in the past 41 years, but for my next lap around the sun, I have added a special goal: become more whimsical. If that’s even possible.

Douglas Adams left us a gold mine of silly stories, many of which I’ve read and this coming year I will re-read. I might even turn it into a weekly newsletter for 42-year olds. Let me know if that idea appeals to you.

In the meantime –

Everything will be fine. I’m just a year older. In fact, I’m just a day older than I was yesterday.

~ Trick, 2025-12-13

Posted in Uncategorized | Comments Off on 42

Chasing AI: Claude Code for…mobile!

I’ve been using Claude Code both in real work and for some wild “vibe coding” type experiments in the past few months — including but not limited to vibing an MCP server which lets you run Claude Code from Claude Desktop (with the goal to later port it to web). This MCP server experiment was motivated by the fact that Claude Code in a terminal is not a great experience:

I don’t mind the tiny text size – I mind the lack of autocorrect and the loss of scrollback due to using mosh.  Yet – it’s so dang useful I still use it almost daily while on the go; anything from hacking on the Metra Timetable to porting an Android app to iOS to editing Home Assistant automations.

It’s good that I never spent much time on the MCP server because the day before I published my last post on Claude Code, Anthropic released what they call ‘Claude Code for web’ but I may call it Claude Code for Mobile – because that’s where I think it really shines.

Code Code for web runs on Claude’s infrastructure inside a lightly configurable sandbox – so you don’t have to run a server in your basement like I do.  Repositories get checked out from GitHub into your environment, and changes get pushed back as PRs.

Demo

It’s all about show and tell here, so here’s a demo of me running Claude Code on my mobile phone alongside implementing the same feature using CLI Claude Code:

Claude Code CLI yielded a very similar result – not bad!

Fun observations:

  • Note the picker is in the middle on Claude Code CLI instead of the left – to be fair, I did not specify where it should land.
  • They both produced the same “bug” – misinterpreting the difference between Saturday and Sunday schedule, so the resulting Saturday schedule shows just a single train.  Turns out Engineers do need to review PRs from AI coding agents!

Actually on the web

I later learned that when you run Claude Code in a desktop browser, as perhaps they intended, it shows full diffs unlike the mobile experience.

Teleport

Super cool – not sure when I’ll use this feature in anger – the “Open in CLI” button – I figured it’d just take me to a help doc to tell me how to install Claude Code for CLI, but it “teleports” your session to Claude Code CLI – importing all that beautiful, productive context into the CLI interface.  It requires you to have a local working copy of the repository and then you just run the command like claude --teleport session_nBaAuyuUfjltLdfz6qr5 and off it goes.

Nifty!

Got questions?  Reach out – I love talking about this stuff.

Until next time – may your models be grounded, and your prompts be precise!

📧 Chasing AI: Get notified of new posts

Enter your email to be notified when I publish something new:


I’ll only email you about new blog posts. No spam.

Posted in Uncategorized | Tagged | Comments Off on Chasing AI: Claude Code for…mobile!

Chasing AI: breaking into AI coding with Claude Code

I’ve always had this feeling that coding might be, broadly speaking, the most useful thing we can get an LLM to do.  They’re great at generating written and visual content and in particular to getting you from a blank canvas to something, but there’s something special – and terrible – about code: it lives on; good code in production can run for decades.  The long term productivity leverage of leaning on AI coding tools, if we can harness them well and get good quality, is big.  Here’s my story about how I’ve found myself knee-deep in AI coding tools.

The Journey

My journey getting LLMs to write code started with ChatGPT – “Hey, can you write some code in <language> which does <X>?”  If you haven’t even done this, I highly recommend it – programmers need to take these steps to understand what an AI tool is doing and how good (or not) it is.  The first code I recall asking ChatGPT to write took 10 seconds of audio from a USB microphone, analysed it with ffmpeg to determine the mean and maximum audio levels, and wrote these values out as a prometheus textfile .prom file on disk.  This got graphed, and I used this to graph to keep an eye on the 2024 cicada emergence in the midwest which was deafening and I had the graph to prove it – using code from ChatGPT!  How many programmers know how to string together Linux audio recording, ffmpeg, and prometheus in one shot?  Your imagination is the limit.  But whatever you do – don’t become a dinosaur!  Try it.

If your anxiety about privacy is blocking you from trying AI coding tools, there are many ways to run LLMs locally – I recommend trying ollama locally.  It’s open source and runs models on your machine; basic models do not require a special computer.  If you’re still stuck at this point, let me know – maybe this is something I should write more about.

My first intro to Claude Code was trying it against my Metra timetable app that I’ve been working on.  The idea came from a chat with ChatGPT, but Claude Code is where it really took off – it debugged tricky problems with the JSON data structure under the hood, ultimately leading to me being able to build a really useful tool that Metra riders today are using.  Let me know if you are a Metra rider and find it useful – or not!

The results got me engaged: high quality changes, bite-size diffs, and it asks me good questions when my prompts are not clear.  Other tools lost track of how the application was designed, or didn’t check to see if the results of their work was even correct – they just did something.  Claude Code has been high quality at the first use.  The interface also encourages you to make simple one-line changes with a prompt because you’re not in your IDE, so you learn quickly how to use it to make precise changes.  It wasn’t until I left my full-time job in August that I had enough brain space to really see what I can accomplish.

Basic intro to Claude Code

Claude Code’s native interface is – controversially – my favorite interface: the terminal!  It’s not everyone’s cup of tea, but I think there’s some brilliance in constraining the UI to a simple text interface.  Installation isn’t rocket science, and if you don’t have the right version of node (like most of my machines) the linked nvm install is what I use.

cd into a code repository – or even an empty directory – and run claude.

If you don’t want to commit $20/month to Anthropic, put $5 in and use API auth (which was my first path.)  I now am on the Pro $20/month plan as I use it daily, both for work and for side projects.

The most basic feature of Claude Code is it will read code and write (for its own) a markdown file explaining how it sees the code base working.  For a developer unfamiliar with a new code base, this can be a useful tool.

Here’s a little demo of it looking at one of my old code bases from a high altitude balloon tracking computer. It does an inventory of the code and writes CLAUDE.md, and I also asked it a couple of questions to give you an idea how not only can it play with code, but with CLI tools.  Plus – it’s fantastic at git!

You can even see that it tried to use pylint to find problems but I don’t happen to have pylint installed, so it found another way to give me some idea of code quality.

Getting Stuff Done

As you might expect, doing stuff isn’t hard, but as you give it more complex asks, it breaks them down into smaller tasks and it works through them.  This works great – you get to keep track of what it’s doing; it gives you better understanding to know when to hit the Esc key and tell it to pivot from doing something wrong, and it makes reviewing changes sensible.  Here’s a little demo of approximately how I used Claude Code to build a little utility I called heic2web:

Real World Example

This time I found a way to let Claude Code iterate autonomously, which was a real a-ha moment for me.

The real trick is to ask it to test it’s own work.  I have some hobby code which reads utility meter data from my home energy provider ComEd.  They had added MFA support, and the client library I use to read data was trying to get support working for entering MFA tokens to regain unattended access to the API.  I got that part working, but then I found my session would only ever last a day; I would have to manually enter an MFA token every day.  Can I write some Python that reads the MFA token from my email?

My email is currently hosted on hey.com, a unique email service by 37Signals.  They have no API!  But wait – the opower library interacts with ComEd webpages using aiohttp so surely Claude Code can write something that reads my inbox?

Overview of my prompts:

  • Prompt: I have this script, ./integrate.py which reads data from my energy provider. Every time I run it it’s going to prompt you for an MFA token which gets sent to my email. My email provider, hey.com, has no API. I just put the credentials for hey.com in secrets.py. Can you write a simple test program that uses aiohttp to log into my account on hey.com and tries to list the contents of the inbox (which Hey calls the “imbox”) ?
    • >> Claude goes off and figures out how to do that for a while, with a few false starts
    • At some point in here, I manually logged into my email and copy/pasted the top email subject lines and told Claude Code what it’s top results should be, so it knows what success looks like.  It figured it out after only a few tries!
  • Prompt: OK now that you can read the inbox contents, run the integrate.py script repeatedly and try to find the matching email in the inbox.
    • >> During this time, Claude ran into several ad-hoc problems which it overcame – having multiple MFA tokens sitting in the inbox and authenticating with the wrong one, not waiting long enough for the new email to arrive, finding the MFA token email in different positions in the inbox list, and the integrate script itself crashing for other unrelated reasons. I had to usher it in the right direction a bit – but was mostly hands off as it wrote three different test scripts to refine how it was reading the hey.com pages
    • I later discovered that each login to hey.com was generating “you’ve logged in from a new device” emails into my inbox every time.  So I told Claude Code to look for it, and starting saving cookies locally until the emails stopped coming in.  It took a couple of iterations but it worked too!

It’s creation, hey_email_client.py is rather lengthy, but it works, and runs every day.  The whole exercise took me less than an hour.

This isn’t an original idea, giving an agent like this the space to run and iteratively solve a problem.  Now I understand what Simon Willison’s write-up about in designing agentic loops – the idea is to have the agent building the desired code and also have tools/code which checks that the desired code/system works.  Similarly to my experience, you can get great results out of Claude Code when you pair it with a MCP server that drives Chrome Headless to view a website you’re building…which is a story for another day!

Meet your new sysadmin, Claude Code

Since Claude Code is a CLI expert by nature, it doesn’t have to write code!  I throw sysadmin-type challenges at it all the time, but this one was particularly noteworthy that I thought to share it.  I don’t know what replaced Pulseaudio in Ubuntu 24, but I know I’m not going to learn it, nor the particulars of my graphics driver.  But can Claude Code figure out why I can’t channel audio over HDMI when I expect this should be possible?  Let’s find out!

Claude Code figured out how to modify sound card configuration by inspecting my system and executed real commands to work around the issue.

I’ve successfully asked Claude Code to do a variety of tasks like this: fixing a broken apt dependency, troubleshooting usbfluxd with XCode on an OSX machine, and finding ways to convert those pesky HEIC images.

What I’ve learned

  • AI coding tools are real and effective – Claude Code is impressive.
  • I am taking on technical challenges I otherwise would not spend the time/energy on.
  • It’s good for a versatile set of challenges – teaching an engineer what code does, finding bugs, a mix of writing code and running system commands.
  • It’s so good at git.  I cannot emphasize this enough.  No one on earth is as good at git!
  • Removing the copy/paste back and forth between chat bot and runtime makes these tools way more fun to experiment with – you then realize how cheaply you can try an idea before really trying to make it bullet-proof.

I’ve had the best experience with Claude Code but only because I’ve spent more energy on it than others and don’t want to spend money trying them all at once.

Finally

It’s still rather early days for these tools despite the leaps and bounds of growth and releases in 2025.  The game is changing for software engineers.  The GUI IDE battle rages on with Windsurf, Github, Cursor and more vying for users; OpenAI, Google, Qwen, and more are releasing CLI coding agents to compete with each other.  But – many people are not using them at all!

These tools give engineers leverage.  The more senior you are – and able to understand what they do and command them – the more leverage you’ll find.

Got questions?  Reach out – I love talking about this stuff.

Until next time – may your models be grounded, and your prompts be precise!

📧 Chasing AI: Get notified of new posts

Enter your email to be notified when I publish something new:


I’ll only email you about new blog posts. No spam.

Posted in Uncategorized | Tagged | Comments Off on Chasing AI: breaking into AI coding with Claude Code

Chasing AI: running ollama on my old AMD RX470 GPU

AI technology still seems rather new, yet much of the groundwork we’re working with today has been around for many years – and has many contributors who have built on top of each other.  We read articles about the immense cost of training new models; we read the news about billions being invested in AI infrastructure; releases seem to come out even more often than Prime Day; we live in fear: can we keep up with AI?  Hence this series of posts – Chasing AI – to try and bring this back down to earth.

I was hesitant to start using ChatGPT when it came out, but a couple of years in I’m to the point where I use it reflexively, even more often than I run a DDG/Google search. Yes, I’m one of those people who uses DuckDuckGo. If you’re weird about privacy like I am, AI was not invented to siphon off your data.  One of the reasons to explore running LLMs locally is to have a safe place to try LLMs without fear that someone else is making a buck off my data.

So what’s actually happening on the server-side of all those magical LLM API calls? I think OpenAI got it annoyingly right when they used annoying bits of haptic feedback – vibration on the phone app – to emphasize the feeling of cost for every word generated; these models are not just large ($millions) to create, but the actual hardware requirements to answer your questions from them are too. Not insanely large like “big data” which is typically petabytes, but > 100G, which has to be loaded into expensive GPU VRAM to be able to run and give you an answer in a reasonable amount of time.  This means that the datacenter computers answering your question need huge racks full of machines running large ~100G GPUs which is why Nvidia is doing so well.  Or do they use clusters of smaller GPUs?  Someone tell me, now I’m curious.  But let’s get down to earth.

What is all this llama business anyway?

  • llama is a series of large language models produced and released by Meta
  • llama.cpp is an open source application which runs inference (queries) on a LLM on disk, originally built to run Meta’s llama models.
  • ollama is a nice wrapper around llama.cpp which simplifies the process of loading a variety of different models

I decided to jump into running ollama on some machines here at home to see what I can do – and learn.

Trying ollama on a CPU

I didn’t really understand how any of this worked until this summer when I decided to try running ollama on a headless x86-64 machine that I use to self host apps like Home Assistant which has an old, mediocre, 15-year old CPU and no GPU available.  I was able to run tinyllama, which fits in about 1G of RAM, and generated a few words of text per second.  It was rather under-whelming – and incredibly taxing on a machine that was busy doing other stuff.  But…it worked, so that’s something, right?

Wait, don’t I have a GPU in my basement?

Quite a few years back, before GPUs became popular for machine learning, they were popular for something else: mining crypto-currencies!  During the GPU shortage caused by this craze, I snatched up a pair of old AMD RX470 4GB GPUs and mined…well…just enough to pay for the hardware and the electricity.  It’s been sitting dusty in my basement for >5 years.

These GPUs are the better part of 10 years old and not officially supported by the ollama project, however a few side projects exist to make it work.  I ran with this one – it worked! https://github.com/robertrosenbusch/gfx803_rocm/

I was so beside myself that I recorded how it compares to CPU-based model performance in another screen cast:

Much like the CPU-based demo above, it’s nothing to compare it against what you get out of modern, cloud-based models – but it’s interesting, educational, and might be useful.  The difference between the CPU mode and GPU mode is huge – and this is on rather antiquated hardware.

PS: Naturally, this old machine burns 35W so I power it off when I’m not using it, to save my precious solar energy for important things like making breakfast for my kids :)

Highlights – what I’ve learned

The most obvious thing – I knew that LLMs ran largely on GPUs, but I didn’t appreciate the need for huge amounts of VRAM to load the model.

Through all my reading I’ve found that apparently Apple made a stroke of brilliance (or was it luck?) to share CPU and GPU memory on Apple silicon devices.  This means that a moderately spec’d MacBook can run some rather hefty LLMs entirely on GPU!  I haven’t owned a Mac for a few years now – but I see a purchase coming, once I find a use case more useful than drawing large birds on a bicycle.

There are many, many models – more than just the big name providers. New models are developed regularly, too. What I didn’t expect is that many models are published on exchange sites so that you can download and try them – most notably, HuggingFace.co (great name). The leading models from Anthropic and OpenAI are not openly published, but many others are.

OpenRouter is cool. It’s an abstraction in front of all the major LLM API providers; it also has tags for who is free to use which is useful, and privacy controls to even make sure you don’t unwittingly use models which have permission to learn from your inputs and outputs.  It’s great when paired with…

llm which is a handy CLI utility (written by the ever-astute Simon Willison) for running LLMs at the CLI.  Sometimes I just want a quick answer, and a terminal is cheaper than a browser tab!

What’s next?

I’ve been hacking  endlessly with Claude Code…I’m curious to see if I can get Ollama Code working…we’ll see!

Until next time – may your models be grounded, and your prompts be precise!

📧 Chasing AI: Get notified of new posts

Enter your email to be notified when I publish something new:


I’ll only email you about new blog posts. No spam.

Posted in Uncategorized | Tagged | Comments Off on Chasing AI: running ollama on my old AMD RX470 GPU

HAB flight 6 – SSH:C strikes again

As with the last launch I wrote about, this is another collaboration with South Side Hackerspace: Chicago (SSH:C) studying the effects of solar maximum as part of the NEBP.  Yes, they know the eclipse was last year ;)

The flight took place on Sunday April 27th from about 12:00 to 2PM local time.
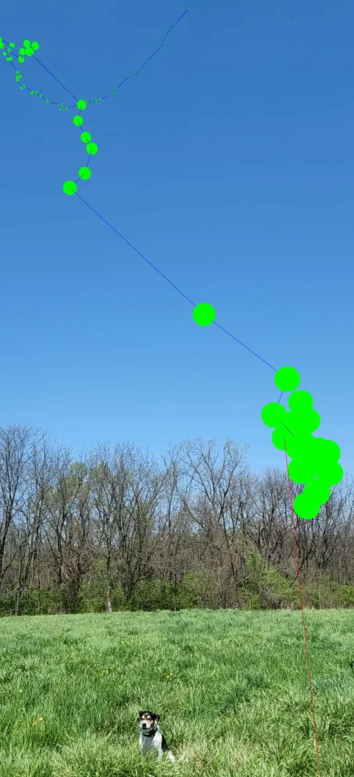
Launch track

Absolutely beautiful – both in weather, path, and driving distance.  Couldn’t have asked for better.


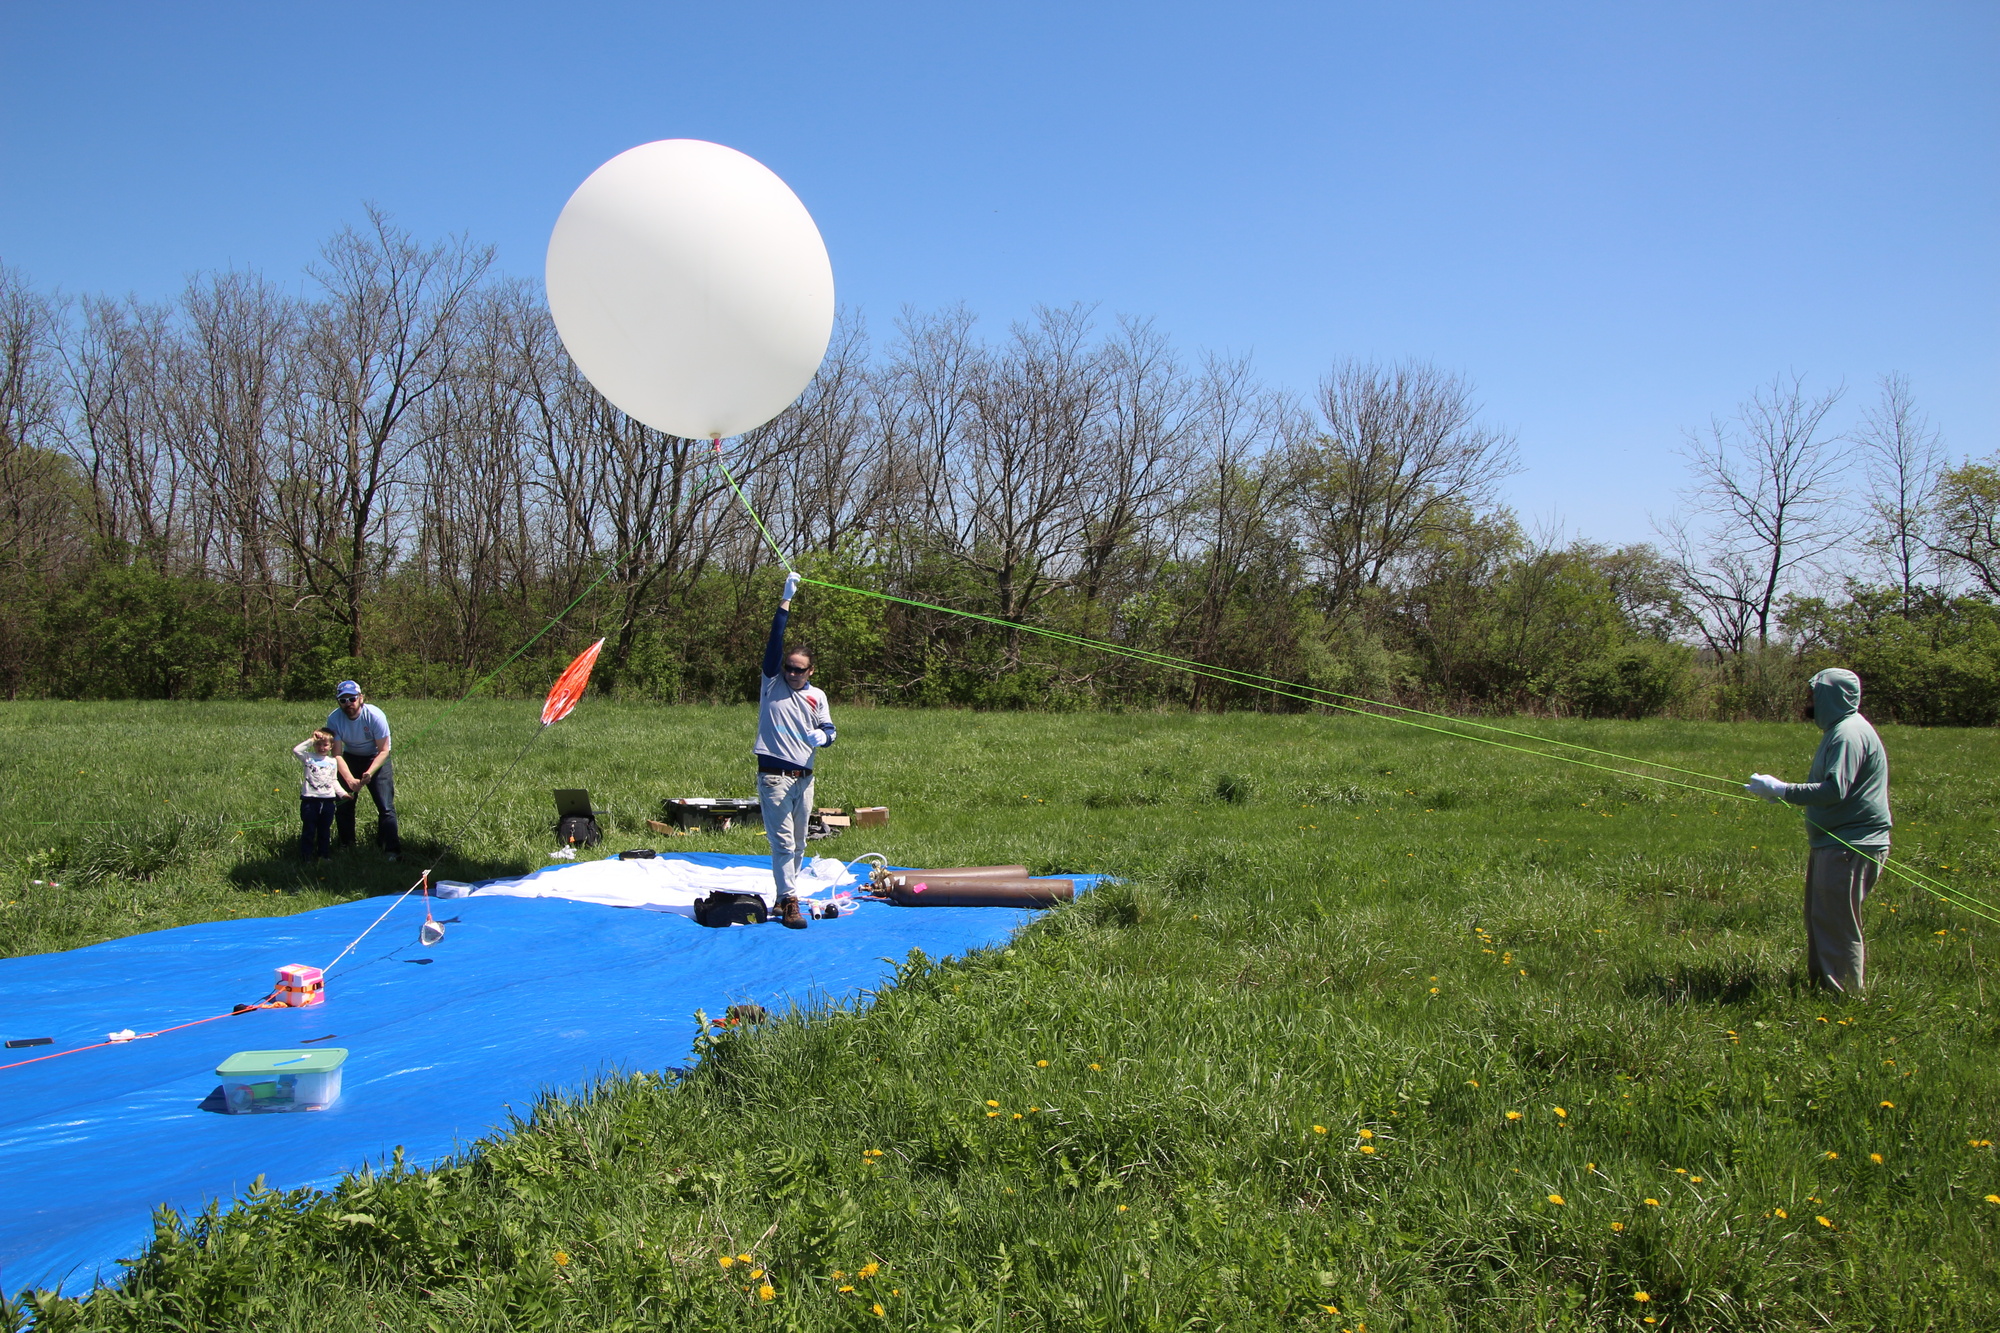
Launch site: Forsythe Woods Forest Preserve, Wilmington, IL about an hour outside the city and suburbs.

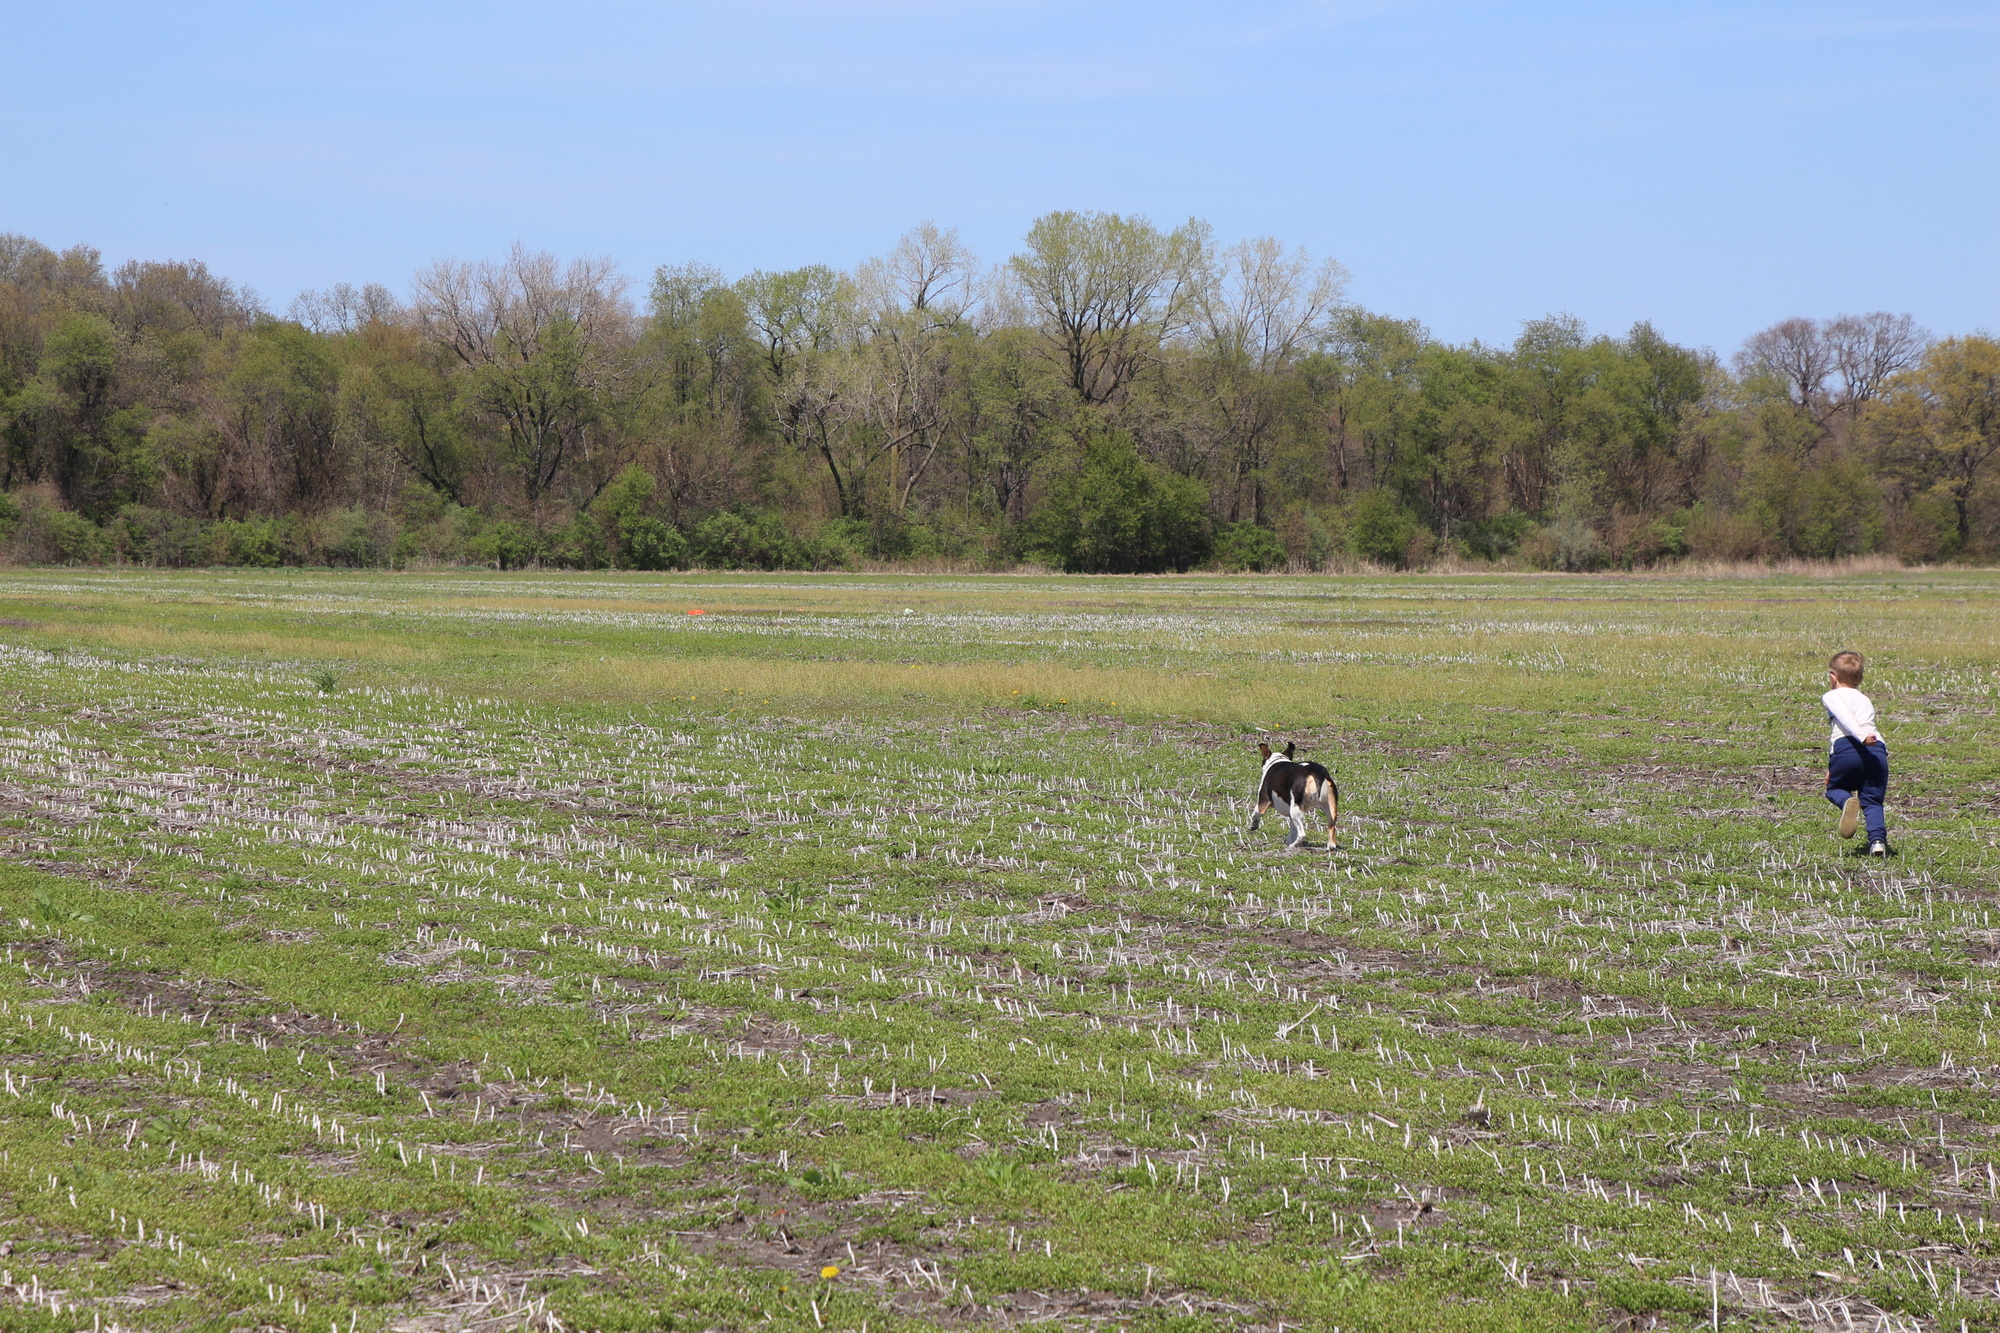
Flight path took us near Lake Village, IN – about a 90 minute drive from our launch site.  Since our flight plan was 2.5 hours, we were able to pack up the launch site, track, and made it to the landing site 10 minutes before landing.

Unfortunately the spot we picked to watch the payload descend put it right below the sun – so we never saw it land.  However we were close enough that the Horus 4FSK DFM17 payload telemetry stream to my receiver never lost signal – even though we were 1.2km away!

This time we hit our neck lift pretty close with an ascent rate of about 5.5m/s – despite challenging ground winds.  Maximum altitude recorded was 30,102m.  We also got our payload train better organized than last time, so this time no tangled line on the way down.

Payloads on-board

  • KD9ZZF-1 the venerable dropsonde, on it’s fourth flight, undisputed best telemetry yet again.
  • KD9ZZF-11 StratoTrack APRS
  • Insta360 camera – the battery pack worked and has produced an amazing full-length flight video.  Viewing on a phone is fun as you can “look around”.
    • Liftoff at 5 minutes in (you can enjoy our tangled safety line that didn’t release for about a minute!)
    • Burst is at 1h27m so watch from a minute before that. Unfortunately it looks like the camera shoots video in 30 minute segments, and the actual burst moment was while the camera was starting a new segment.
    • Landing at 1h59m
  • Experimental Meshtastic payload, which I’ll talk more about below!

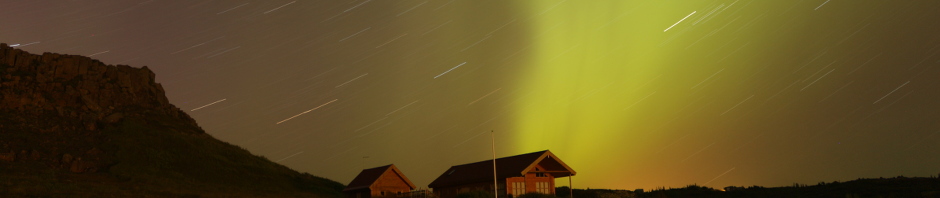
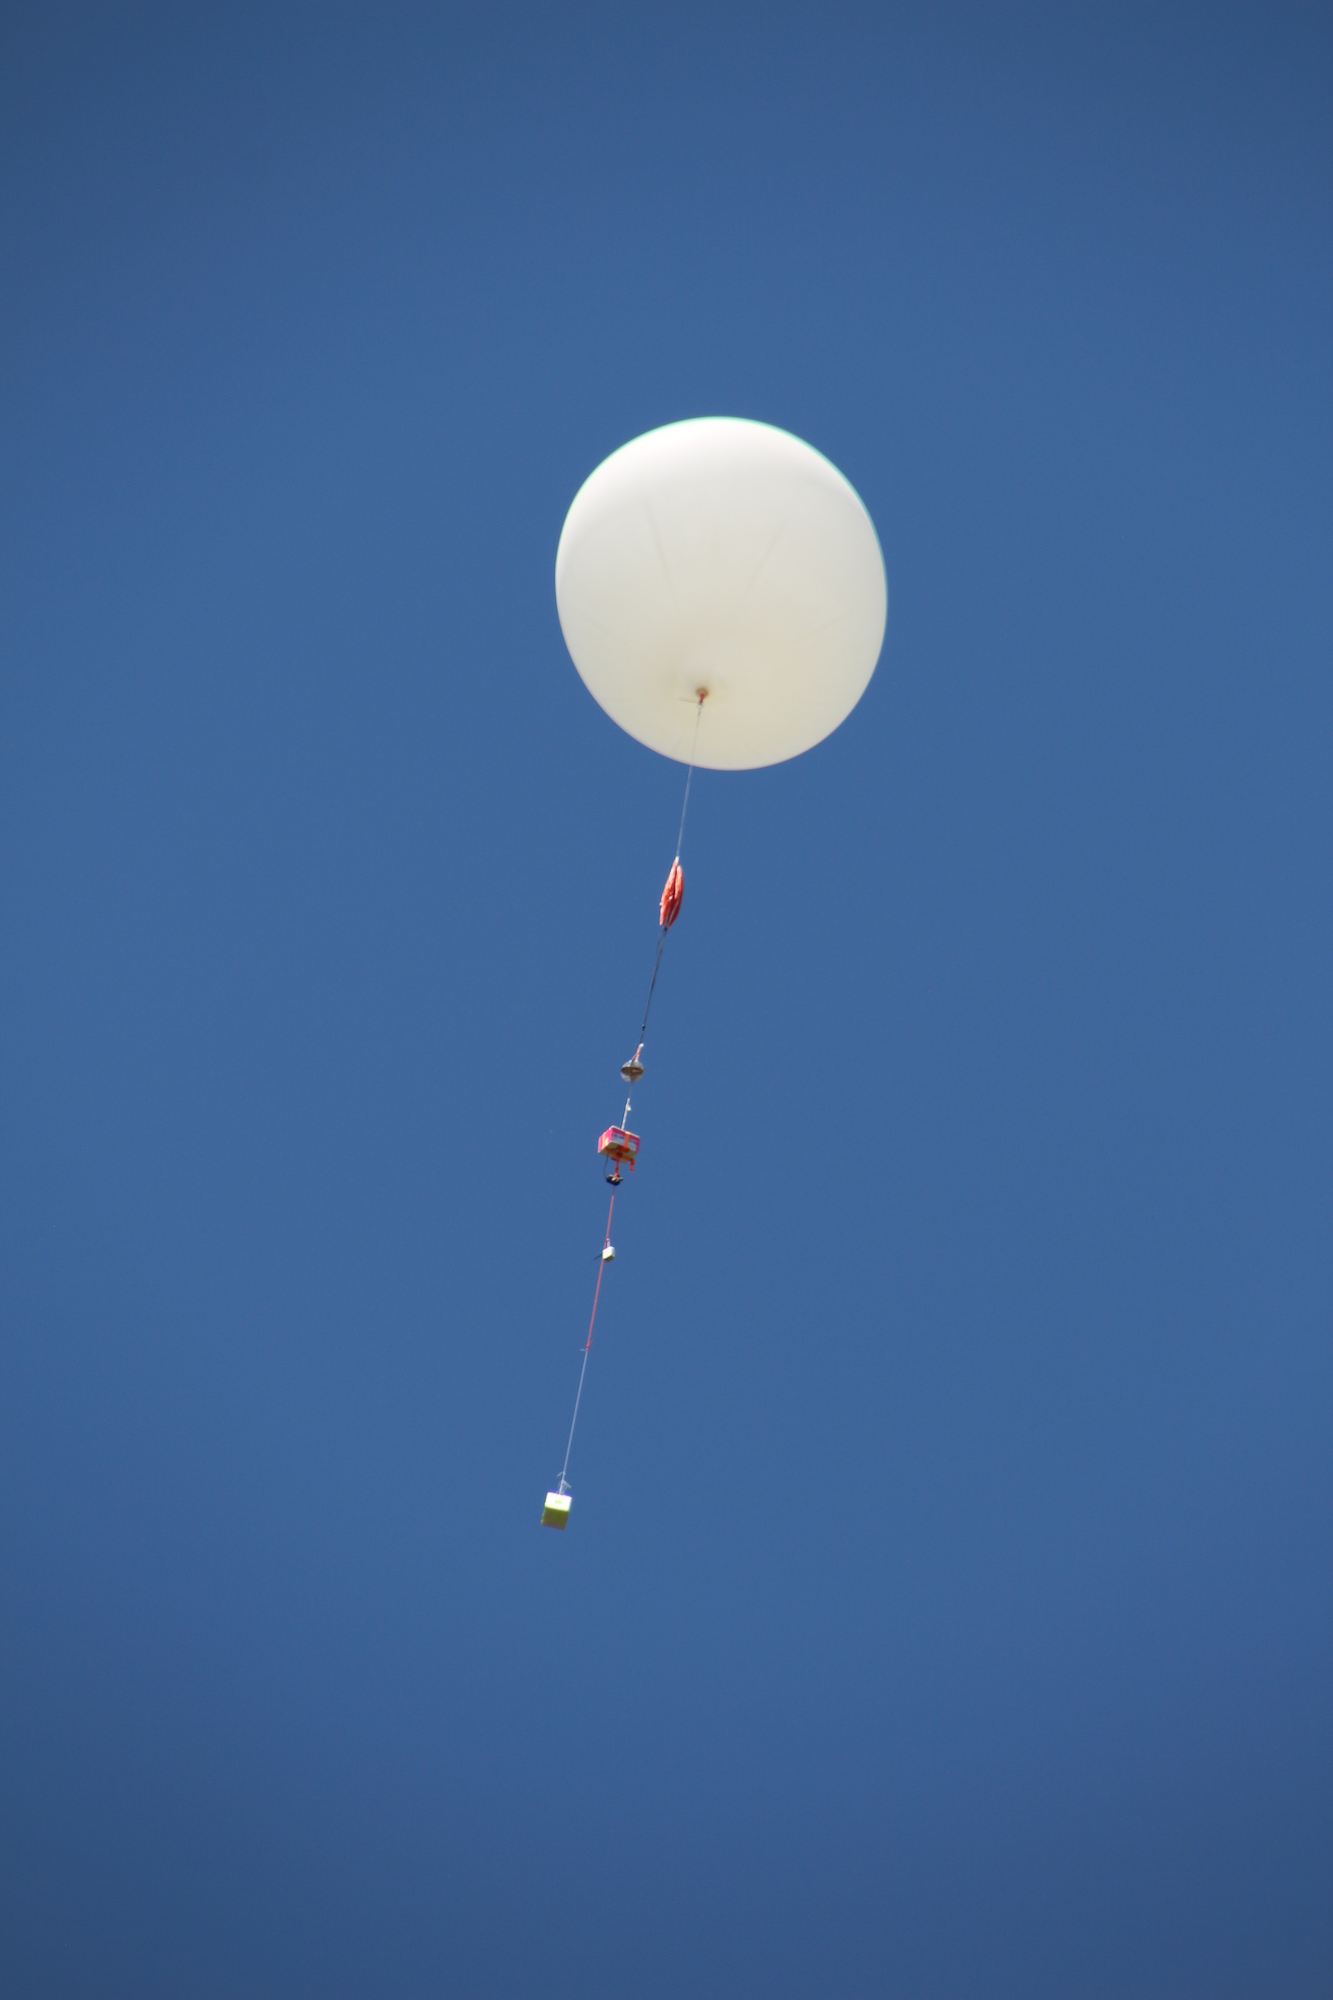
Amazing photo from the camera at burst:


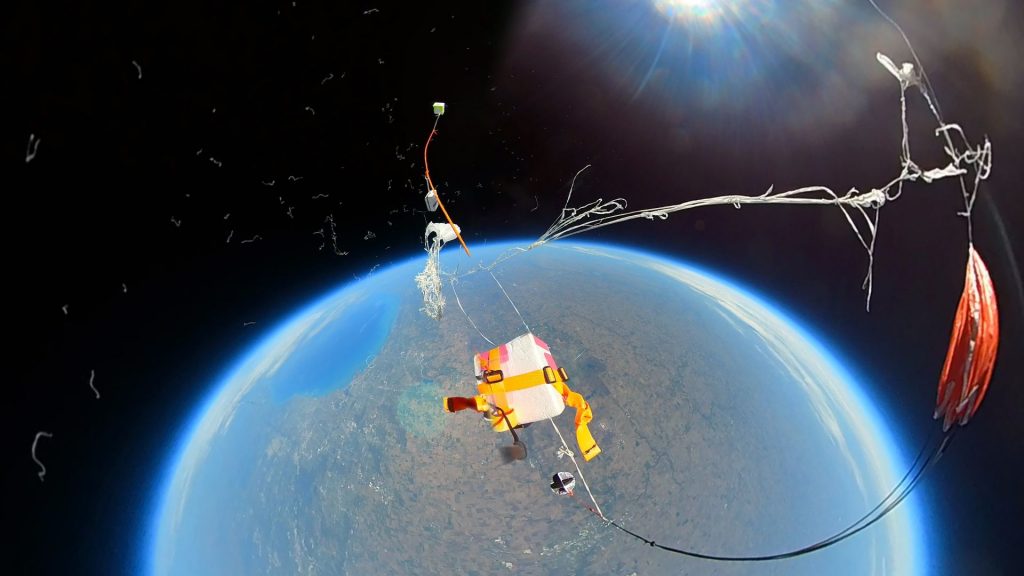
Note that this is a 360 degree camera which can render the most amazing fish eye effect ever making it look like we’re up above the earth much higher than we are :)

Other Fun Tech

One of the SSH:C members, Andrew, has been working on an app to visualize sonde telemetry in an augmented-reality viewer.  It’s web-based and in my experience only works on Android + Chrome as iOS doesn’t seem to support WebXR (yet?).  Check out the code if you’re interested: https://github.com/ajs5710/locatesonde

He used it to view telemetry of our payload after launch:

Meshtastic takes flight again

I’m not the only person putting Meshtastic payloads on balloon flights, but I’m trying to learn:

  • Is this detrimental to the mesh? Will a high altitude node seeing hundreds of receivers simply hit max duty cycle and cease to be of any use?  We need good logs of the chUtil and airUtilTx metrics.
  • Can a Meshtastic node work like a crowd-sourced payload tracker much like APRS is often used for?

Concept

The node was configured, as with other flights, in standard CLIENT mode to allow Meshtastic users to discover and message each other via the balloon node and potentially span hundreds of miles.  On top of this I wanted to capture tons of telemetry, in three ways:

  1. On-board, logging boat loads of node information to a log file on disk for later analysis.
  2. Via MQTT, aggregating standard position broadcast packets on the default channel and using a centralized gateway to send data to Sondehub Amateur, relying on passive listeners.
  3. Broadcasting bespoke telemetry packets on a separate channel key, so as to not spam everyone’s radios, and using a receiver-connected uploader script to upload this telemetry to Sondehub Amateur under a different payload ID.

As a bonus to make it more fun, the on-board code was configured to:

  • Respond to any direct message on the public channel with a position and signal report.  An automated QSO bot! Thank you to Bob KE9YQ for the idea!
  • Broadcast a message to the public channel every 5km altitude to say “hey I’m a balloon!”
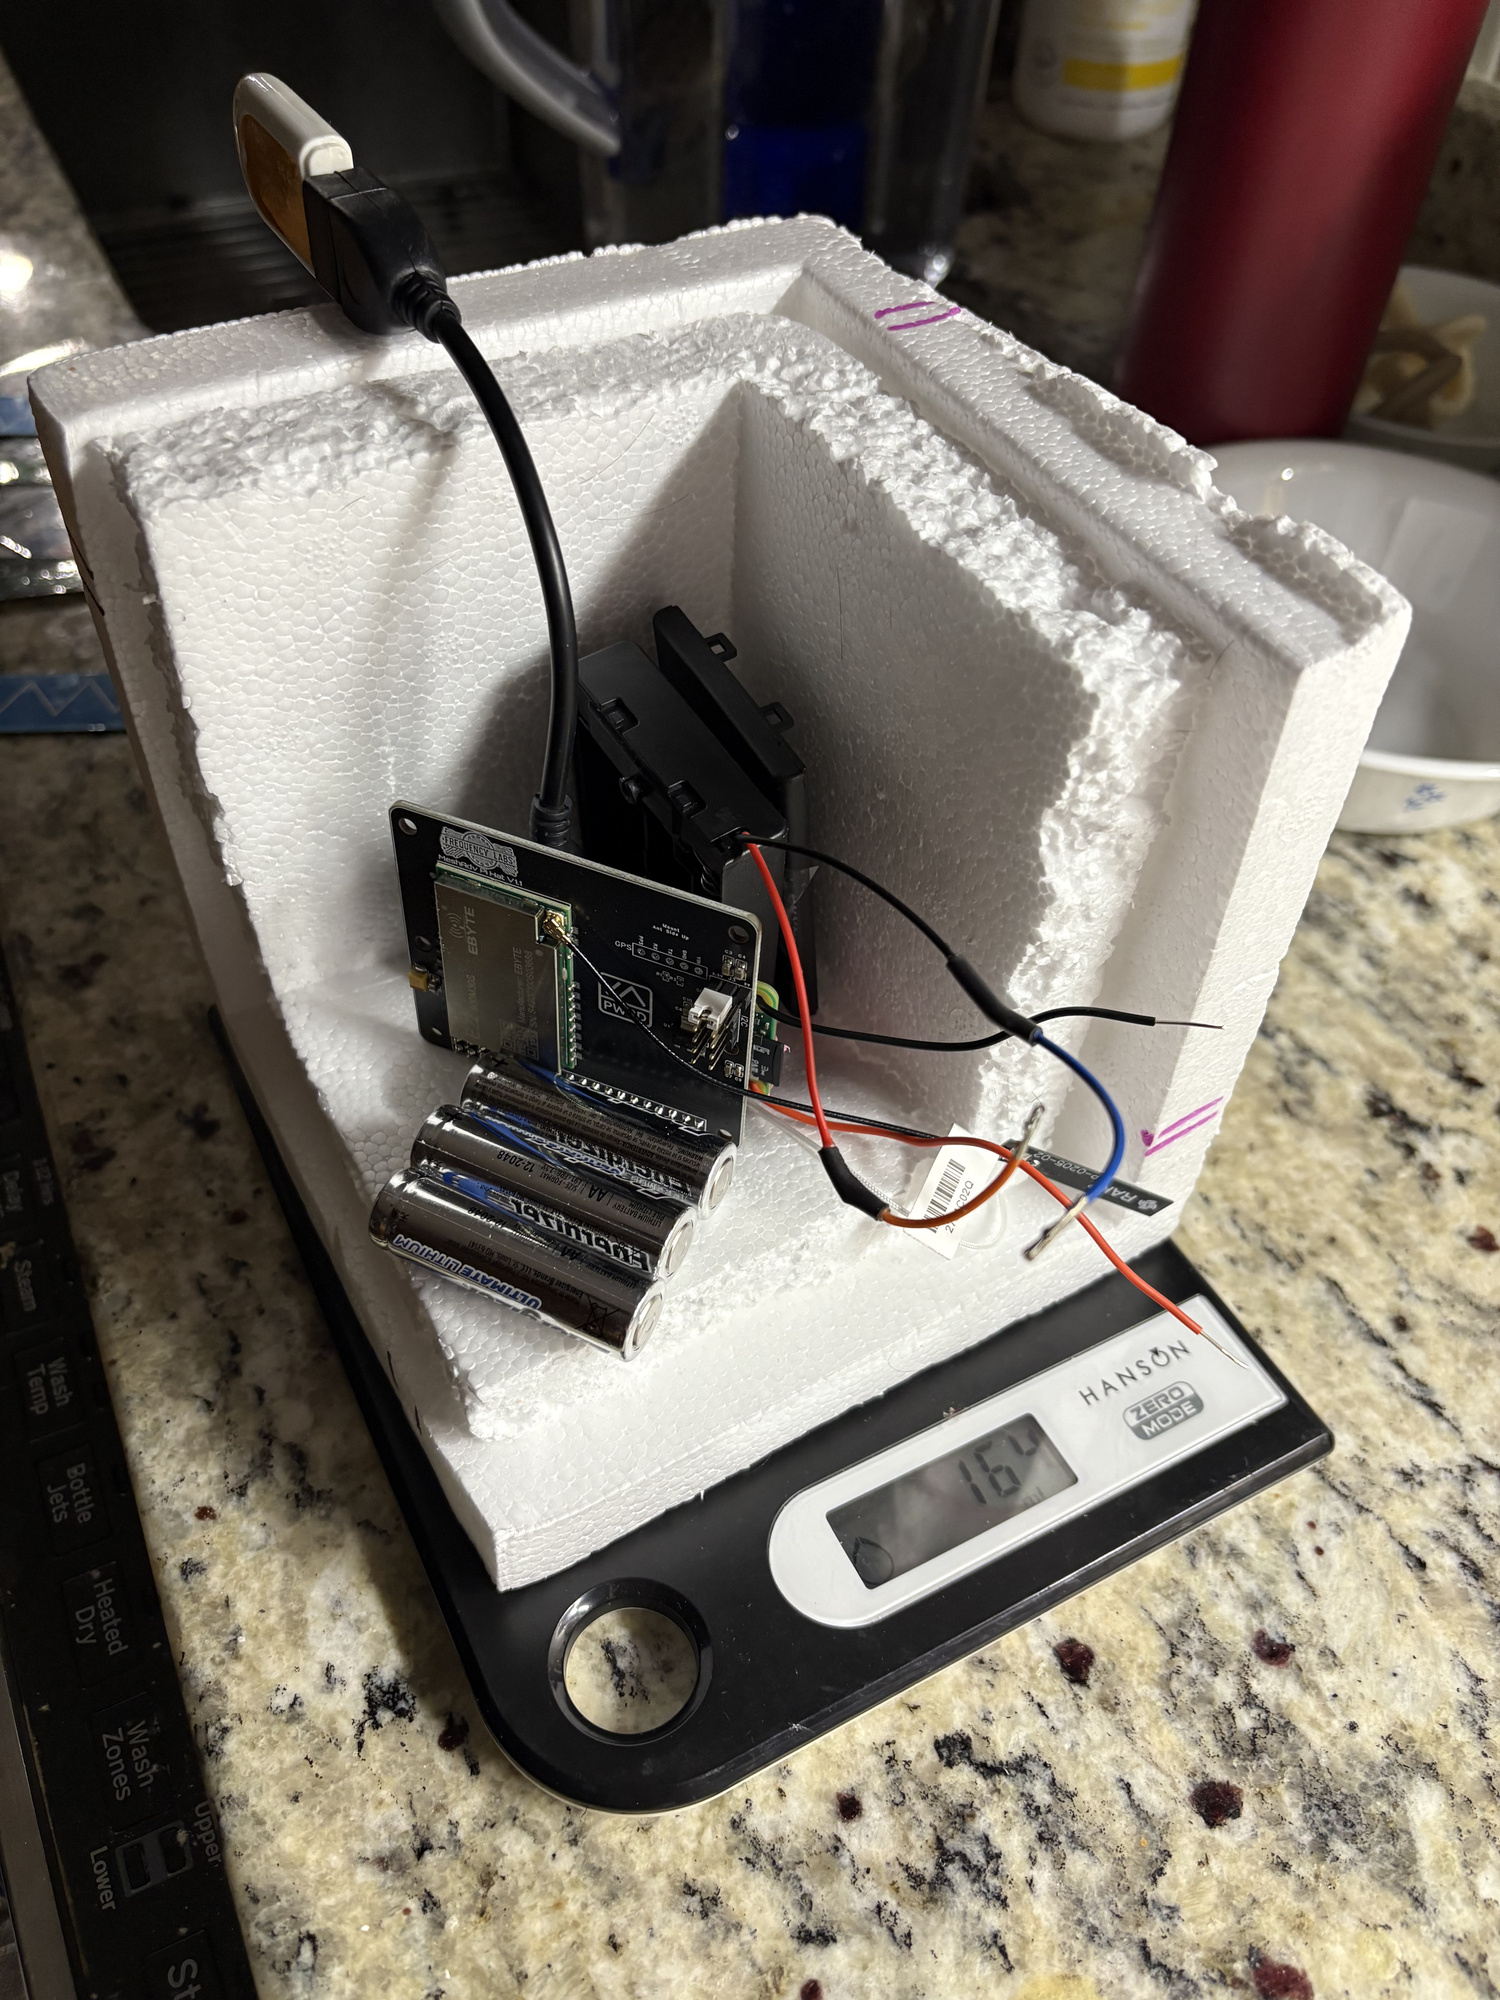
The Build

This time I used a Frequency Labs hat attached to a Raspberry Pi.  The Pi runs portduino to run the Meshtastic firmware.  This is amazing – because now to run custom code outside of Meshtastic to get it to do custom things, it’s still “on board” – you’re talking to Meshtastic over TCP on localhost.  It’s the fastest connection I’ve ever seen to a Meshtastic node, presumably because the bandwidth is high and the CPU running the firmware is relatively speaking huge.

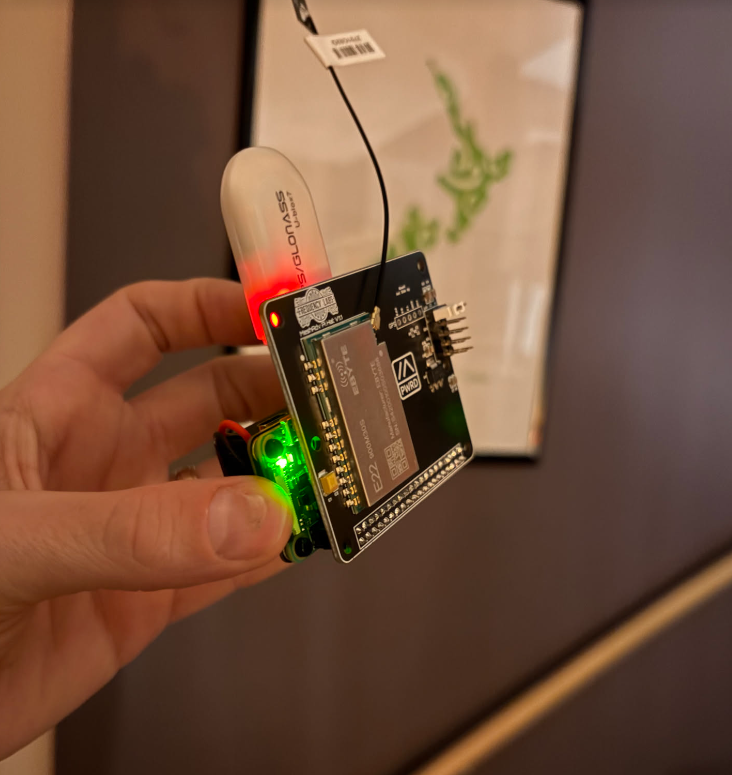
Yes, the GPS receiver needs to be on a short extension away from the Meshtastic board else it will never get a fix.

Code: balloon-bot

This is the bot which runs on the Pi which:

  • Sends downlink telemetry periodically to the BalloonData channel
  • Answers DMs
  • Logs data locally
  • Sends broadcast messages

It’s pretty straightforward. You can modify it to work with a Meshtastic radio over serial or BLE too.  Within is also code to put the GPS receiver into flight mode, using a systemd oneshot service that runs before meshtasticd starts.

Code: meshtastic-hab-uploader

This runs on a ground station node, receiving downlink telemetry packets on the BalloonData channel and uploads them to Sondehub.  Pretty simple!

Code: sondehub-meshtastic-mqtt-gateway

I probably spent more time on this code than any other part of the flight prep.  This was fun to write – Meshtastic has multiple different packet types (position, node information, text message, device telemetry, and more).  Packets are by default encrypted, although the default channel has a publicly known and simple key.  Packets are also encoded in protobufs.  To get a payload position on the map, you need to cache the node information which has it’s name.  I took inspiration and a lot of copy/paste from tcivie/meshtastic-metrics-exporter (thank you!)

It’s no where near ready for use as an always-on service like the Sondehub APRS-IS gateway; at the moment it’s just a hardcoded user ID for my node, but could easily be extended to automatically classify any node in MQTT with a balloon emoji in the name as a balloon on the Sondehub Amatuer map.  But…we’ll probably get a handful of inadvertent nodes on the map.

💡 if we wanted to make Meshtastic on balloons a first-class citizen, it would be a good idea to register a port number or two for specific telemetry types that we want to use on balloon payloads.  This would let us pack arbitrary telemetry encoded in efficient protobufs, and client nodes would be able to clearly identify these by the port number.  But – that’s a potential job for another day – this might all be a waste of effort!

Challenges inherent to Meshtastic

Position ambiguity: Meshtastic has a specific positioning packet type, but when packets are fed to the central MQTT server for centralized sharing and mapping, positions with more than 16 bits precision are filtered out.  This is rather new for Meshtastic (late 2024 ish) and causes a lot of confusion. For a HAB flight, position ambiguity is rather detrimental – when a a payload lands, you really want to know where it is.  16-bit precision means that a location packet is accurate to the nearest 1194ft / 363 meters.  363 meters away from a landed payload means you can’t see it.  So you need some method to get high resolution latitude/longitude upon landing, even if this is not a broadcast.

MQTT: Meshtastic nodes by default do not ship telemetry to MQTT, but there is a public server run by the maintainers team which can be turned on with a switch in the application.  A lot of users use this, usually to promote discovery of other nearby node positions not yet connected to. However the Meshtastic MQTT server is busy with tens of thousands of nodes online around the world.  In recent months reliability of the server has gone downhill.  In the days leading up to this launch, the public MQTT server had long periods where it was impossible to connect, and then even if the gateway connected, nodes that I might be sending to were also having trouble connecting.  On launch day…it wasn’t great.  I’ve since set up an UptimeRobot TCP probe for which you can view the stats; there’s been some activity to work on it since then.

Stuff I learned while developing all this:

  • When you ask the Meshtastic node via the Python API where your own node is, it returns you a POSITION_APP structure. This structure is not your most recent unfiltered GPS position! This is the last position packet it sent. So if you’re sending both high precision and low precision packets on different channels, you’ll get back a variety of answer precision’s. In the end, to capture high resolution data, I simply grepped the meshtashticd.service logs for the most recent GPS position debugging coming from the GPS module (which updates every 10 seconds and is unfiltered) and used that in my code.
  • Position ambiguity doesn’t affect altitude – the altitudes I broadcast and captured from MQTT seem to have no loss of accuracy and match up with the unfiltered data which I logged on-board.
  • You can send high resolution position packets, but the public MQTT server will filter them out.  You can also send private app messages, but the public MQTT server filters these out too.

Flight Data

I collected a lot of data…but…not quite enough!  Highlights / challenges:

  • The telemetry downlink on the BalloonData channel worked great to my ground station…until it didn’t.  I only had a couple of remote listeners, and they saw very few packets.
  • Very few listeners were connected to MQTT that day.  Only two nodes relayed packets into MQTT which the uploader caught and sent to SondeHub.  My own nodes did not – presumably because they were busy running the uploader script. 🤔
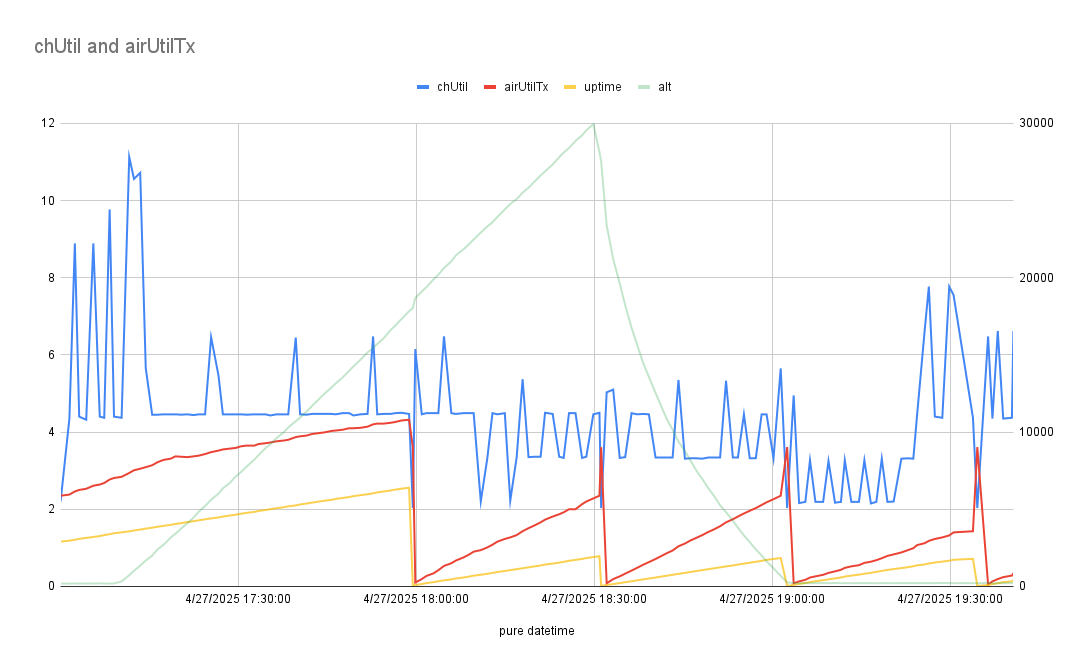
  • The chUtil and airUtilTx metrics logged by the node seem impossible. On the ground sending messages rapidly I found I could get airUtilTx over 10% or 20% easily. The numbers here cannot be real.
  • The payload rebooted a couple of times. I think this was a power supply issue. AA’s rattling around in a spring loaded battery case. How many times will I suffer the same mistake before I adapt.
  • On-boarding logging of node information didn’t work. I don’t know why, I didn’t test the code much before flight.  So I logged some 30,000 node information packets which were all stale :)

Here’s a graph of the three telemetry streams – the 4FSK payload in light blue for reference, the packets received and relayed by the hab-uploader on the BalloonData channel in red, and the MQTT packets in yellow.  It’s interesting how as the MQTT listeners got more data, the BalloonData stops coming through.  Related?  Quite likely.

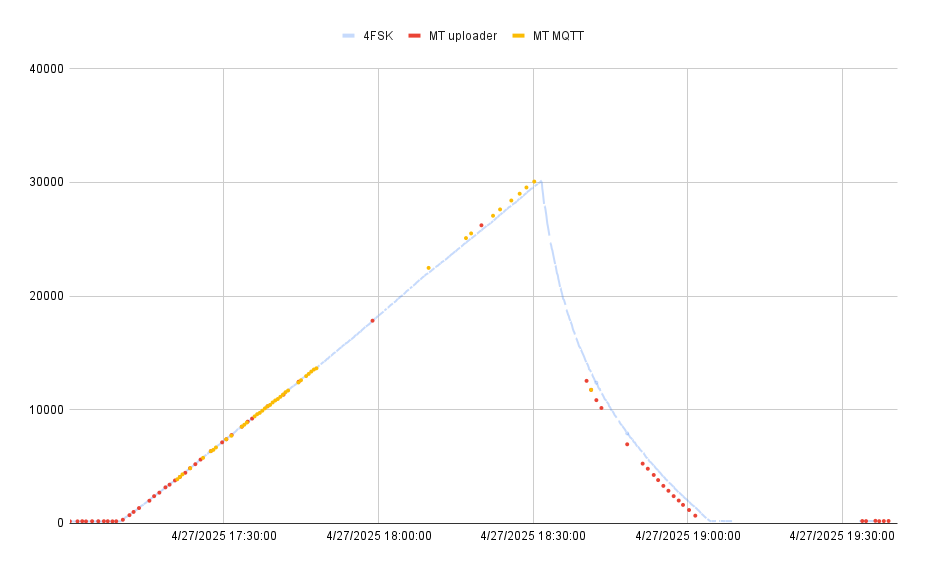
The BalloonData (“MT uploader”) transmits once per minute and ground stations received 51 of the 113 transmitted packets during flight.

The MQTT feed should get position telemetry every 30 seconds…but we got 44 of an optimistic 226 packets.

The air/channel utilization data, overlaid with uptime for fun:

chUtil never goes over 10% during flight?  These numbers are strangely low.

Hypothesis: I think the radio’s receive sensitivity is incredibly low.  In anecdotal ground testing, I found my Rak node (which has a less powerful transmitter) to have better signals with other nodes using my roof-mounted antenna.  Reading through the meshtasticd logs, I observed that when transmitting the radio seemed to never detect any incoming packets and always went ahead and transmitted.  Maybe incoming signals were much too weak for it to detect the possibility of a collision?

Sadly, I never logged anyone DM’ing the bot for their automated QSO report :(  Sorry Bob KE9YQ!

For a future flight:

  • If MQTT is in decent shape, just use that. We can actually extract the BalloonData telemetry from MQTT, so perhaps even run my own MQTT server which feeds into the global/public server. I can then listen to whichever server is more functional, get all the same data, but combine data streams.
  • Log more data. So much more.
  • Solder a battery pack already.
  • Sync the system clock from the GPS; this definitely confused the meshtastic daemon.
  • Fly a second Meshtastic node on the same flight (probably the Rak node) and compare results? Bob KE9YQ’s idea – I like it.
  • Does having a secondary channel defined mean that the radio is changing frequencies regularly, and it’s channel utilization metric may be misleading?

This is the third flight for me with a Meshtastic payload on board.  More to learn!

Posted in Uncategorized | Tagged , , | Comments Off on HAB flight 6 – SSH:C strikes again

HAB flight 5 – collaboration with SSH:C

A group of balloon enthusiasts at South Side Hackerspace: Chicago (SSH:C) are doing a series of launches studying the effects of solar maximum. These launches are a continuation of the Nationwide Eclipse Ballooning Project, a NASA funded program which is operated by Montana State University. The folks at SSH:C have launched balloons for the last few solar eclipses with NEBP and have also joined this project in the first half of 2025. It just so happens that for my fourth flight, Adam Kadzban from SSH:C took me up on the open invite to join the launch and we’ve kept needing about balloon launches since then (despite losing the payload!)

Launch track

This is my first HAB flight where I wasn’t responsible for the flight track! I knew roughly where we would be heading, but the overall payload weight and gas fill volume were someone else’s job. We launched from Willowhaven Park in Kankakee, IL – barely a tree in sight and a good launch location unless you are looking for a wind break to control the balloon while you fill (queue ominous music).

Our original flight track had us landing just north of the Michigan border somewhere between Dowagiac and Three Rivers. The flight path was expected to be long, the highways weren’t perfectly aligned so it would be about a 2.5 hour drive and a flight of about the same time.

It turns out we under-filled the balloon, due to a combination of missing a couple of weight measurements and likely due to the ground wind which was about 10mph. The balloon was moving around with the breeze and presumably we were getting some lift from the breeze. Instead of a typical 5m/s ascent we achieved about 3m/s which lengthened the flight path considerably. At one point the projection had us landing in Flint (I thought it was a joke!).

Burst was just over 30,900m and the landing was just north of Battle Creek, MI. The drive was about 3 hours and the flight was about 3.5 hours long; about an hour longer than expected. But – we made it!

SSH:C payloads

On board were a Stratotrack APRS tracker, a Spot satellite position beacon as a last resort, a DFM sonde running RS41ng with Horus 4FSK which performed brilliantly again, and an Insta360 camera. I got to add to the payload train – a first flight of a Wenet payload, and another Meshtastic node.

The best tracker on board was definitely the DFM with 4FSK. It was received by my home station at just over 1000m altitude from >50 miles away, and between my home station, my brothers station in Kalamazoo which we flew over, and my laptop, we had continuous high resolution telemetry throughout to just before landing.

The Stratotrack is cool as it’s APRS and there’s a variety of ground stations picking it up along the track.  But the refresh rate naturally has to be rather low.

Tracking data:

The Insta360 camera footage is a blast to watch; unfortunately we only got ~1h of data as the secondary battery pack failed yet again…

Wenet payload

This is a new tracker, running a Wenet tracker that I threw together using a spare RFM98W from Uputronics that I bought years ago to build a LoRa / PITS SSDV tracker. I’m not happy with the GPS on USB-serial and I spent a few hours trying to get both of the Pi’s distinct UARTs presented mapped alternate GPIO pins, but that didn’t work out – and I didn’t have time to work on an I2C implementation. So I flew this mess, and it worked!

The whole thing, duct tape and batteries included, weighs about 140g.

After recovery. The duct tape really makes it shine.

Post-flight thoughts:

  • Live flight photos really are exciting. It’s less exciting the next day, but in the moment, it makes the flight day way more fun.
  • Wenet itself worked great. I lost signal from my tracking station at 8km altitude / 56km across land – before we’d even left the launch site.  Should’ve left earlier, but I likely would not have kept up with it anyway – the payload horizontal speed hit 138mph – and we were not able to drive exactly along the path of the balloon.
  • I could have used home stations to track this payload; worth a try next time depending on the launch track.
  • The tracker stayed online and capturing photos the entire flight – which are beautiful.
  • I could put ground plane radials on the wenet payload and maybe get a bit more transmission efficiency
  • This payload is going to require a decent yagi ground station to maintain good reception throughout flight…could use a good community to work with me on receiving :)
  • It would be interesting – since this pinout can run either Wenet or LoRa/PITS – to script the payload to run both! Alternating each protocol each minute, and see which one wins?
  • I think the battery pack bumped on landing and caused a reboot. Classic, despite this battery pack having a screwed-on lid.

Data links:

The payoff: Lake Michigan from 30km up

Meshtastic Payload “redd”

This is something I’ve wanted to try again after September’s beautiful mess of a payload, but I haven’t had the energy to even start.  That payload is full of beautiful data on a Raspberry Pi SD Card, up in a tree still…

A month or two ago, a local ham got me back interested in Meshtastic, so I bought this incredibly energy efficient little RAK Wisblock mini starter kit and a GPS chip (RAK12500).  I’ve been tinkering with it as I drive around but did zero prep to launch it, other than that I stuffed it into a DFM17 sonde case!  It came out to about 70 grams give or take a few bits of duct tape.

The results were both fantastic (in terms of feedback from people on the ground) and disappointing.  Meshtastic nodes do very little recording on-board; the phone app keeps historical data but it also is continuously overwritten while the node is online (say, when you’re driving home.)  Now 6 days after the launch, the nodes I made contact with have all rotated out of my node database because the mesh ’round here is so busy.

Here’s a little map of some of the notable position reports I was able to salvage from the Meshtastic app (note that anyone in the Chicago area I excluded because I received tons of data from y’all’s nodes on my drive home and I can’t say for sure if the data came from the flight or from simply driving by)

You can poke at the data here if you’re curious.  It’s not much!  The one good thing I’ve found in the data is enough data points which tell me that the payload survived the frigid cold and ran continuously throughout the flight.  I don’t think it died at any point; the LiPo battery it was running on was sufficient.

There’s a lot of data you can’t get out of the app, so here are some screenshots.  I had another node, “BLUE” on the ground in my car during the flight and it kept seeing the node “redd” throughout the flight (ok, I was driving, so I was not looking at it continuously).  The downlinked Device Metrics log is odd – almost entirely blank during the flight which was from 12:00 CDT to 15:00 CDT:

The Signal Metrics Log is also interesting:

Basically we launched at ~12:00, lost metrics at 12:13, and re-gained them at 2:54.  I did stop during the drive to move my Meshtastic antenna onto a roof mag mount – perhaps I did this at 2:54?  And maybe this is 2:54 Eastern time, not Central time? Signal log that I typed up from the screenshots (no, you can’t export it)

Time Signal Quality  Events
16:15:26 Good
16:08:56 Good <– recovery
15:13:19 Bad
15:12:51 Fair
15:12:25 Fair
15:12:06 Bad
15:11:54 Bad
15:11:04 Bad
14:54:49 Bad
<– +1 time change
12:13:30 Good
12:13:14 Good
12:12:49 Good <— launch

It’s hard to piece much data together…

Thinking forward…

What I’d like to see with Meshtastic on a balloon is if we can somehow – safely without killing everyone’s local mesh – push exact position telemetry out that gets fed into MQTT.  From there it would be rather straightforward to feed it into Sondehub.

It’d also be great to fly this with some data logging onboard like I flew on the last flight.

Stuff to do for a future Meshtastic payload:

  • Data log all kinds of telemetry from the device itself, the current nodes connected, and their coordinates.
  • Proactively exchange positions with other nodes on the mesh as they are discovered so I get their coords?
  • Find a way to send my position coordinates in a way that gets fed into MQTT but is not intentionally imprecise like Meshtastic now expects.
  • Hack the GPS chip so that it gets set into some kind of flight mode and works at altitude; I think this is a uBlox chip; it’s a case of actually hacking the Meshtastic firmware.
  • Consider: How can I configure my payload so it’s not jamming up airtime utilization too much?  Reduce max hops, disable store & forward, etc?

Looking forward to feedback from the Meshtastic community on this – you can find me as “trickv” on the chimesh.org #balloon-talk Discord.

See you next time from 30,900m…

Posted in Uncategorized | Comments Off on HAB flight 5 – collaboration with SSH:C

Florida Space Coast visit and launch viewing guide

We visited the Florida Space Coast last in November 2024 and had a fantastic experience.  The dates for the trip were drawn up a couple of months in advance of any firm rocket launch expectations, but with the cadence of Falcon 9 these days we crossed our fingers and hoped to see a launch.

Then we saw five in the span of a week!

Watching a rocket launch is awe inspiring, and I highly recommend it.  My goal today is to enable you too to enjoy a visit to the Space Coast and feel the power of a Falcon 9 rocket launch.  I want to share what I learned through many hours of anxious/excited reading about where & how exactly to view a rocket launch with the hope that you’ll be more informed.

I learned a lot of this information from other sites – notably:

  • Rocket Launch Viewing Guide – Ben Cooper Photography – the best resource I found. It took me a while to absorb it all – his explanations are thorough, and one complex question I wanted to answer to try and make a viewing decision I derived by reading the entire page (where to go view a RTLS launch)
  • Launch Rats – an older guide which is primarily useful in it’s gauge of distances from viewing sites to launch pads.

When viewing a launch, indispensable is the Next Spaceflight app: the countdown clock is particularly useful.  Duh.  But as someone who’s grown accustomed to watching launches on YouTube where your delay from reality doesn’t much matter, a properly timed countdown clock is essential.  They also do a good job of updating launch times as launches are inevitably delayed.  More on launch scheduling later.

One hard thing I’ll try to help with: there are a lot of launch towers!  From any reasonable distance it can be hard to distinguish one launch pad from another.  I found myself comparing views of supporting infrastructure on NSF live streams and eyeballing the compass direction in Google Maps against target launch pads to make sure I am looking at the right pad.  I kid you not – one time I had a 300mm zoom lens trained on the wrong pad at liftoff.  Oops!

We saw five launches of rockets from LC-39A and SLC-40 but I’ll list them by where we watched from, what you can expect, and where to look:

Route 528 – LC-39A + RTLS to LZ1 and SLC-40

We chose to watch two launches from a pull-off spot on Route 528 over the Banana River.  The first launch we saw was on LC-39A with a landing on LZ1, and Route 528 is a good trade off between being able to see a clear view of the launch pad and a view of the returning booster down to LZ1.  It’s 14 miles to LC-39A, 12 miles to SLC-40, but only 8 miles to LZ1.

It is – however – not a single location.  The spot I recommend is here – the second pulloff when you drive westbound on Route 528 over the river.  Don’t be afraid to drive slow despite warnings of crazy Florida drivers – 1/100 cars on the road are also pulling over to find a spot to watch the launch, and there’s actually a lot of space to park. You’ll find yourself in great company – at least a few fellow space nerds will be camped out here.

Beware of the first pulloff here.  You’ll find people here who plan to watch the launch – but – LC-39A is obscured by a small green island. Other pads are visible and you might be inclined to stay.  We spent a half hour here before realizing we couldn’t see what we wanted to see and driving over to the next spot.

Falcon 9 launch from LC-39A with Koreasat 6a on board. Hazy day and you can hardly make out the Starship launch tower.

Falcon 9 landing at LZ1 of Koreasat 6a’s booster B1067. Note that there are no obvious landmarks of the landing zone; there are no towers. You can also check out a little cheesy animation from Google Photos which is fun. If we were at the next pull-off east on Route 528, the booster landing would have been obscured by Port Canaveral buildings.


SLC-40 launch of GSAT-20 payload.

Panoramic view from Route 528 location I described above showing which pad is where. LZ1/2 landing spot is off to the right.

Launches we watched from here:

Titusville – Casa Coquina or Kirk Point park

We wanted to watch this particular LC-39A launch from Playalinda beach but at the national park entrance 90 minutes before launch was a park ranger forbidding access to cars.  Since we were staying in Titusville anyway and the BnB (Casa Coquina) has a second floor viewing platform, we decided to just go back there.  It was a good show, at 12 miles away.  For photographer purists, I’d recommend walking over to the water front – I was dodging power lines around my photos and editing them back out later.

Titusville offers lots of spots to watch along the west side of the Indian River and they’re all pretty comparable.  The Max Brewer Bridge is frequently mentioned – but I opted against it because there is some new building construction blocking a couple of viewing spots, and also because it’s a mile long bridge – which means you’re walking half a mile.  Granted it’s in a concrete-blocked off pedestrian walkway – but it means that as you catch your breath from the walk up the bridge (breathing car exhaust fumes!) you’re also going to be trapped – there’s nowhere to move around while you wait for a launch.  I have two little kids who would’ve gone nuts being here, next to traffic, and the launch was delayed by an hour.  I’m glad I didn’t stop.  Serious photographers won’t mind this, but dads might!

LC-39A just before liftoff, viewed through a 300mm zoom lens. The dark black tower in the middle, same height as the water tower, is the F9 launch tower. The larger tower on the right is the Starship/Super Heavy launch tower which is close by, southeast of the F9 tower.

Falcon 9 just after liftoff. Beautiful glow on the exhaust gases below. I edited out the power lines in view.

Launch we saw from here: Sun Nov 17, 2024 – Falcon 9 LC-39A – Optus-X/TD7

What you can see from Port Canaveral

One of our launches was scheduled for 5:15 AM, the morning after a marathon 14 hour day at Disney when I didn’t go to bed until 1 AM.  I dutifully woke to my alarm at 4:30 to check the countdown clock, and it had been postponed by only 15 minutes to ~5:30 AM. Since it appeared on-time, I carried sleeping kids to the car and drove to Route 528 hoping for a beautiful night sky liftoff…all for SpaceX to punt the launch at T-5 minutes.  Reports I read indicated that this call had been made much sooner, but being a 5 AM launch, NASA Spaceflight and Spaceflight Now were not quite awake to notice that SpaceX hadn’t even fueled the vehicle.  We went back to our hotel near Port Canaveral and slept a few more hours, and watched the launch from SLC-40 with no pad view from the hotel’s 5th floor balcony on the other side of the port.  It still sounds amazing and is awe inspiring even when it’s not a great view!

View from the 5th floor of our hotel just south of the Port Canaveral area. The port loading buildings obscure any pad views, but of course you can see the sky.

Starlink finally launches after waking me up at 4:30 AM. I didn’t bother to get the proper camera out for this and ended up behind a couple of rows of other viewers. Enjoyable sound, not the best view. Also made me acutely aware of the fact that looking at the pad is different than looking at the full flight trajectory – we all lost view of the rocket 60 seconds after liftoff because it was east and above us.

Launch we saw from here: Thu Nov 14, 2024 – Falcon 9 SLC-40 Starlink 6-68

Booster Return: Jetty Park

Our hotel was walking distance to Jetty Park, which worked out well as you can see two things from here – both boosters returning with the drone ship comes into the port, and you can drive through Port Canaveral across from the unloading docks where SpaceX lifts used boosters off the ship and get a pretty good view of a booster.  NSF’s Space Coast Live stream keeps an eye on the booster unloading dock and often a camera will pan over to watch the procession down the canal.  But I recommend making the time to watch one come in – it’s the closest you’ll get to look at a production Falcon 9 booster.

To know when to find a booster coming in, get an account with Marine Traffic and look up MARMAC 302 (A Shortfall of Gravitas) and MARMAC 303 (Just Read The Instructions).  MARMAC 304 is Of Course I Still Love You, currently stationed on the west coast, but that may change by the time you read this. When out at sea to catch a booster (typically about 600km downrange north of the Bahamas) it is out of terrestrial AIS range; if you can swing a paid account you can use their satellite tracking feature, but this isn’t strictly necessary. Weather permitting the booster will come in about 36-48 hours after a landing, and will come in terrestrial (free) AIS range at least an hour away from the port.  It comes in slowly under power of a tug at 7-9 knots; the procession from a blip on the horizon to up-close on the canal took nearly two hours and it takes another 30 minutes down the canal into the port to their dock.

JRTI with B1076 on the horizon. This is about 1.5 hours away.

Coming in closer.

It had never occurred to me that drone ships are pulled by a tug. The entire way to the Bahamas and back, Signet Warhorse III pulls JRTI.


B1076. An odd thing for a photographer – not having to use much of my zoom lens because the rocket is so close!

Up close and personal

Mmm…engines…

Grid fins!

Drone ships also go back out to sea empty of course – about two days ahead of a launch; during my visit, the drone ships turned around same day and are probably a constraint to Falcon 9’s launch cadence.  I happened to be on the beach at Jetty Park and wanted to go check out the pier.  Walked over the boulders to see ASOG going out to sea!

ASOG going out to sea for it’s next catch.

Booster unloading dock

You can drive into Port Canaveral and see the unloading dock from a bit of empty land across the street from Gator’s Portside Restaurant.  Or maybe go have lunch there!

Presumably B1080 after Starlink Group 6-69 launch, unloaded from ASOG waiting for processing.

Blue Origin’s Jacklyn landing ship on the left, B1080 in the middle; Doug (fairing recovery ship) on the right.

Jacklyn looks ready to go.

B1080 on land, B1076 about to be unloaded.

Apparently there was a third booster hidden behind JRTI which we couldn’t even see, laying on it’s side. Busy place!

Boosters we saw in port:

  • B1080-12 after Starlink 6-69
  • B1076-18 after Starlink 6-68

Viewing from Kennedy Space Center

KSC advertises launch viewing heavily, but it was confusing to me before we actually got there.

The main KSC visitor complex has a “launch viewing area” but it doesn’t offer pad views.  If you happen to be at KSC, you’ll enjoy it, but I wouldn’t go out of my way to view from here.

Viewing from the Saturn V center is quite different – a much better view.  But it’s at the other side of a bus ride. P ay attention to the timing – the last bus to the Saturn V center from the main visitor complex is at 2:30 PM, and the Saturn V center closes at 4:00 PM.  We were aiming for a 4:02 PM launch and got conflicting reports from staff on whether we’d be allowed to stay.  In the end, the launch was postponed to 4:28 PM, and while the staff closed all the exhibits and food at 4PM, they let us linger outside and then ride buses back after the launch was over.  I think had the launch been postponed much later, they would’ve sent us packing.

This view was great, although there are two sets of stands and the Banana Creek stands which are not always open were not available to us – those would have provided a better view, but are only open on certain occasions.  We stood on the grass lawn and had a great view regardless, despite people waiting until T+10 seconds to decide to stand in front of us and hold their phones up in the air.

Panoramic view from KSC Saturn V center. You can in fact see SLC-40 from here; it was just behind a bush when I snapped this photo. You can also see LC-39B off to the left.

Different angle panorama showing what SLC-40 looks like.


View of LC-39A just hours after Koreasat 6a launch. This is the closest we ever got to LC-39A.

Launch of Starlink 6-69 from SLC-40. No zoom lens for this launch; I forgot it in the car! We just enjoyed the view and the sounds without too much technology.

The rocket contrail was blown by upper-level winds into the shape of a 3 which made my three year old son very happy!

Launch we saw from here: Mon Nov 11, 2024 – Falcon 9 – Starlink 6-69

Worth Mention: Playalinda Beach

I think Playalinda is the intersection of most accessible “close” viewing spot + rather simple public access + SpaceX’s choice of LC-39A viewing to get as close as possible (around 3 miles away) from an everyday Falcon 9 launch.  Unfortunately we didn’t get to experience this – the one time we tried to go to Playalinda, it was closed.  It became apparent that we were in a line of cars all going to this beach for the launch, and annoyingly we didn’t find out it was closed until we were 15 minutes out of Titusville around here.

Experience with scheduling

Launches are often scheduled for one date, postponed back 24 hours at a time, and many launches have a window of time during which to launch – and don’t always hit the start time.  Falcon 9 in particular has a go/no-go for propellant loading – the primary decision point – at about T-39 minutes.  If a launch is going to be postponed, the new time is usually updated in Next Spaceflight about 30 minutes out from the originally scheduled time.

At about a week out from our vacation starting November 9th, there were only two launches on the Next Spaceflight schedule:

In the week leading up to the trip, two Starlink launches and the GSAT-20 launch were added.  And while they all slipped a day or more, we saw them all!

Our experience, by launch:

  1. Starlink 6-69 – was originally scheduled for the Saturday we flew into Orlando. Then bumped to Sunday evening at 5PM with a launch window going to ~8 PM. The launch got bumped back to 8PM in the afternoon and at dinner around 7PM got bumped to the following day at 4:02 PM.  While at the Saturn V center, it was bumped back an additional ~30 minutes to about 4:30 PM before lifting off.
  2. Koreasat 6a was on the schedule early for Monday the 11th and stuck to it.  Originally it was listed as “NET November 11” and eventually got the time slot of 11:07 AM.  The launch was bumped back only a few minutes to 11:22 AM with about an hour of notice.
  3. Starlink 6-68 – was originally scheduled for Monday November 11th at ~5:45 AM. It was pushed back to Tuesday, and then to Thursday when it finally launched.  Each time it was pushed back, the opening window moved forward about 10-15 minutes.  The launch had a several hour long launch window.  It also changed launch pads between LC-39A and SLC-40.  On launch day the window was set to open at 5:15 AM; an hour before this it was bumped to ~5:30; at T-5 minutes we learned that the new launch time was 8:21 AM, which is when it finally launched.
  4. Optus-X/TD7 was also on the schedule early for November 17th, but did not get a launch window as early as Koreasat 6a.  The launch window opened at 4:28 PM and about an hour out we learned it was bumped to 4:58 PM, and shortly thereafter to 5:28 PM which was the actual launch time.  5:28 PM is way better – the sun had mostly set, and the view was more brilliant!
  5. GSAT-20 was added to the schedule a bit later than Koreasat 6a and Optus-X but I don’t remember when.  It was slated for Sunday November 17th, but got bumped back to Monday November 18th which was our last day in town.  If I recall correctly, the launch window opened at 1:15 PM, but an hour out from launch it was bumped to 1:31 PM.

Moral of the story: the schedule is always changing, but if you keep up with it, you’ll get to see stuff!

Why go see a rocket launch?

It’s true, we’re incredibly spoiled with 4K HD views on YouTube in our pockets of launch pads around the world.  For big launches like Starship, I often have two or three stream going to watch the epic launch from multiple angles.  But there are four things you can’t get on a launch stream:

  1. The light: The fire isn’t orange; it isn’t yellow: it’s just bright.  Looking at a rocket engine firing is like looking at a mini sun.  It’s not bright enough to make you need to look away, however a computer screen can’t reproduce the sheer intensity of the light you’re seeing.  It’s absolutely beautiful.
  2. The sound.  It’s incredible.  At ~10 miles away, the sound is delayed by ~45 seconds from what you see, which is surreal.  But when it hits you, there’s nothing like it short of watching the Blue Angels flying overhead. I’ve never heard & felt anything like it in my life.
  3. The crowd: you’re never alone looking at a launch.  You’ll often find a couple of folks obliviously fishing, but the nerds huddled around their phones are there to watch the launch. Go say hi, you’ll meet cool people.  There are serious photographers too, like the folks from US Launch Report whose trailer-mounted telescoping camera was worth a photo itself.  Every single person I met was excited and nice.
  4. The excitement: watching a launch on YouTube isn’t as exciting.  You can pause the video mid-launch and go get a coffee.  In real life, when the launch is delayed by 30 minutes, it’s different.  When the launch goes off, people gasp and “ooh”.  So do you.  You’ll feel like a kid again, I promise.

Happy viewing, folks!

Posted in Uncategorized | Tagged , , , | Comments Off on Florida Space Coast visit and launch viewing guide