What is High Altitude Ballooning (HAB)?
Build a computer with a GPS receiver and a radio transmitter, attach it to a big balloon full of helium, and let go. It rises up into the atmosphere, and as the air gets thinner, the balloon expands and eventually bursts. The computer is continuously sending radio signals down to tell you it’s GPS position. You then drive to the estimated landing area and find the computer. Why? Put a sensor on board, such as a camera, and you can see what Earth looks like at an altitude well above what you’ll ever see out an airplane window.
The UKHAS website has more information: https://ukhas.org.uk/
How I got here
I’ve been preparing and building my first tracker since coming home from the UKHAS conference in 2016. It has taken me a while to build it – I ordered the radio transmitter and RTL-SDR receiver in the fall of 2016, built and sent my first RTTY packets and learned what it means to “bit bang” a signal. I prototyped on an Arduino but quickly moved to a Raspberry Pi since I’m a Linux nerd. I tracked a handful of balloons in 2017, and in the fall started to get serious and actually drew a “design” :) In November, I decided I was ready. I wasn’t, but I started looking at launch sites and asking the UKHAS community for help with my first launch – the community really is quite active and willing to help – a happy distinction from some of the IT communities that I frequent in my day job. IRC is always busy.
Launch date bingo
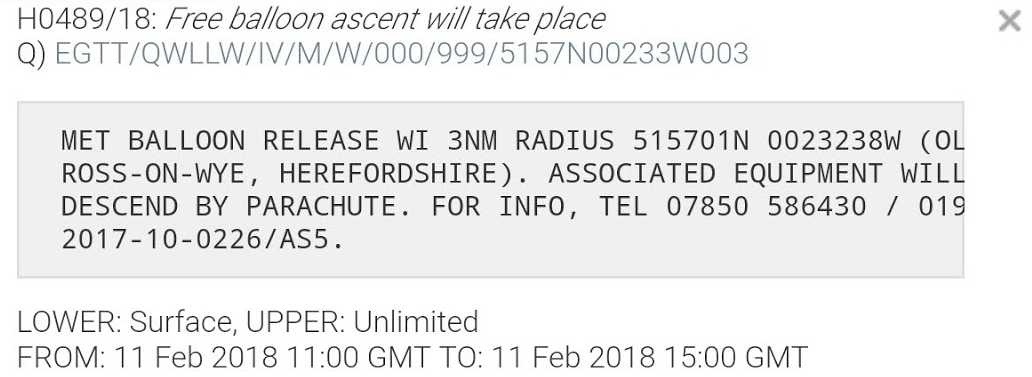
After deciding my tracker was ready in November and Dave Akerman kindly agreed to host me for a launch at his site in Ross-on-Wye. Sorting out a launch date takes time. Weather is the top challenge: you need to have decent ground weather (e.g. not too windy, lots of precipitation makes it miserable and can also make chasing & retrieving challenging, I hear.) You then need to think about the ever-changing weather up in the atmosphere – these winds, combined with the trajectory of the balloon up & down, give you a predicted landing spot. We use the CUSF landing predictor to run simulations. On top of this, you have to have approval from the CAA for the launch site, and a NOTAM issued so that air traffic control and pilots know you’ll be in their airspace. Dave has prior approval for the launch site, so only needs to deal with the NOTAM which needs to be issued a few days in advance.
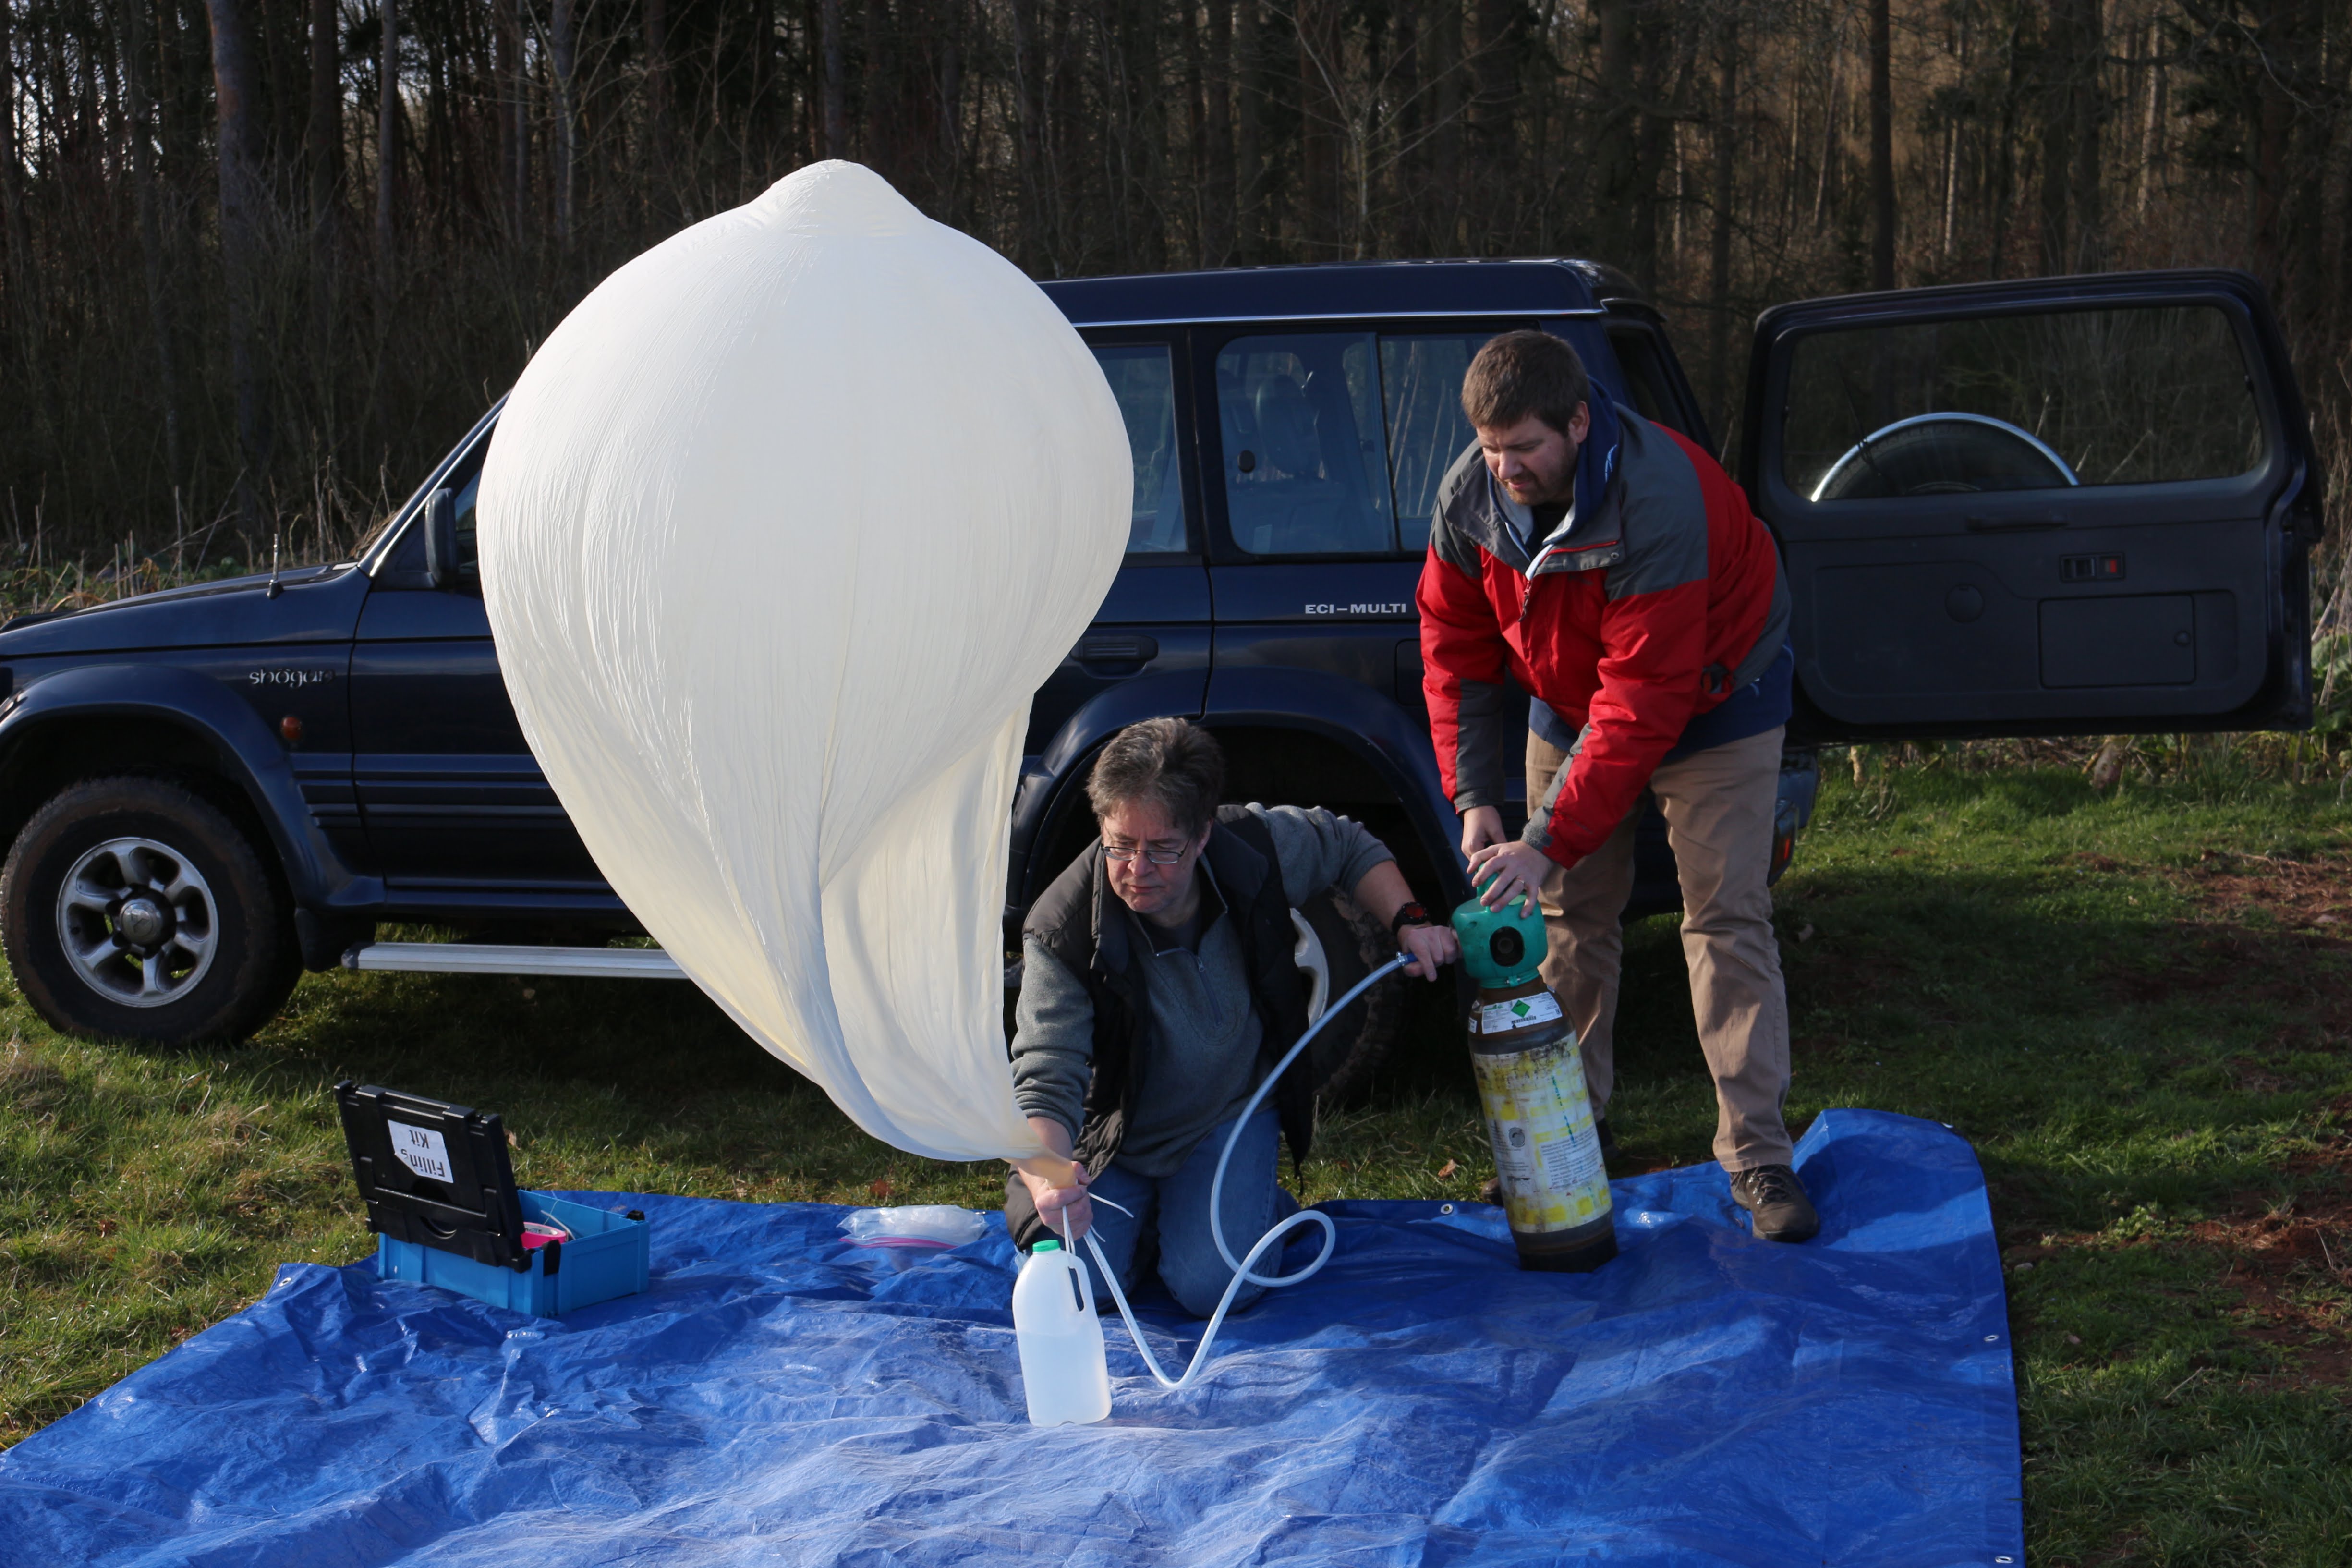
You also need to hire (“rent” in the US) a cylinder of helium, which you can keep for 3 months. I hired mine mid-December from click4balloons.co.uk.
Dave and I traded emails throughout November but we were both travelling. We penciled in a date in December, but had to scratch it for weather (and I was ill enough that I’m glad we didn’t launch, hindsight.) We picked a date in January and had to scratch for weather again – wind was going to blow the balloon almost down to Gatwick airport.
We settled on February 11th with a launch prediction landing near Banbury. Dave filed the NOTAM; you can see active NOTAMs on various unofficial sites like notaminfo.com. Here’s mine:
Payload specs & balloon
Balloon: Hwoyee HY-500
Parachute: Spherachute 24″
Payload box & line purchased from Random Solutions. Dave on launch day decided that my line wasn’t strong enough for a windy day and used some of his – something I need to ask him about / what specs he looks at with payload train lines.
Payload:
- Raspberry Pi Nano W (the original was a plan Nano, but I fried it.)
- Pi Camera v2, pointing up towards the balloon
- uBlox MAX-M8Q from Uputronics, lines soldered in
- Micro USB to TTL serial converter for GPS I/O
- Radiometrix MTX2 dangling with soldered leads, TX pin to Pi UART, EN pin to a GPIO
- UBEC DC 5V power regulator**
- 4x AA Energizer L91 Lithium batteries
- BME280 temperature / pressure / humidity sensor, outside the box
- LM75 temperature sensor, inside the box
- Canon A810 point-and-shoot camera running CHDK and a slightly modified version of the script here which takes a photo every 10 seconds. I bought the A810 on Ebay for £13 as it had a broken screen which is perfect for this job, as I turn the LCD off anyway.
Total weight: 550 grams, including the parachute and line. Dave’s BUZZ tracker added a whopping 37 grams.
I wrote my own tracker software. I could probably use the PITS software with little modifications, but I wanted to learn it. I’ve published my software, BSD licensed, on GitHub as “radio flyer”. It’s written in Python 3 and might be useful to someone else, if nothing else, it’s interesting. Please borrow / fork / ask questions.
** UBEC: I’m pretty sure I shouldn’t be using this :) It’s meant for LiPo batteries…and might have been part of the failure during descent.
Launch day weather: uncooperative winds turn into another experiment
Leading up to it the prediction looked OK, but on Saturday it became apparent that the ground winds were dangerous. Consistent winds of 15+mph and gusts of 30’s. I’d already rented a car for the day for Sarah and I to drive out there, so I figured we’d make the drive out anyway, even if we had to scrub the launch.
We sat in Dave’s house drinking tea and getting to know each other a bit. The wind didn’t let up, however we started to float around a crazy idea. The launch field is on a hill, and the hill slopes down westward. At the bottom of the hill is a line of trees. Wind in itself isn’t a huge problem, indeed as the launch photos will show, it’s even more windy the further up you go – however wind on the ground is trouble. The balloon needs to clear obstacles on the ground; namely, the power lines going over Dave’s house at the east end of the field. The trees blocked the wind for the first 15 meters or so of altitude, so we could prep the balloon there, wait for a brief gap in the wind, and let it go. We did some quick mental math to make sure the balloon’s ascent velocity would carry it high enough quickly enough to clear the power lines – and indeed we turned out to be right.
Not that it wasn’t nerve wracking, but we went ahead with it!
Launch
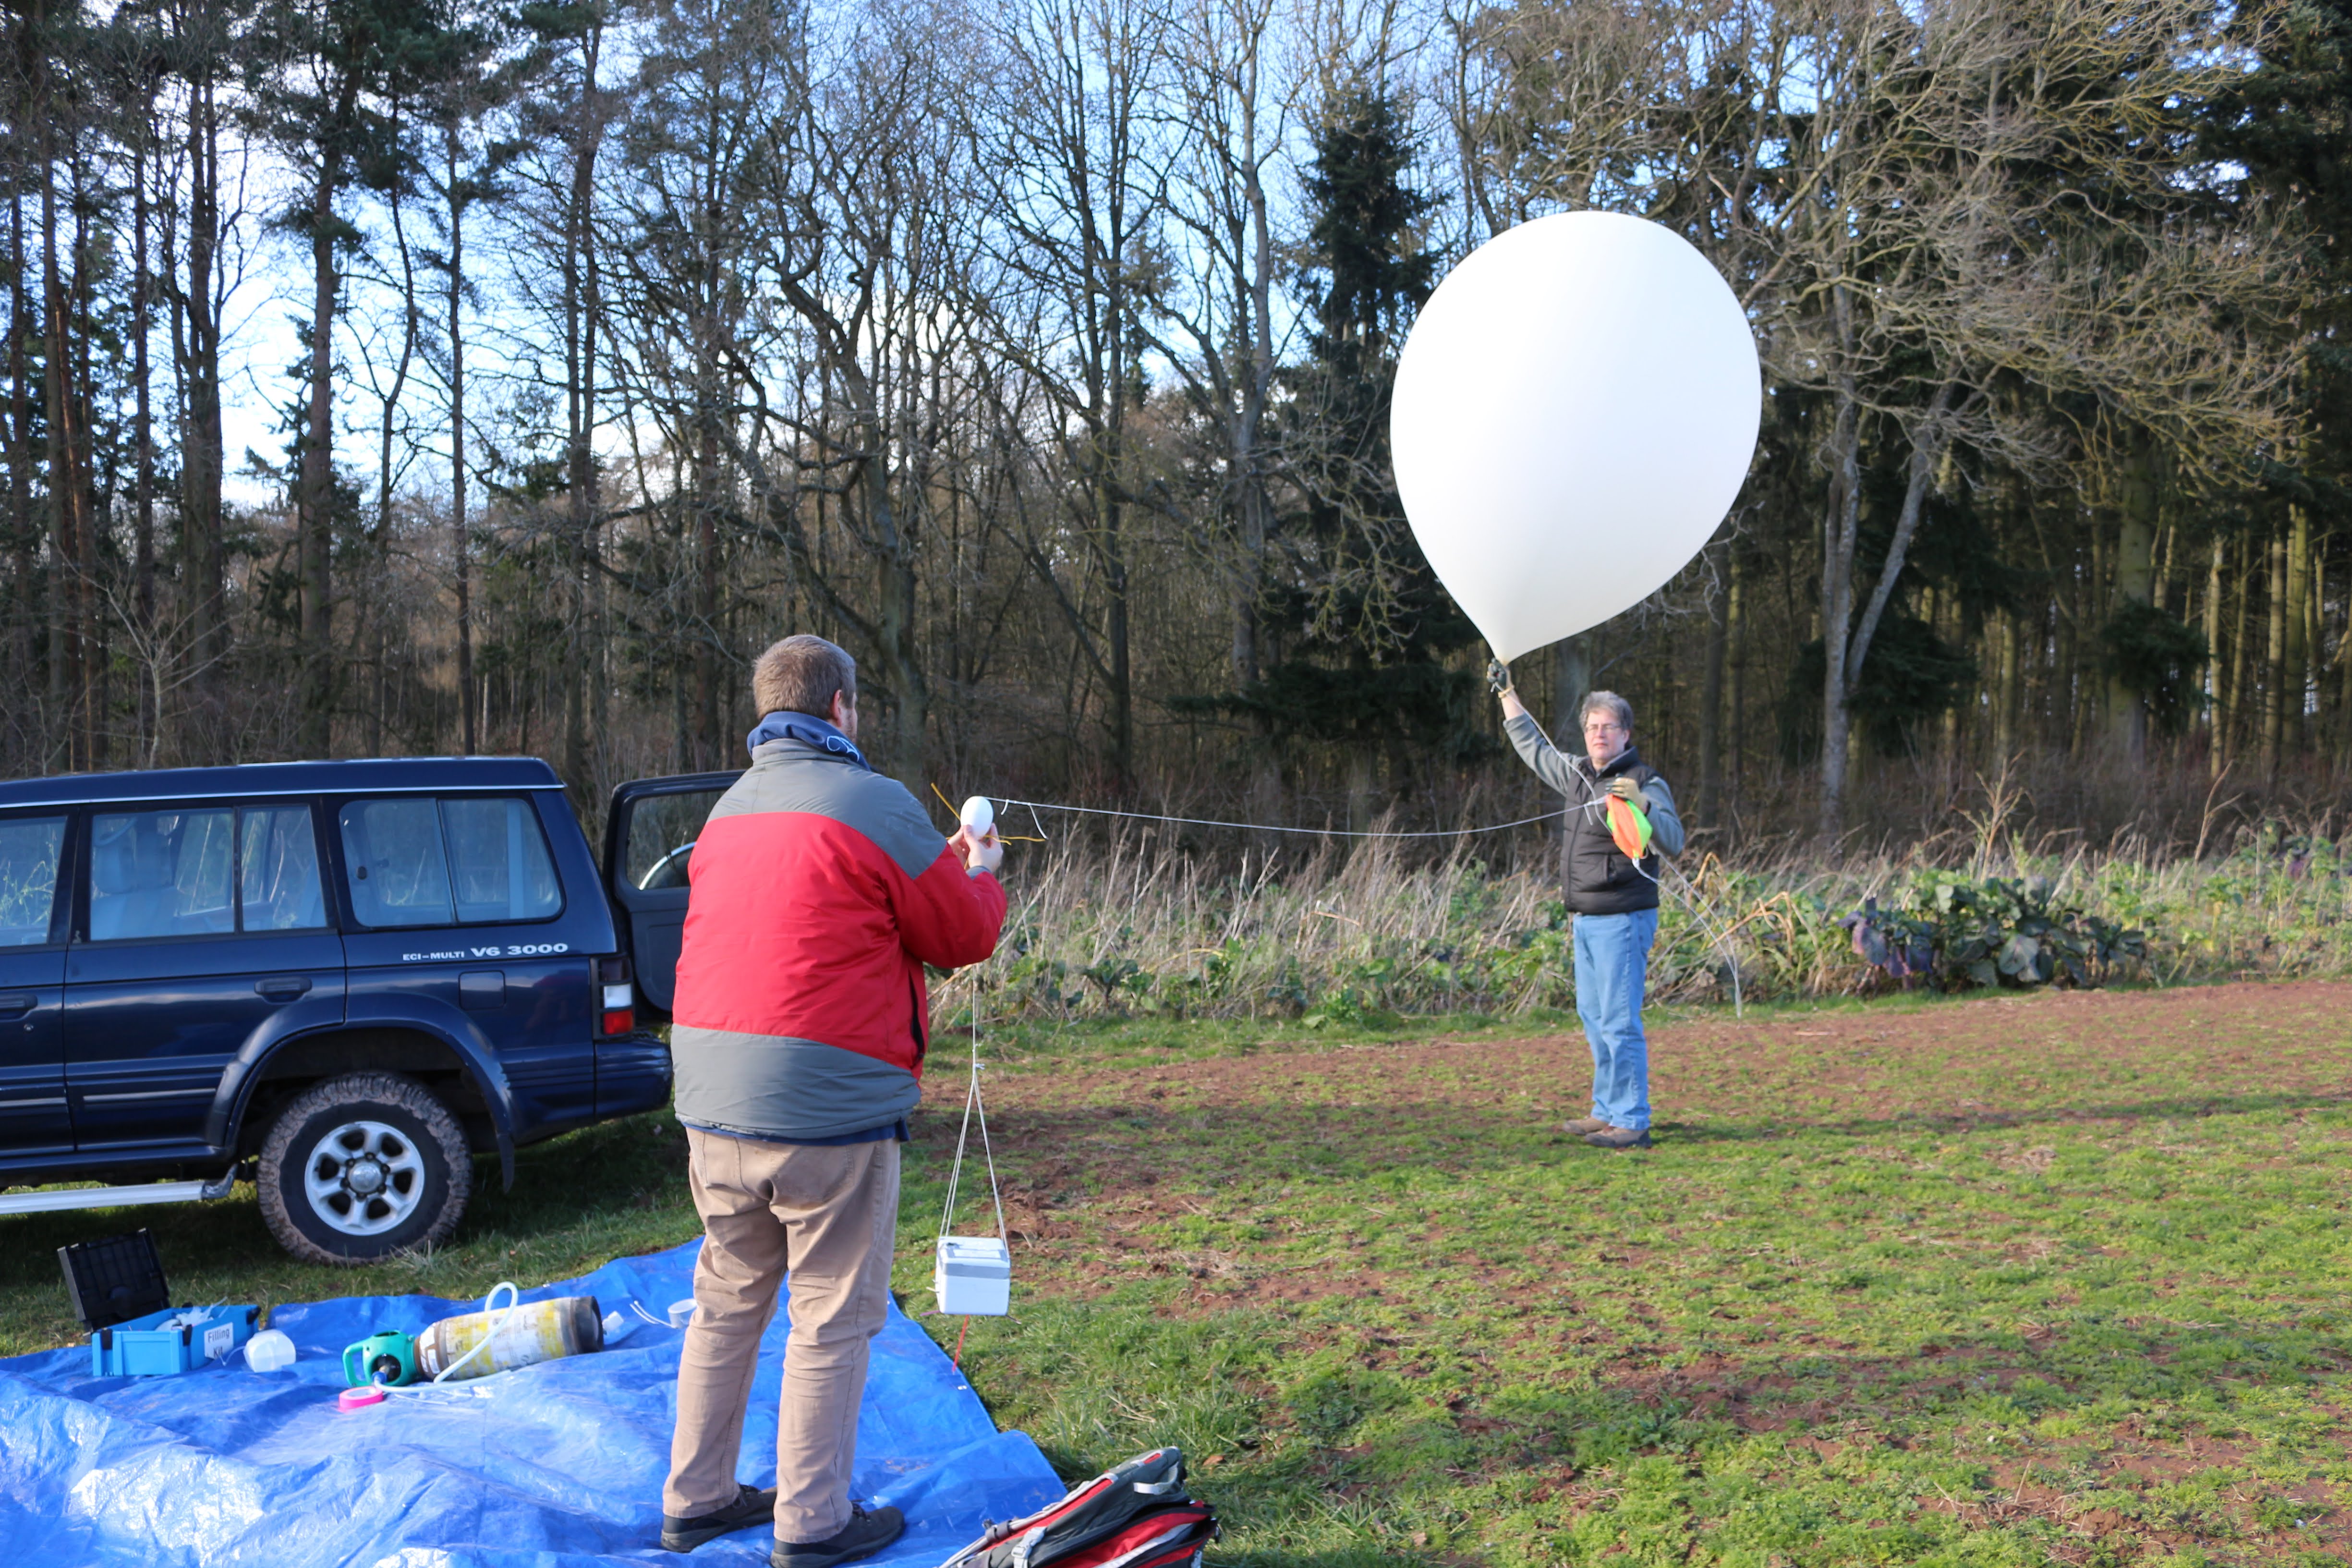
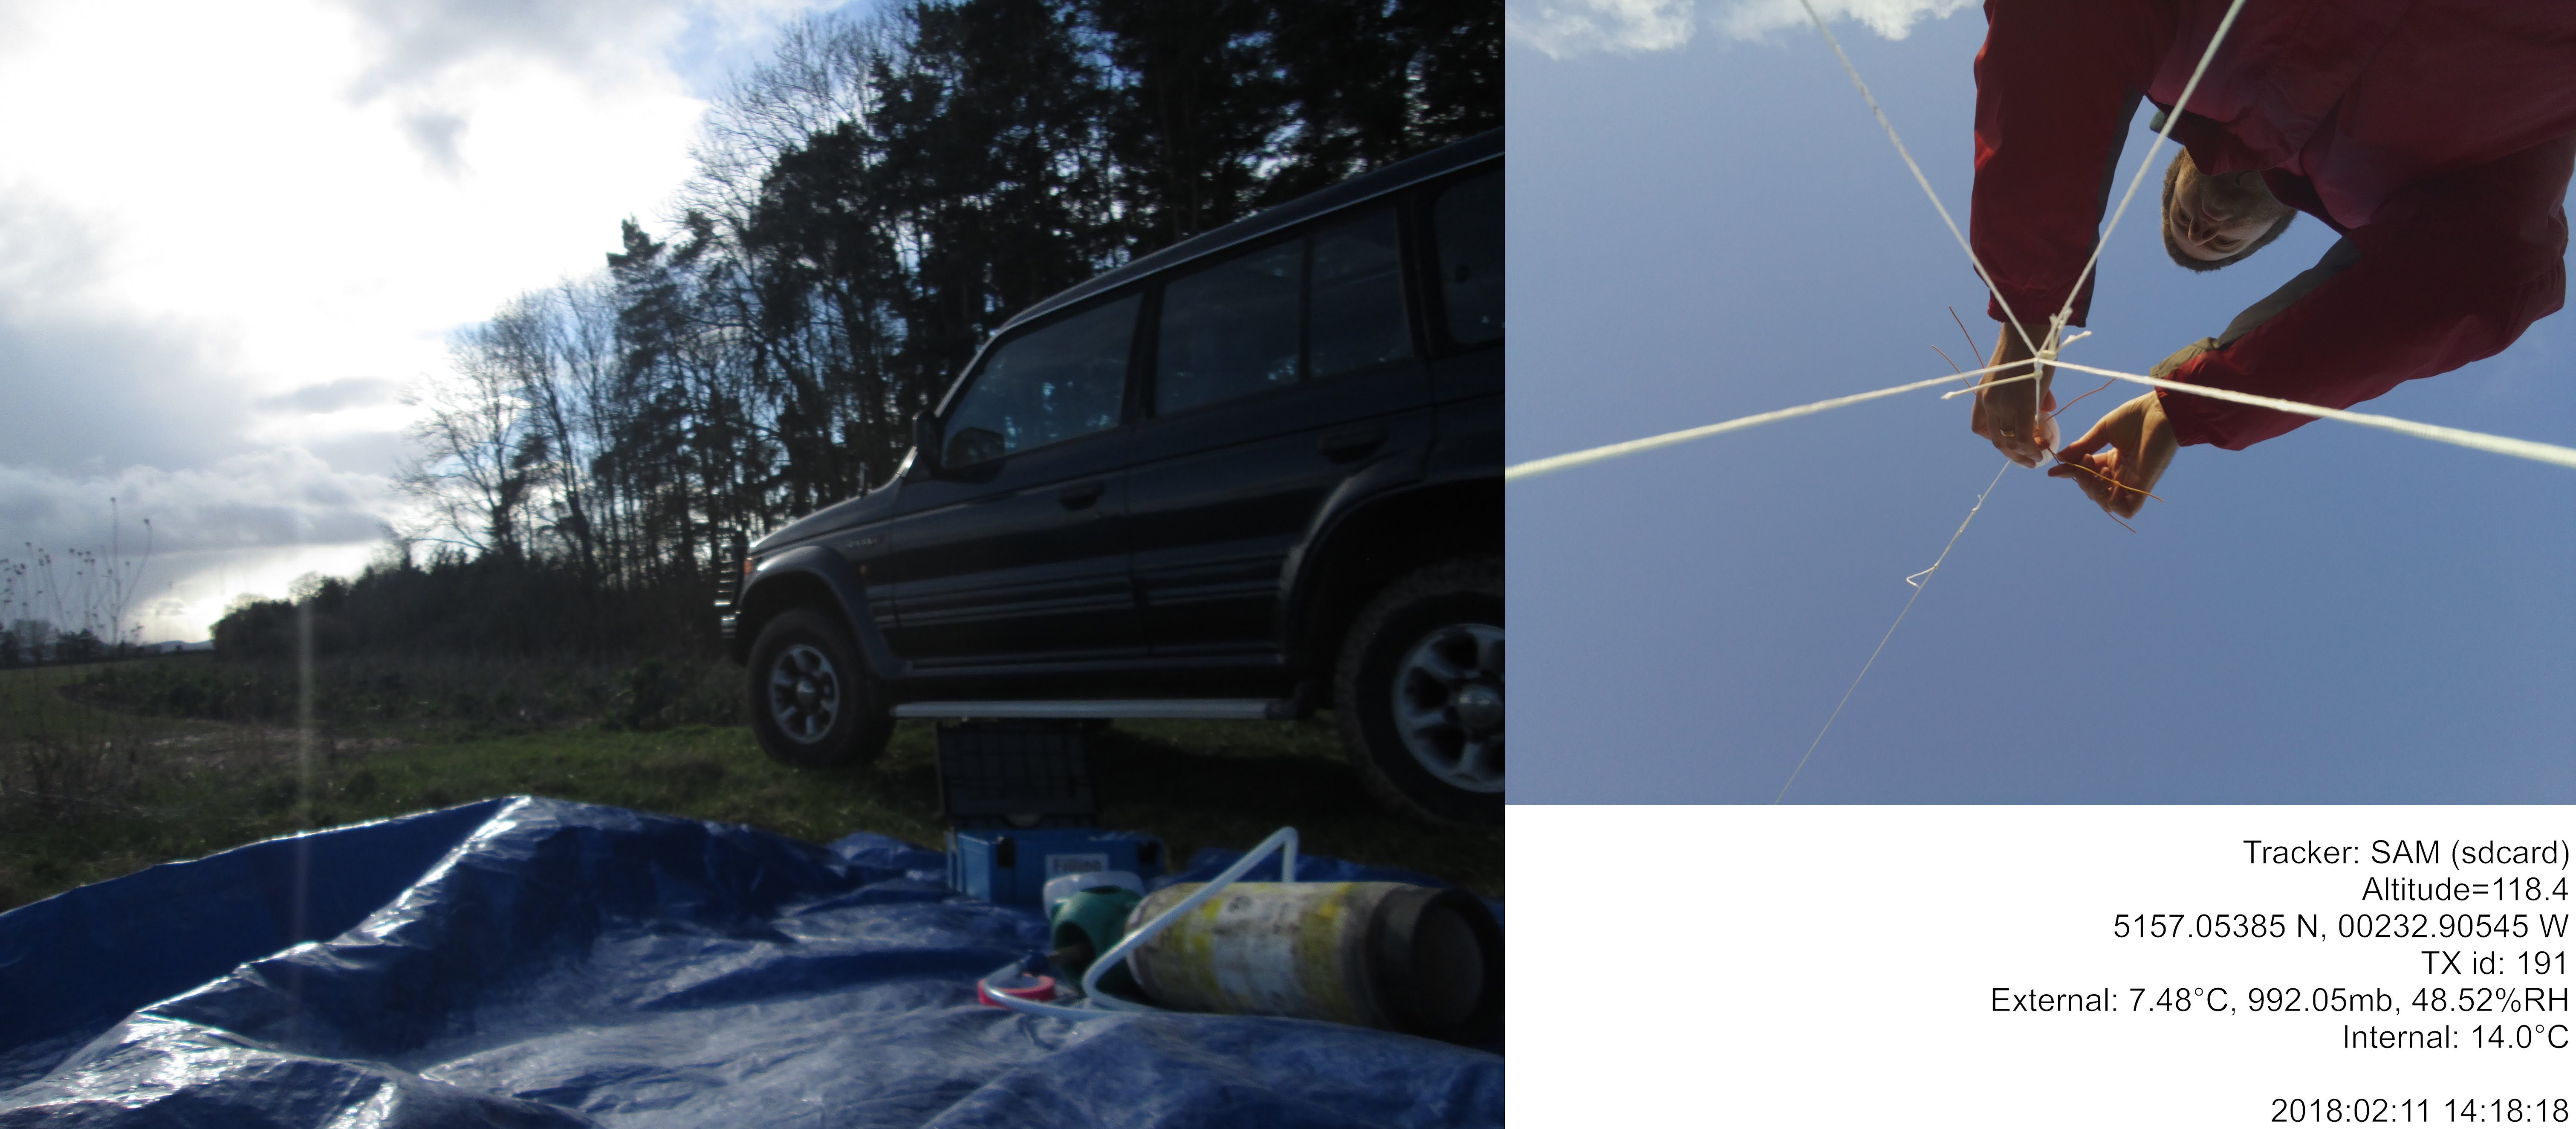
Up, up and away! It cleared the power lines just fine, as we’d estimated. The wind was worrying at times – I wouldn’t recommend a windy launch. There were a few gusts where the balloon carried to the side and without enough clearance it might be easy to puncture the balloon.
Chase drive
Something I never expected to work: I put my home-made yagi antenna in the back seat of the car, horizontal to the ground, and sat in the front passenger’s seat with my laptop + SDR receiver. Since the balloon was above us at a decent angle for much of the chase drive, I was able to receive radio signal. I had decent reception throughout the flight all the way to maximum altitude. I’m getting a better feel for radio waves, I guess. I thought a directional antenna like a yagi would almost “filter out” this sort of radio…
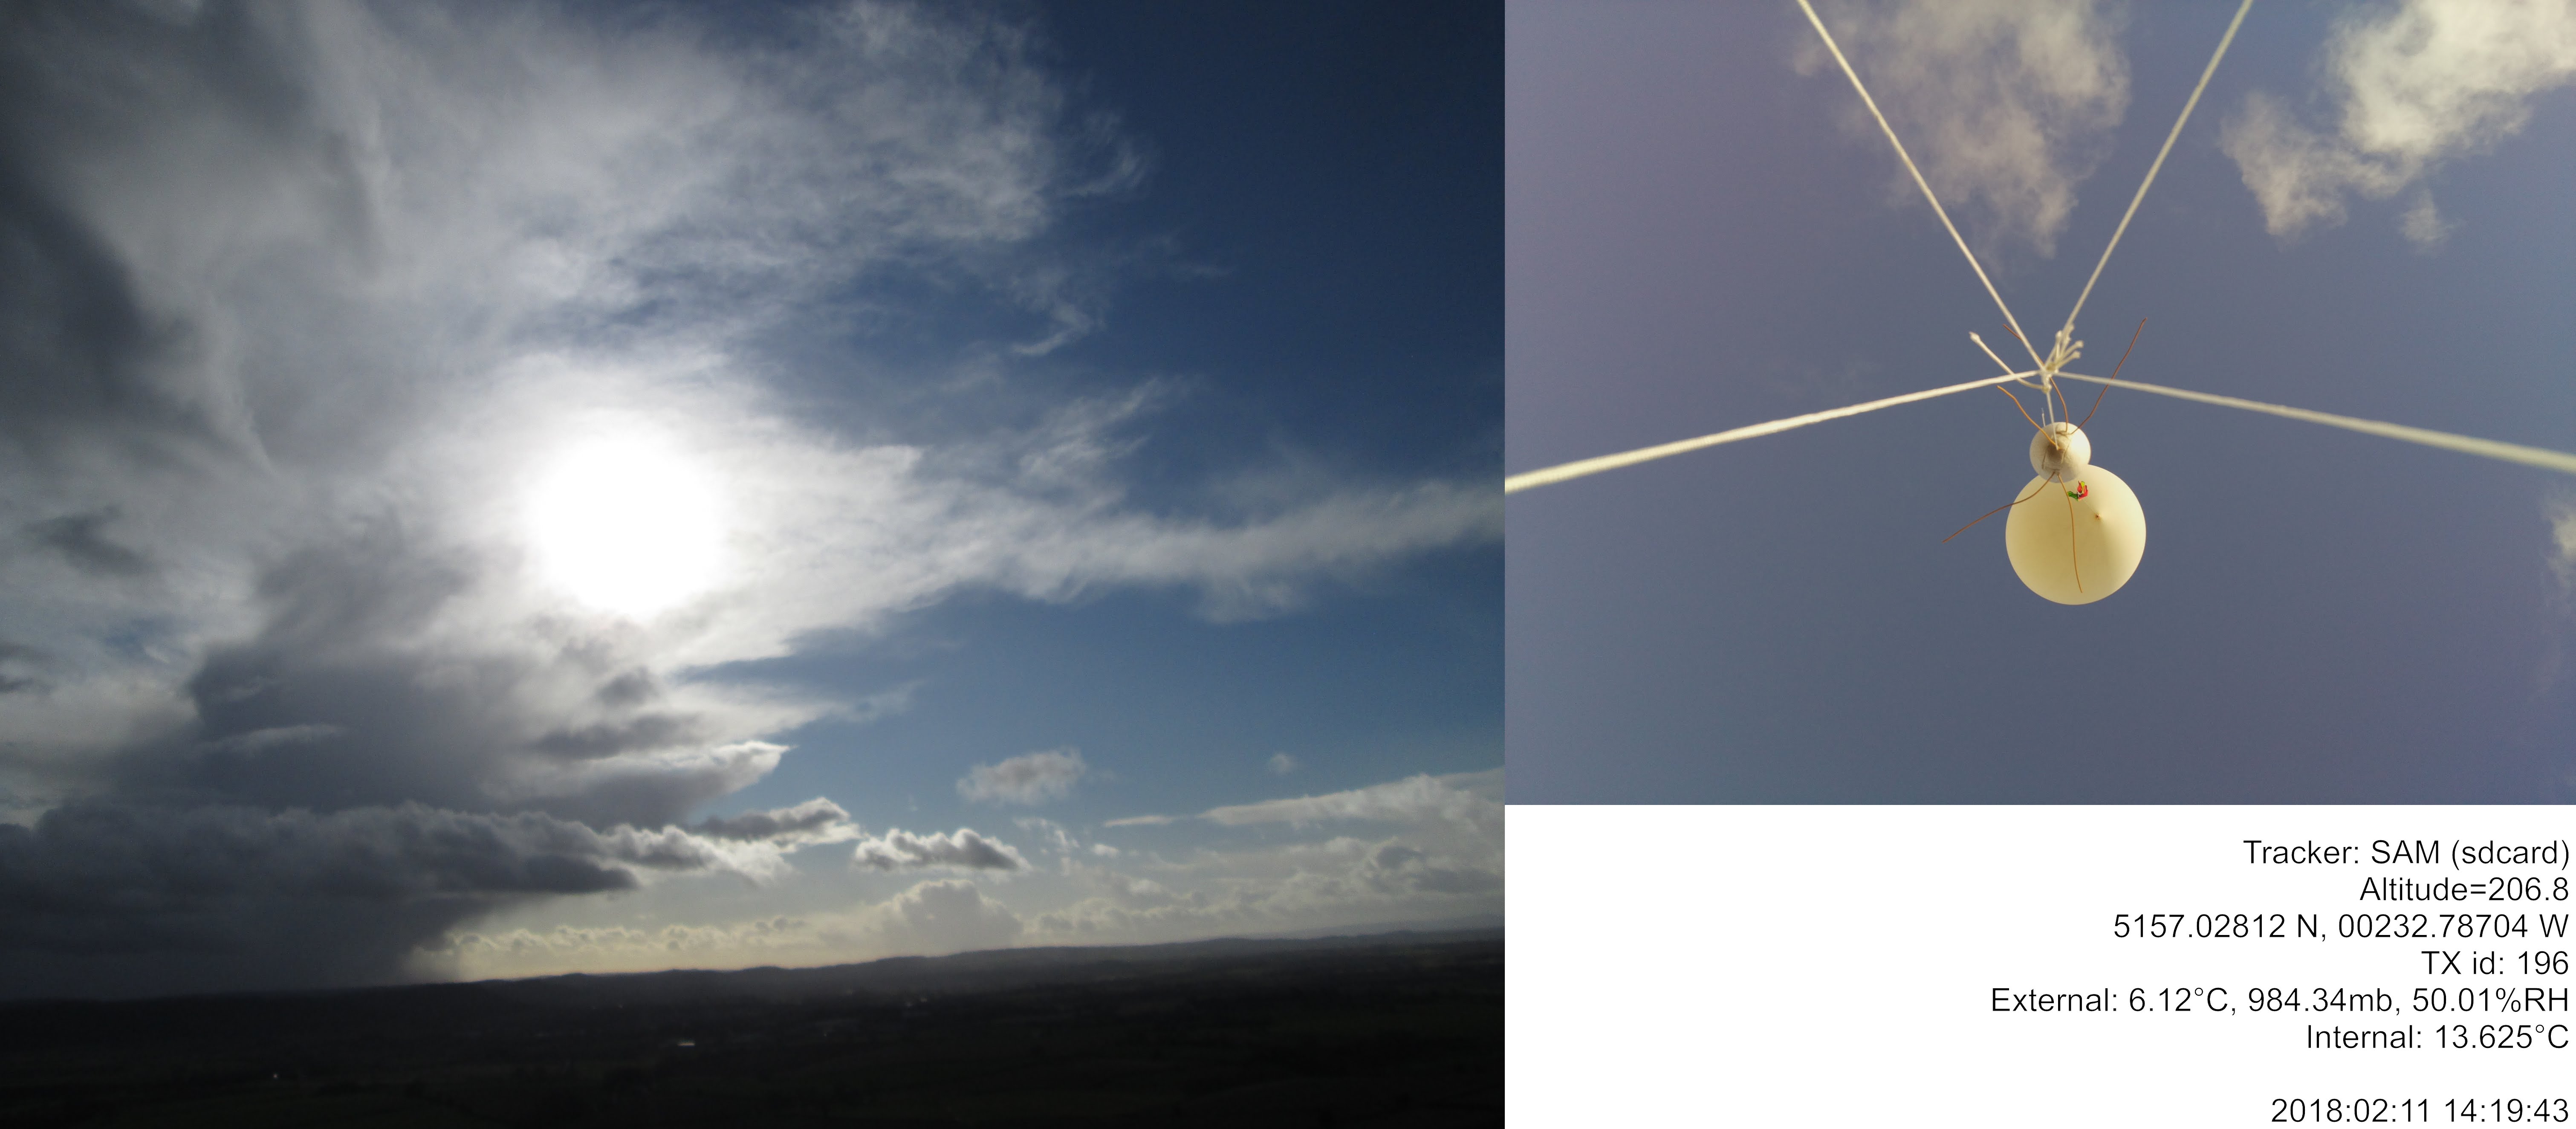
Burst
I had estimated the burst to be around 29km when shooting for a 5m/s ascent. Due to the high winds, we added extra helium to shoot for a 6m/s ascent rate – which would bring the burst altitude down, I figured to more like 28km. The balloon went further – the max altitude I recorded on the SD card was 31005m. Crazy! The upwards-facing photos around the time of burst show the balloon to appear shiny which is quite cool.


Descent velocity
Something I hadn’t spent enough time thinking about – is that the atmosphere at the time of burst is so thin that the parachute does very little and the payload descends quite quickly. Telemetry data confirms it for this and every other flight. Looking at the GPS data on the SD card which is recorded at 1Hz, the maximum descent velocity is 53.9m/s which is 120mph!
During the descent, the payload gets quite cold, and sure enough, my tracker died.
Landing & recovery
We made good time driving despite a few navigational errors – I was spending too much time looking at telemetry data and not enough on the road ahead. Dave parked at a spot near Lower Compton and we watched the telemetry data on habhub, as well as read the incoming signal on his handheld receiver. We made such good time that we were parked about 2km away from the landing spot, at Butler Hill Farm, while the balloon was at ~1.5km altitude. We tried but didn’t manage to catch visual of the payload descending.
Recovery was straightforward. The GPS marker showed the payload about 500m north of a small muddy drive (which turned out to be a private drive), in the middle of several fields. As we drove we were able to spot the payload rather easily.


SAM tracker failure & analysis
The worst part about me having radio reception in the car was realizing the moment when my tracker failed. Suddenly the beautiful two yellow bars of RTTY signal in dl-fldigi fell silent. Other receivers on IRC confirmed that the radio signal had fallen silent. Not even a single tone which would indicate that the tracker software had crashed – the transmitter fell entirely silent for the rest of the flight. Thank goodness for BUZZ, else it would be nearly impossible to find the payload. The last transmission received from SAM was sentence 553, showing 15318m. However as astute trackers may have noticed at the time, SAM has a large output buffer on it’s radio transmitter – on the SD card, I had two more sensor readings; a further 50 seconds of data.
My initial impression looking at photos from the Canon A810 camera were that the payload went through a cloud of snow/ice on it’s way down. If the payload was moving quickly, maybe a lot of moisture went inside the box, causing a short? However later correlation of photo times shows that this cloud was at 2km altitude, much later than when the tracker failed.
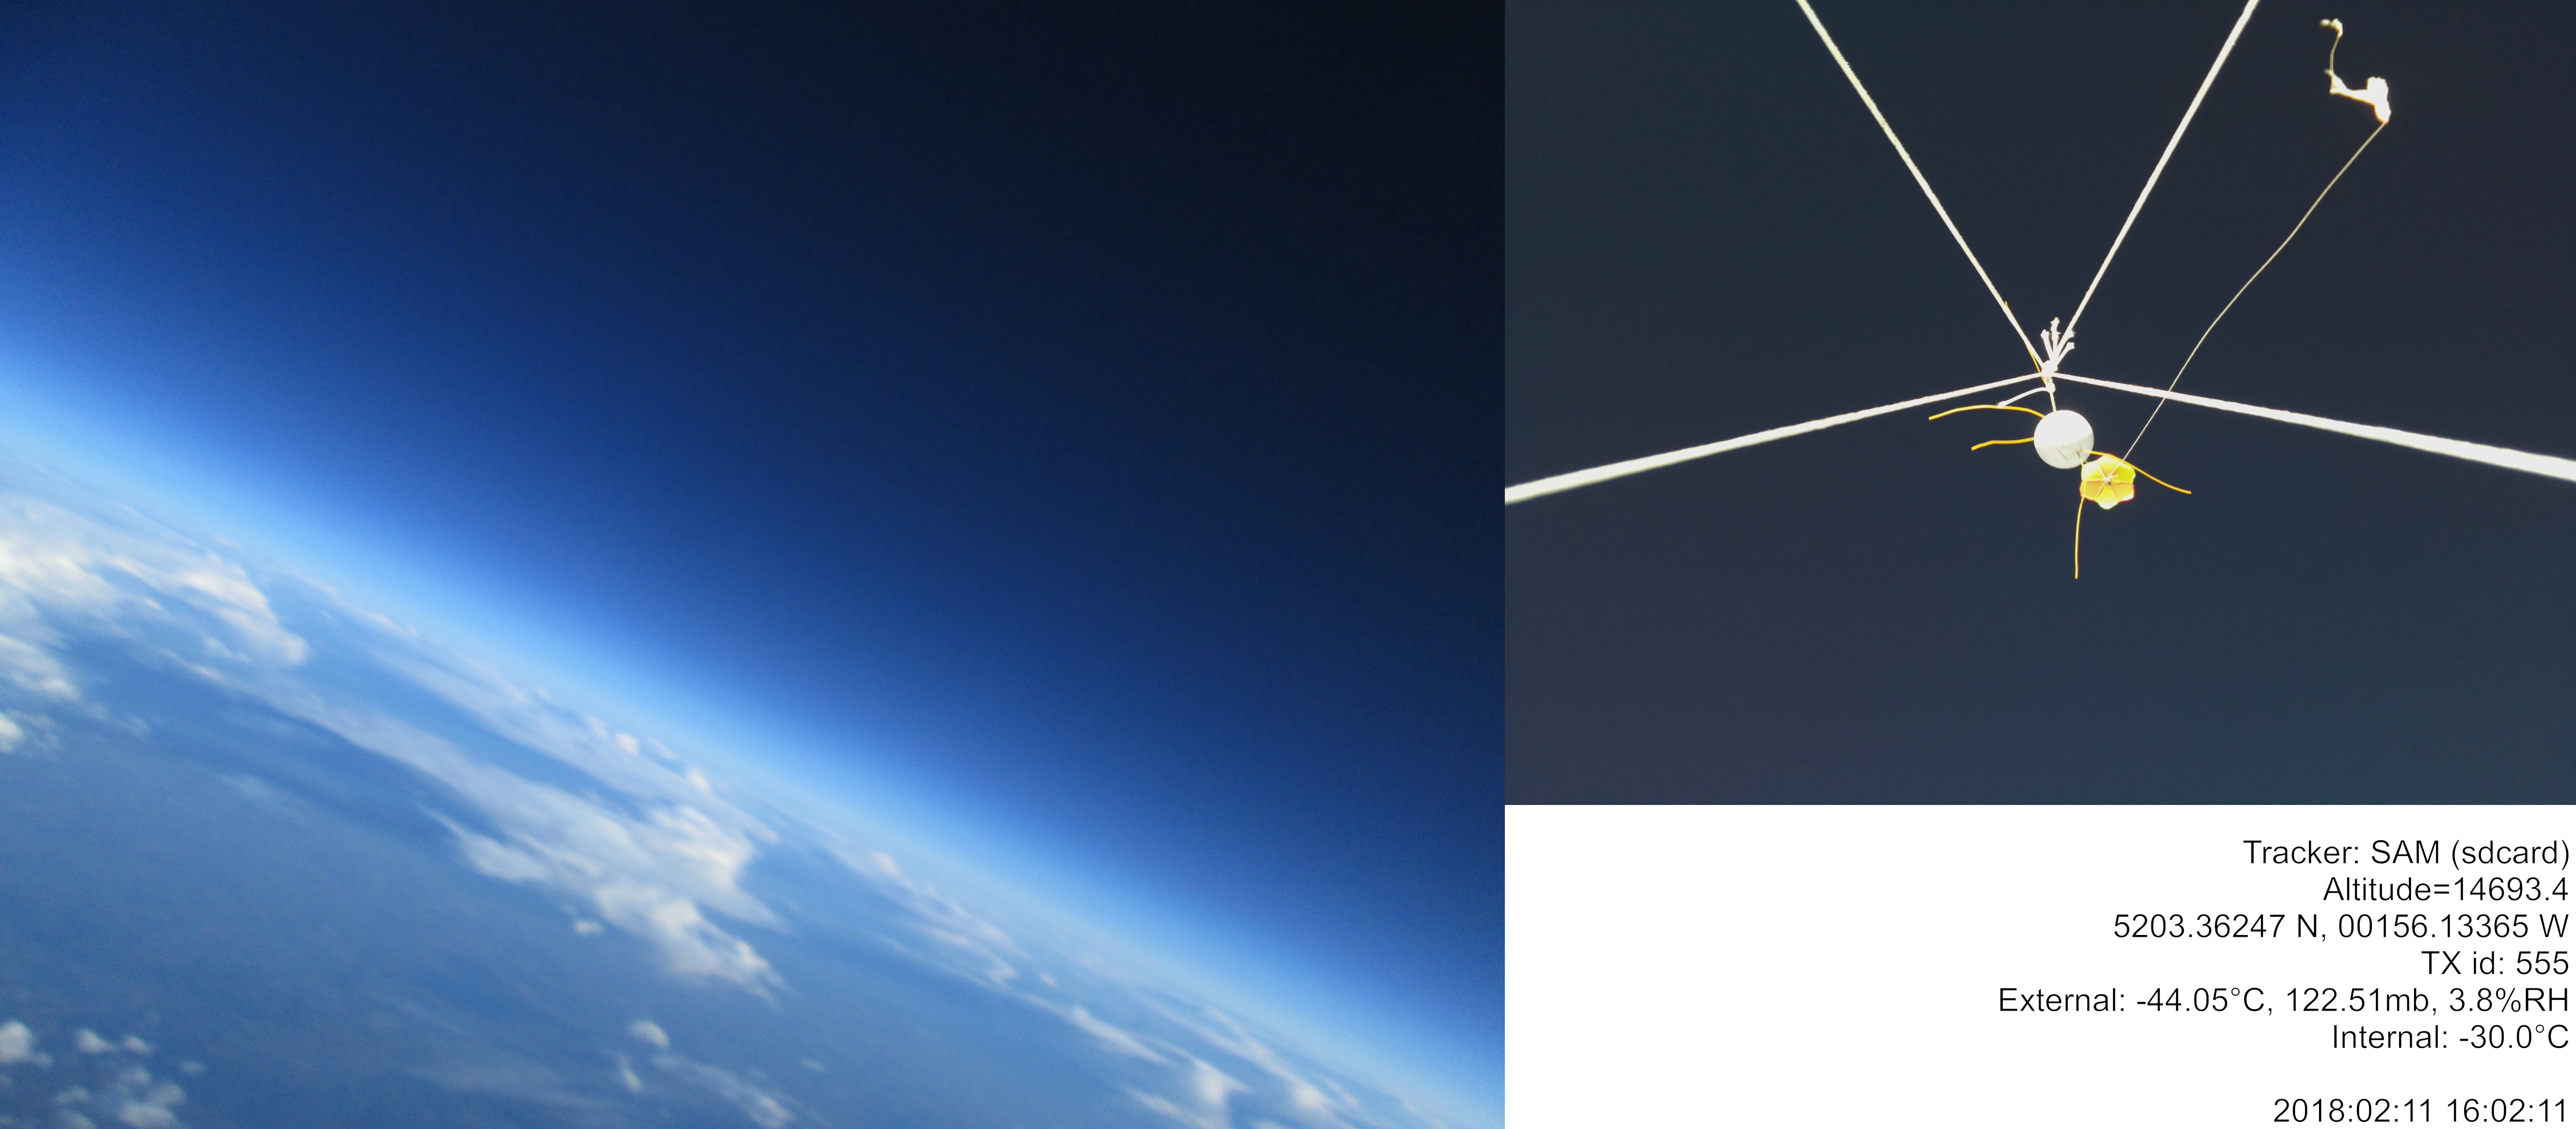
Looking at the temperature data on the descent, as expected, the payload got very cold.
Temperature readings at burst: external -20C, internal -18C
Temperature readings at tracker failure: external -44C, internal -30C
The views at the time of tracker failure:
I really wish I’d had a voltage sensor on-board. I suspect that the 4x AA batteries at this temperature put out just low enough a voltage to cause the Pi to hang. In testing I found that the Pi would crash when voltage was down around 4.5V, which isn’t much of a margin when the theoretical voltage from the battery pack is 6V (stepped down to 5V by the UBEC regulator.) It could also be that the UBEC is unsteady with lower input voltages; Steve Randall mentioned that the UBEC I’m using is meant for higher input voltages than what I’m using in the first place.
Followup before the next flight:
- Test freeze a battery pack, and see what voltage is typical. Energizer rates the batteries to put out about 1.2~1.3V at 250mA after 2~3 hours of runtime.
- Experiment with another battery regulator which will step up as well as down?
- Use 6x batteries on the next flight? Would only add 50 grams more, and would certainly keep the voltage higher.
- Integrate a voltage sensor
Habitat reporting position in Bermuda?
One other oddity which I need to test out again is what to do when I’m transmitting sentences where the GPS has no fix. I had a special case in my tracker code which sent a sentence like this:
$$SAM,47,NOFIX,13:42:04,4,6.99,989.28,50.96,868,20.875*3399
I didn’t include any latitude/longitude in the sentence, thinking there’s no point in sending zeroes. But perhaps habitat interprets this in a weird way when there is no latitude/longitude interpreted at all? Needs more testing.
Unfortunately now a week after my flight, even though habitat has my data stored, I can’t find the data on the tracker mobile site anymore. Let me know if you can find it.
Telemetry & Sensor Data
I’ve done up a bunch of charts of sensor data in Google Sheets.
Here’s a photo of tracker.habhub.org showing BUZZ’s flight path:

Photos
- Full collection of my photos, from before & after the flight, as well as on-board.
- On-board photos put into a 5fps video.
- Dave Akerman’s photos from the launch & chase.
Conclusion
Other than the extensive list of todo items I keep adding to this week, only question remains: when’s the next launch? :)