It’s been five years since my last HAB flight. The payloads have been moved across the world in a shipping container, grown dust, moved from box to box, and even parts pillaged for other projects. “hatTrick” and “EAGLE” haven’t broadcast in five years…until this year! 2023’s success in chasing radiosondes (7 so far) motivated me to want to get back to launching my own. This time without any Steve or Dave guard rails to avoid me messing it up. Which we did – we made a brilliant mess of an otherwise successful launch on September 7th, 2024.
This is a very long write-up to detail how I got here from the last flight, about the flight itself, and detail on all the trackers.
Table Of Contents
- Building Up To The Flight
- Differences Observed from UK to US
- The US NOTAM Process
- The Flight Story
- Payloads Flown
- Q&A
Building Up To The Flight
One thing I was sure of: I wanted to re-fly both hatTrick and EAGLE given that they are “flight proven” trackers from previous flights (1, 2, 3). They’ve been there and back again and proven themselves. While I want to also experiment, I don’t have a huge local community to track like I did with UKHAS in the UK – and my flights in the UK I also had the Dave/Steve safety net of them attaching one of their super-light payloads to the train as a backup tracker. This time I’m on my own.
EAGLE sat on my shelf proudly for years, but hatTrick had been partially disassembled for a trip to New Zealand where I considered flying it, and parts of it had gone in different boxes which I had to find. I found them all, found their Raspberry Pi CSI cables both suspiciously missing (I have a habit of breaking them and not keeping stock). I powered them on and they transmitted signals. I had to go back to my emails from 2019 to remember what frequency and encoding they were set to! The Raspberry Pi and Lora Hat I was using had parted ways years ago and I had to re-build the ground station, but that was easy enough.
A lot has changed in five years; habhub has been re-birthed as Amateur Sondehub. No one uses dl-fldigi anymore and apps have been updated. Radiosonde reuse has become everyday, and chasers have huge boxes full of them. Horus 4FSK has become commonplace in that time as well!
In the months leading up to launch, I prepared a bunch more things:
- Scouted launch sites
- Built a balloon filling tube following a trusty old UKHAS guide using a simple and cheap inflator with a pressure gauge
- Resurrected payloads, played with RS41ng on the DFM17, figured out horusdemodlib and horus-gui, and more.
- Bought both a HY-800 and HY-350 balloon – turns out the cheapest source I could find was Steve in the UK! The HY-350 would serve as a backup plan.
- Sourced a 100 cubic foot helium cylinder from a local party balloon store:
Scouting launch sites was interesting. I had tried to liaise with the Illinois DNR over the summer to see if they had any permit requirements, and while people there found it fascinating, I never received a straight answer on whether they had any requirements or not.
I had guesstimated from looking at rough historical flight data for NWS sondes from Davenport, IA for September each year that the flight would travel a fair distance ESE on a given day – 58 miles ESE was the gauge I used. I ran scenarios with a couple of different launch sites, estimating driving distance from my home given the guessed launch path to lead me to the launch site. This was useful, but overly scientific. It did give me a good bit of information to write a flight announcement to encourage friends, family, and new community members to join the launch. I also wrote a technical version of it just for hams for how to configure their radios to receive which people found useful.
Differences Observed from UK to US
Community
The UK is, geographically speaking, rather small. Lots of radio amateurs live within the south of England and enjoy tracking balloons, so if you’re doing a launch in the area, you’re basically guaranteed a crowd of listeners. The US is more spread out – there are just as many hams and balloon nerds, but most of them will be out of range of your balloon.
In the UK I made all my connections through the UKHAS mailing list; in the US I’ve made connections through the GPSL mailing list and interestingly connected with some fellow radiosonde chasers simply by looking up each other’s callsigns on the Internet. One of whom tracked and chased my balloon which was a pleasant surprise! If you tracked any of my payloads and would like to get in touch, you can contact me here.
I’ve also not found the selection of Web SDRs here that I had found in the UK; often if a flight was in the air and out of range, you could find a Web SDR on 70cm to listen to it. Most if not all of the Web SDRs here in Illinois seem to be focused on HF.
Radio license
The UK had an explicit rule against amateur radio permissions while airborne, and a license-exempt ISM band around 433mhz. In the US, this band requires a radio license. It’s incredibly easy to get the basic technician license which due to the pandemic is now possible entirely remotely. To get my license in the UK, I had to schlep across London, solder a circuit, and take an exam. In the US it’s just an exam. Reconfiguring my trackers to transmit my callsign was easy enough.
APRS
It seems that the defacto standard for trackers in the US is APRS. Since amateur bands are legal airborne, this isn’t a bad idea, but I’ve never built an APRS tracker. I had enough trackers going on that I didn’t bother with an APRS tracker for this flight; I may in the future (I have all the parts to build one in a box, just didn’t find the time, yet!)
Rules & legality
The UK required permission from the CAA for the launch site, and a NOTAM, for all flights. This made it a bit challenging to sort out a launch site, so I borrowed others’ regularly used launch sites for simplicity.
In the US, regulations are not simple either – however if you’re under 4lbs / 1.8kg and follow a couple of other easy to meet regulations, you can fly “exempt.” You don’t need any prior authorization from the FAA, meaning that you can use any launch site assuming you cooperate with any requests from the owner. Public parks are great. Filing a NOTAM is not required but a good idea, so I did one (even though we didn’t quite follow it!) It was easy.
The US NOTAM Process
There’s a lot of stress around NOTAM filings for me. I don’t want a FAA officer to say “hey you can’t do that” and deny the NOTAM, so I was hesitant at first. Having done it, it’s a breeze, and I’ll do it in the future. I mostly followed Project Traveler’s NOTAM guide with a couple of modifications – the operator was happy to take the launch location in latitude/longitude, and also wanted to know the actual real intented altitude (which was 100,000 ft in my case). They do seem to care about above FL600. The phone number is the same: 877-487-6867; I was on hold for 2 minutes to connect to an operator, he was entirely professional, patient and kind, and the whole process took maybe five minutes.
They took my phone number and initials, but no further identification was required.
I recommend you file a NOTAM even if not required. It’s easy, and fun to be able to look yourself up a couple of hours later on the FAA NOTAM search.
The Flight Story
Week leading up (T-7 days)
The flight path prediction varied wildly in the week leading up to flight.
I had originally picked a Illinois State Park called Franklin Creek as my planned launch site, with a backup plan in Dixon, IL.
The CUSF/Sondehub Predict tool supports predictions up to 7 days out from a given launch time, and at first prediction 7 days out this showed the balloon flying due east and landing in St. Charles, IL at the very western suburbs of Chicago. Not great; it’s a very populated area. As the days progressed, the landing site shifted south, to Joliet, and then pulled further east of Joliet. Interestingly, the hour-by-hour change was at least a couple of miles different, meaning that launch timing was important to keep an eye on. The GFS model which powers the predictor tool is updated every 6 hours. At about 4 days out from launch time the landing area became reasonably consistent. I kept a log of the predictions I ran each day.
At T-2 days I filed a NOTAM for launch from Franklin Creek but there was a glint in my eye that we’d move a couple of miles west to a park in Dixon, IL. The forecast of ground wind speed of 11mph wasn’t encouraging, but I didn’t cancel the launch. Instead I worked on my launch procedure and checklist doc (which maybe I’ll share some day), packed up payloads and everything into boxes, etc. I picked up the cylinder of helium 3 days before launch from a local party balloon store who was actually fine with me keeping it for a month or “as long as I need.” We’ll get onto helium woes in a minute.
As the week went on, the final flight weight got honed in a bit more. I added a GoPro camera (101g) but subtracted some fluff I had previously estimated so my weight went up from 776 grams to 838 grams – enough to change the calculations and flight profile slightly, but not huge.
Launch Day
01:00 CDT, T-10 hours from launch
That’s what time I went to bed. I was up late, packing payloads, putting finishing touches on the launch procedure document and packing lists which will pay off at the next launch. 1 AM was a common time in the weeks leading up to the launch, as late nights are often the only real time I have to myself with two young kids at home! It’s certainly not good for my health…
06:00 CDT, T-5 hours from intended launch
On launch day I woke at 6 am, T-5 hours before target liftoff time, made a pot of coffee, and checked the prediction. The landing spot was too close to a combo of stress – a nuclear power plant and a national guard training base:
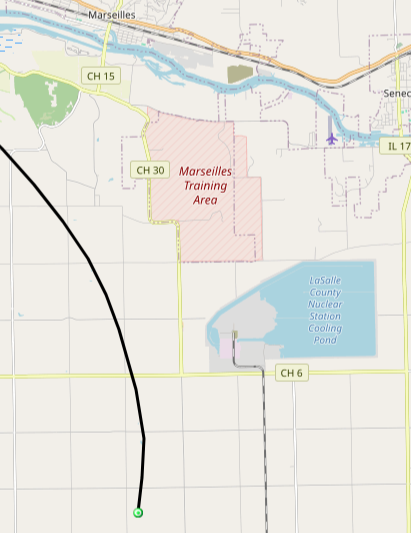
A “fouled chute” – a faster than planned descent that happens from time to time – put the payload about a mile from the training area. (!!)
Just wait until you see where it landed.
The alternate launch site in Dixon, IL looked perfect. I SMS’d the launch crew, packed the car, and left the house 45 minutes later than planned. The launch would be delayed a bit. I had estimated two hours at the launch site to prep and test, but an hour late liftoff would work fine from a timing and prediction standpoint.
It took me an hour to drink coffee, run a dozen hypothesis about alternate launch sites, make the decision, nervously drink more coffee, document the decision, and send the messages to the launch crew. After which I still had a stack of boxes to get in the car and a short list of odd items to hunt through my house to find.
09:45 CDT, T-75 minutes from target launch time
We all met up at the launch site:
- Myself, Sarah, and our two kids
- Adam from SSHC
- Spencer from Mintel, and his friend Joel
We arrived at the launch site in Dixon which I’ll post a satellite image of here with fun commentary:
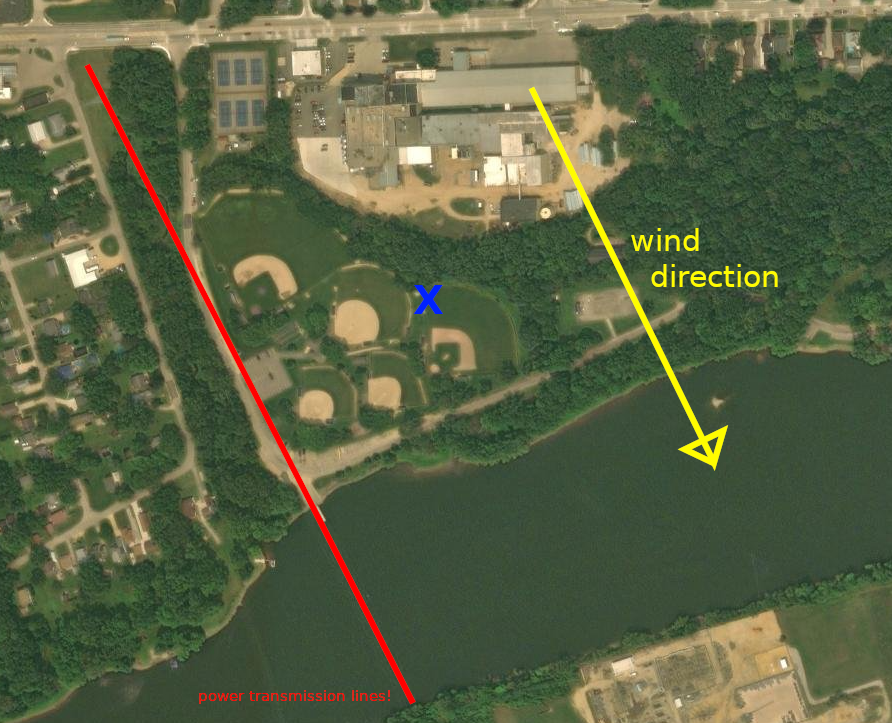
I hadn’t noticed those big power transmission lines that cross the river! Fortunately, they were off to the side, and the wind was blowing parallel to them, so clearance was not a concern. The only launch clearance concerns were a line of trees towards the water, and some flood lights on the baseball diamonds – all easily avoided. The tree line to the north provided perfect shelter from the ~10mph ground winds; we set up shop at the blue X, bothered no one for the hours we were there, and it worked perfectly. We had one spectator who pulled out a lawn chair and watched us prep.
It probably took us 45 minutes just to say hi in the parking lot, walk around and scout launch spot options and contingency plans, and pick the X spot where we’d set up and launch from.
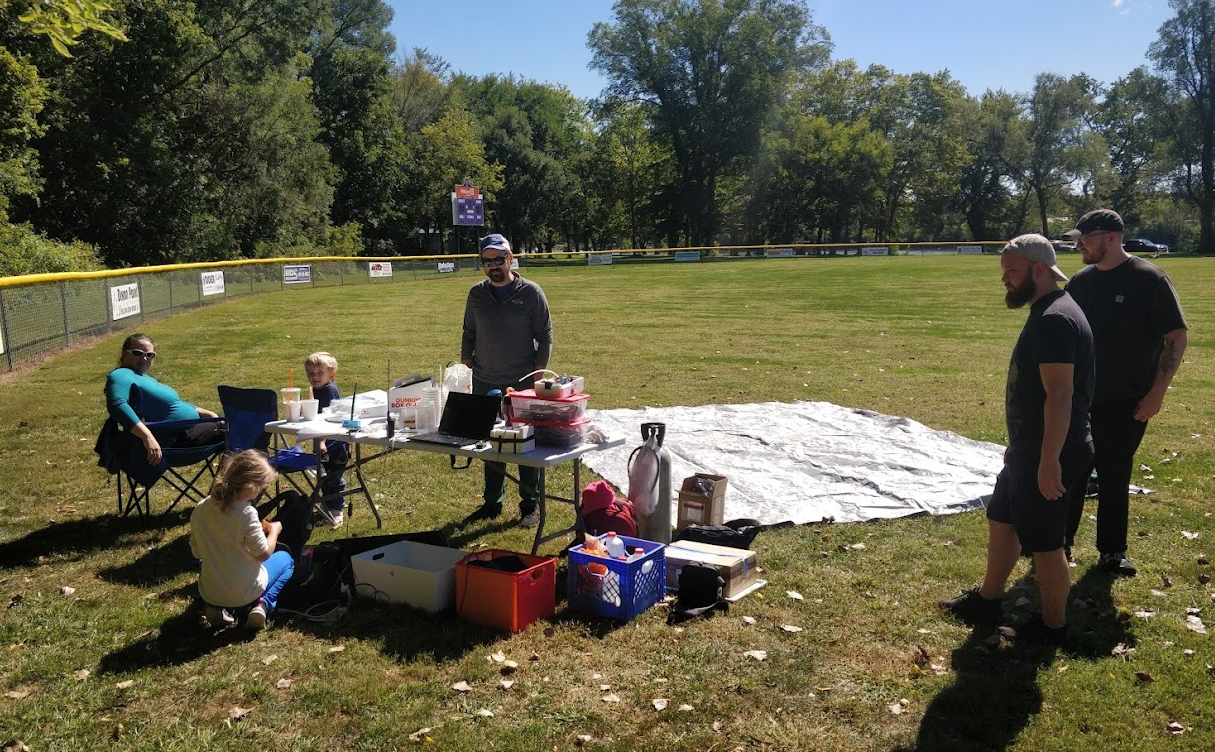
I spent some time in the parking lot (50m walk away from the launch site) setting up a tracking antenna, laptop, power supply, and radio in Spencer’s car so we’d have a second chase car with an independent data feed in case we split up (say if one of my kids needed something!). I put some more antennas on my roof, pulled wires, and powered up both EAGLE and KD9PRC-4FSK1 (DFM17) in the parking lot on spare batteries just to make sure we had signal. We then hauled all the boxes of stuff over to the launch site and set up shop; Spencer brought a folding table which was a great idea. He brought donuts and coffee too, which turned out to be absolutely essential as the launch prep ended up taking hours.
10:45 CDT, T-15 minutes, no way in hell we’re launching on schedule :)
I fired up all the receiving radios and trackers using spare batteries. I realized that I didn’t have a lot of a plan for what order to string them up in or exactly when to close up payload boxes. So I got the trackers laid out on the ground, decided an order, running on spare batteries, and tested signal on everything end to end until I was happy.
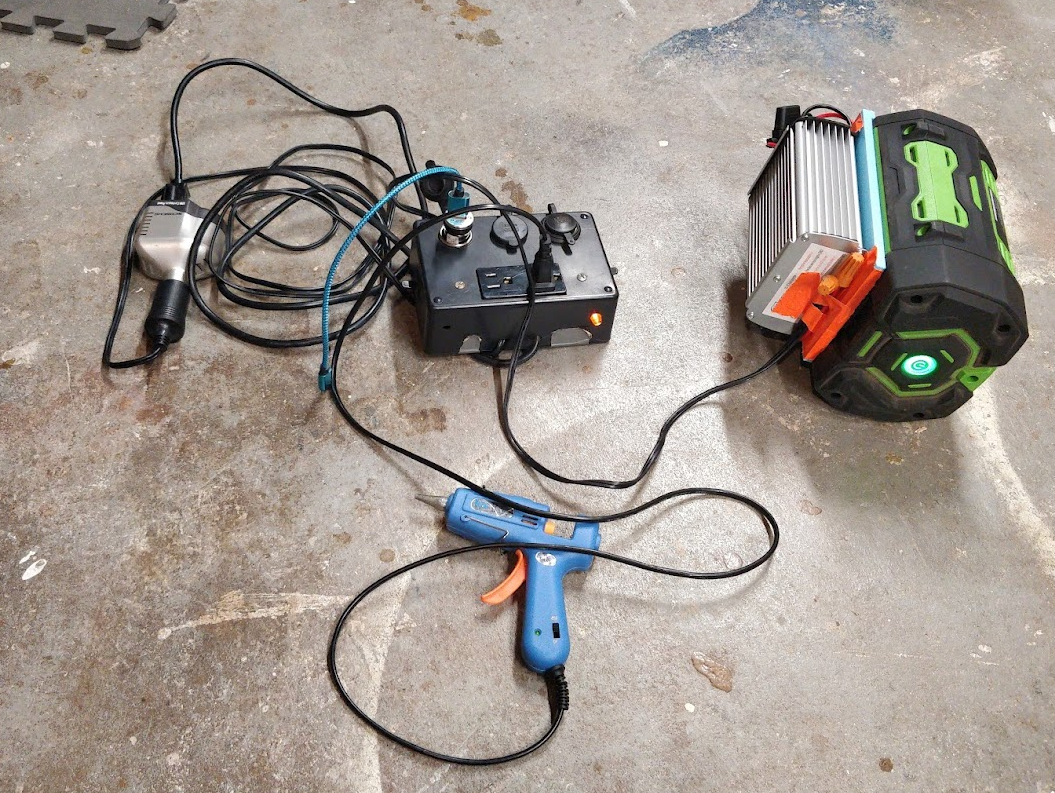
My lawn mower battery power adapter built from this model was very helpful: over at the launch site far from the car I had a laptop and half a dozen electronics gizmos all powered by a 250Wh battery converted to 110V AC which did not run out of juice.
11:15 CDT, T+15 minutes, which turned out to be T-2.5 hours from launch
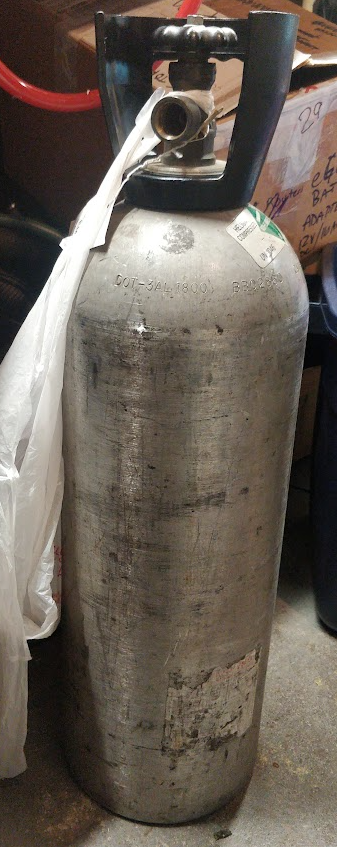
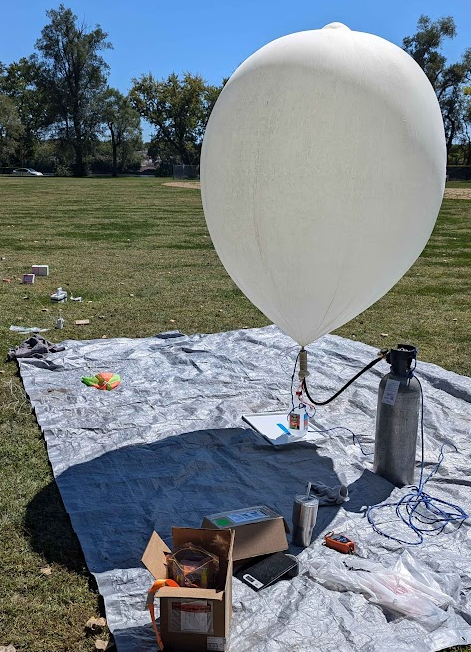
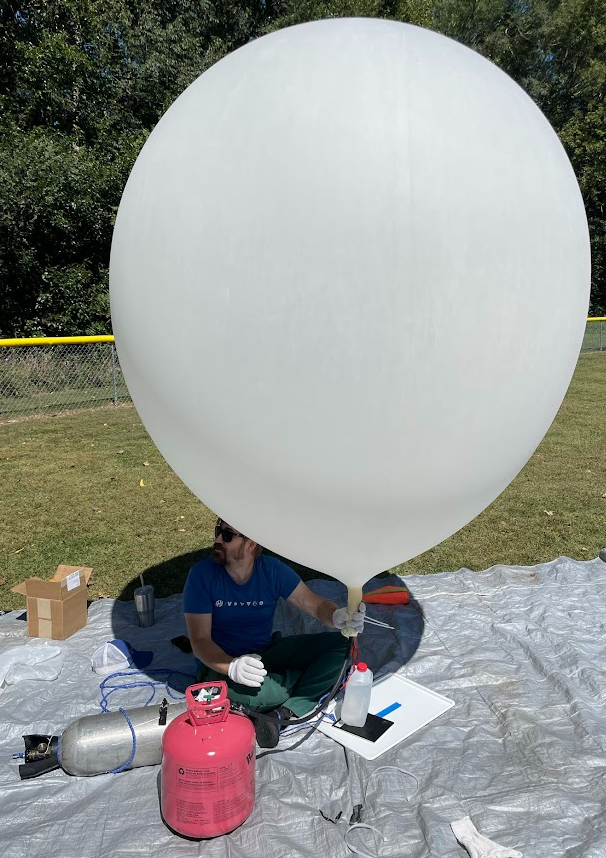
We started the balloon fill. Adam had brought some nice soft gloves for us to wear, which was a great addition to keep the balloon safe. The minute I attached my recently built inflator to the cylinder and started to fill, I knew we were in trouble: the PSI reading on the cylinder as we started to fill was only 1400 or 1600 PSI. I started yelling out PSI numbers as the cylinder rapidly drained. 1000. 800. 500. 200. Done. The balloon had some lift, but nowhere near the required neck lift. Fail #1 of the day. We needed about 90 cu. ft. of helium and did some guessing with the scale and figured we had only about 60 in there. The balloon did not look puffy and full, it looked sad and still slightly wrinkly:
A bit of googling and phone calls and we found that Hobby Lobby 15 minutes away sells $50 packs of balloons including 14.9 cu ft of 80% helium in a canister made by Balloon Time. At 80%, we needed 4 of them to hopefully yield another 40 cu ft of lifting helium gas; 4 canisters should be about 48. Which was a penalty of $220 in the end. Ouch. Hobby Lobby ended up having only one in stock, but Walmart had half a dozen on the shelf. Sarah drove and bought helium and fed the kids while the rest of us sat at the launch site, slowing getting burnt in the sun, taking turns guarding the balloon from the odd gust of wind.
13:15 CDT, T+2h15m intended launch, T-1.5 hours until actual launch
Sarah arrived with four Balloon Time boxes, two kids who were happier to have some lunch in them, and we started the fill. It was a goofy procedure of pinching the neck of the balloon between cylinder changes, moving the hose to a new cylinder, and taping it on – but it worked and we didn’t leak any that we observed. The tiny cylinders filled slowly, but surely. It took about an hour to fill, using ~3.5 of the little cylinders, to get to our target neck lift. Now the balloon looked healthy!
I ran a couple more flight predictions, but at this point we were both launching late, and with an unknown volume of gas. I expected the balloon would burst early, maybe as early as 25km instead of the target 30.5km, and predictions looked OK. Still in farm fields!
14:15 CDT, T-35 minutes from launch
Now the balloon was full, we’re all so tired, and it’s time to put in the non-reusable Energizer Ultimate Lithium batteries into everything, confirm telemetry, tape up the payloads, string them up, and get ready for liftoff. This took another 30 minutes during which I remembered an important checklist item:
Zip tie the batteries in hatTrick and EAGLE so the batteries don’t pop out on landing.
I remembered this after hatTrick was already sealed up. We cut the payload train off it, cut duct tape, zip tied, and fail #2 of the day hit: the Raspberry Pi camera CSI cable came unplugged. Telemetry continued to feed, but I didn’t notice that SSDV was offline.
14:50 CDT: Liftoff!
Liftoff! We cleared all obstacles easily. We watched the balloon for a few minutes, and then started packing up. I lost telemetry for most of the payloads, because my big roof mounted antennas were on the car, and the receivers were on the ground with no antennas at all. I found some stubby antennas for one of them, but EAGLE and hatTrick lost telemetry for a couple of minutes until I got the radio receivers into the car.
On returning to the car and rigging up roof mounted antennas to trackers, we found that the radio I’d put in Spencer’s car was not receiving any data. Investigation found that the SMA-to-MCX adapter was broken (the tiny pin inside broke). I don’t like MCX connectors. Unfortunately had no spares on hand despite packing an extra of seemingly everything. It was only a week later that I recalled that I had a spare SMA SDR in the bag, and my Kenwood TH-F7 can receive the Horus 4FSK signal…could’ve used either of those to receive! Next time.
We set course for a way-point in Ottawa, IL, towards the predicted landing site.
As we drove through Mendota, IL, a fellow ham and radiosonde tracking extraordinaire KB9RKU messaged that he would join the chase!
We had upwards of 100 contacts on Meshtastic, and people had fun with it. Every time I received a downlink message from the python script on the Meshtastic payload, I giggled a bit. I sent it silly messages in reply. I watched EAGLE start to send NOFIX telemetry during the drive, and fiddled with my LoraBluetooth receiver whose rooftop antenna I broke in the haste of the chase, so it only had a little stubby antenna to try and work with.
16:30 CDT: Waiting for burst
The balloon flew much higher than I could have hoped for; had this been pure helium, I bet it would’ve seen 32km or more. It burst at 30,984 meters! Burst was at 16:35. We had been sat in a KFC parking lot in Ottawa watching the telemetry come in, getting a quick bite to eat, observing burst, and then waiting for the prediction to update with a new landing spot.
16:55 CDT: Watching it descend
We drove a mile or two north of the predicted landing spot to watch the best thing of all: the payload descending! We parked on the side of a road, and looking straight up, caught a view of it up at about 3km. The bright orange and green parachute stood out well in the sky. Someone must’ve taken a video, but I did not. We watched it fly straight over us, parallel to the road we were on, directly for a rare patch of trees. If we got lucky, it’d land in the road…
17:07 CDT: Landing
No luck. Sadly, it landed up in a tree, far back in private property. We had telemetry from all four payloads after landing and great signal indicating that it was up in a tree. We never caught a glimpse of the payloads. They may return some day.
Wrapping Up the Flight
It’s sad to return home without payloads. Good news is that the DFM17 tracker performed excellent, and I have another four DFM17s here that I haven’t even taken a soldering iron to yet – and they rain from the sky every day. I can probably recover 5 of them this winter when the winds blow them this way.
Next flight? After losing payloads, and not taking home a single photo due to the combination of losing SSDV and also from not recovering the GoPro onboard nor the photos on EAGLE’s SD card…I probably don’t want to launch anything valuable…I’m sad about it all. I’ll focus on fixing the logistical failures (helium in particular) and probably rely on a pair of DFM17s – one to transmit Horus 4FSK continuously, and one to tinker with CATS.radio with a bit of 4FSK as a backup. Maybe a Horus Wenet or another PITS payload for in-flight pictures, but, only if I’m feeling energized. It’d be interesting to focus on a telemetry-only flight. I also have new parts in stock for an APRS tracker, so maybe I’ll throw that together.
The Meshtastic crowd wants another flight and people have already offered to help sponsor a payload, so I’ll be looking to connect with serious folks who want to fly a Meshtastic node – one that’s well tested, doesn’t crash when frozen (bonus points if it gets tested with dry ice), and need to keep an eye on which GPS chips are in use so we make sure they are in “flight mode”.
The Failure List (ahem, the Opportunities To Learn List)
- Helium. Figure out what happened – is this not a 100 cu ft cylinder? Was it under-filled from the store? Was it a helium/air mix? Does anyone know what size cylinder I have pictured, and what it’s full pressure should be?
- EAGLE: why on earth did it lose GPS fix on ascent? A failure mode not seen on earlier flights.
- horusdemodlib telemetry logs: the RTTY payload logs didn’t get captured locally on any of my receivers, only the Horus 4FSK telemetry strings. Is this because we were running two modems / uploaders in parallel, both held open a different file handle to different inodes, so it ended up being a race condition which one gets written last and preserved? If so it’d probably be worth modifying the horus uploader to write separate telemetry files for each payload ID or process ID or timestamps, to avoid this clash. I wish I had the “nofix” data from EAGLE for analysis, but it scrolled off all my consoles and only one copy of it remains – and it’s currently up in a tree.
- Tying the payload train together was tedious and error prone; it would be easy to mess this up. Rehearse this.
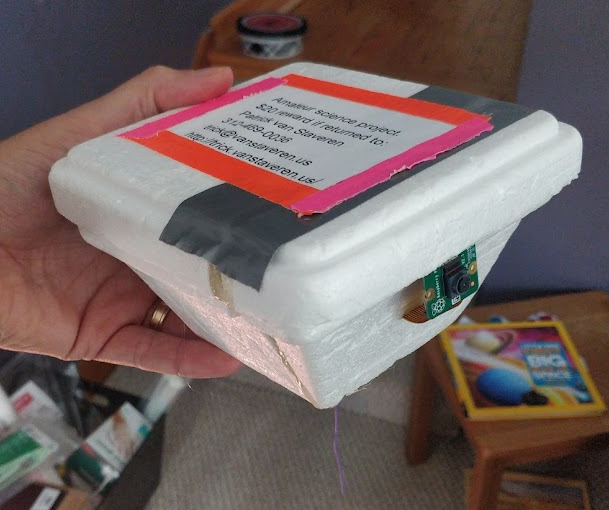
- Payload label – I put a printout of my contact details on the front of a couple of the payloads. Laminate this. Once it rains, the ink will wash away and if it’s recovered by an unsuspecting visitor, it may never find it’s way back to me.
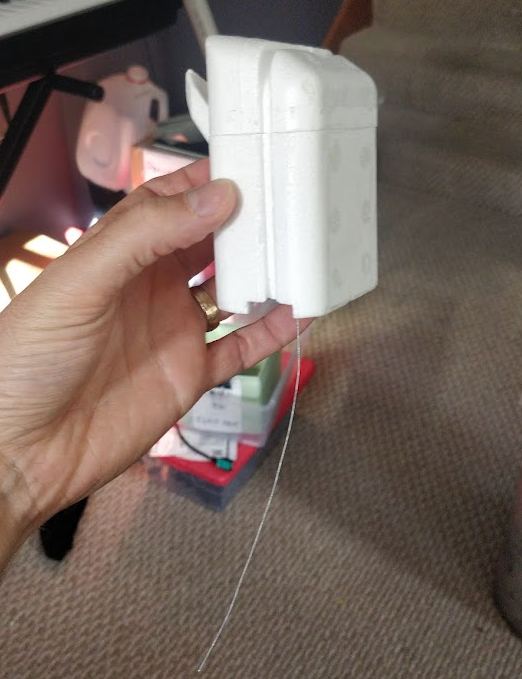
- Buy / find a source of better boxes :) The styrofoam box I built for the meshtastic node was crude.
- SSDV status got missed: maybe it’s worth having some kind of red-light green-light system which aggregates data from Sondehub and SSDV for expected payloads and shows them in a big bright display on the screen meant to use prior to launch. If any expected payload is offline, or stale for more than a minute, turn it red.
- Meshtastic: why did the unit fail and start to reboot loop? GPS max altitude, temperature / voltage drop, or something else?
- Meshtastic: log more data on a downlink, in case of losing the payload. Write a MQTT aggregator which uploads data to Sondehub Amateur for the payload, and maybe write something that downlinks data for every new contact made and posts the top 10 active payloads by distance so we can accurately verify when we set a Meshtastic distance record (which we certainly did on this flight – but the evidence is not there.)
- Hydrogen as a lifting gas? Why not? How big of a bang could it possibly be to have a balloon of hydrogen blow up? The scientific response is, of course: fill a little party balloon with hydrogen and blow it up!
- Payload mass calculations: I forgot to include the chute in my latest payload weight calculations (it’s only 28 grams anyway) but I also forgot to include any balloon remnants in the descent velocity calculations. This means that while I calculated 6.8m/s descent velocity, it went a bit faster (looks like 7.5). Not a huge deal, just an observed error. My ascent velocity was lower than planned; either we weren’t able to quite get neck lift calculated right, or I used a ton of duct tape, or something extra…
Payloads Flown
I went nuts on this flight. I had two experiments to fly, and I wanted to make sure as hell that if/when something went wrong with a payload or a receiver that I had enough redundancy to be able to track the flight in it’s entirety. So I flew both EAGLE and hatTrick (LoRa PITS-like tracker) alongside the two new experimental payloads. Here’s a rundown of each of the trackers that flew. You can also find some weight data in this sheet if you’re curious how heavy stuff was.
Experiment: DFM17 Horus 4FSK & CATS.radio
In early 2023 I recovered my first few DFM17 radiosondes, and was sad to not be able to find any material progress on a replacement firmware at that point in time. A couple of weeks later, I found gx1400’s code which needed a lot of work, but was a viable base. I patched and hacked at it, eventually getting it to transmit CW and APRS, but the code base quickly sprawled out of control and needed a re-think. I was troubled by how fragile my development setup was, so I worked on making a 3d printed clip to enable solderless programming which I hope someone tries. I ran out of energy for the code base, so I put it aside for a while and forgot about it. Some months later when tinkering with horusdemodlib’s RTTY support, Mark Jessop asked me – why not use Horus 4FSK? I didn’t think I had any hardware that could transmit it. It was at this point that I learned that RS41ng had been ported to DFM17 and merged in late 2023. I fired up my ST-Link programmer and was up and running in 30 minutes! I knew immediately that I had to fly it. So I did. It barely cost me a thing, with a fully assembled and powered DFM17 sonde weighing in at 69 grams. It performed admirably on the flight.
I also enabled the CATS protocol for fun with a beacon once every 20 4FSK packets, hoping I might find someone in range running a CATS I-gate. No such luck, and I could not spare an SDR to receive it myself during chase. Maybe next time?
I removed the sensor stalk (I don’t think RS41ng uses it?) and the one real hardware modification I made was that I trimmed the antenna to be a bit closer to the new 434mhz frequency. I didn’t measure the actual length; I actually desoldered the antenna, jammed it into my NanoVNA, and cut until the peak frequency was about desired; probably about 1cm shorter. I tinned the end of the antenna where I had cut to prevent fraying, and re-soldered it to the board.
For batteries, I used RAMWAY CR123A lithium batteries, which appear to be the same as what I find in the DFM17 sondes upon landing. In testing, I found that a new pair of batteries ran for about 6.5 hours in my configuration. On the actual launch day, it ran for about 7.5 hours.
How did it fly?
Amazingly. The DFM17 competed with the LoRa PITS tracker for telemetry update frequency; they were both about once per second.
The frequency drifted. This didn’t cause any problems for me tracking; all my trackers had configured a 10khz bandwidth and the frequency varied about 2500hz throughout the flight. Probably not ideal but it worked? I’d consider flying one of these as a primary tracker given my experience with this flight.
Link to Sondehub Grafana data.
Experiment: Meshtastic node
I’ve recently found Meshtastic to be interesting, and have seen a couple of other nerds who fly them up high on a drone to see how many contacts they can make before the drone’s battery dies. I thought “this is silly, put one on a balloon! It’ll bridge Michigan, Illinois, Iowa and Wisconsin in one go!” My actual expectation was that the Meshtastic channel utilization limitations would quickly become saturated. In preparing for the flight, I heard a few comments that this had been done before – but I haven’t found any write-ups of the flights, just mentions.
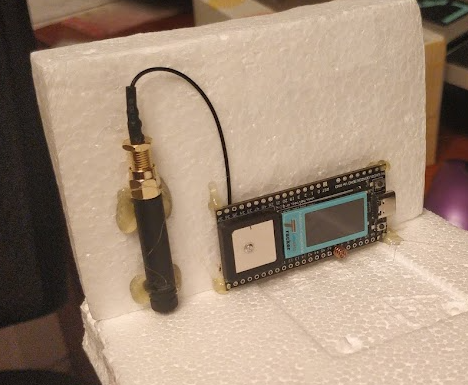
The tracker I flew is a Heltec Wireless Tracker, which is basically a Heltec v3 with a GPS chip on-board. It has a hefty ceramic GPS antenna too. I didn’t prep or test this payload much other than spending a fair bit of energy trying to script the node to send me periodic telemetry messages showing channel utilization and keeping log of the node list throughout the flight. I quickly settled on a Raspberry Pi Zero connected via USB, with 3x Energizer Ultimate Lithium batteries in this holder powering the Pi, and the Pi powering the Heltec. I found issues with the Heltec over USB-to-serial (the Heltec would reboot 90 seconds after listing the node database), so I ended up communicating with it over BLE from the Pi which was slower but worked better. I logged data onto the Pi’s SD card with the node database, and sent my ground station node a message every five minutes with some basic information including notably, channel utilization. The code is here.
I built the payload box out of scraps of styrofoam assembled with hot glue, so it didn’t look good and was probably a bit heavy. But it worked, at least well enough.
In flight it had a lid, I promise, I just don’t have a photo to prove it…
How I mounted the heltec before the box was complete (antenna pointing towards the ground)
How did it fly?
Not bad for a largely untested hack which I hacked together in a week. Two days before flight I did a battery runtime test and ran the whole unit until it died – the next day the Heltec had reverted to factory settings. Glad I found that before launch day! The node config I used is here for reference.
The node kept downlinking me coordinates and altitude until under 18km, at which point it appears that the Heltec entered a reboot loop – every time I received a telemetry message after that the uptime was a small number of seconds. This could be that the Heltec got overwhelmed with too many contacts, the GPS reached it’s maximum altitude (ublox GPS chips require to be in “flight mode” above 12km; the Heltec’s UC6580 probably has some similar limit?) It could also be that the battery voltage dropped low enough at this point, and/or the payload was simply too cold.
Did it saturate air time fairness limits imposed in the Meshtastic firmware / by the regulations on the frequency? It doesn’t appear so, but I’m far from an expert. The node reported up to 24% “channel utilization” at it’s peak.
Ideas for a next Meshtastic flight:
- See if it’s possible to log telemetry on-board; is it possible to hack the Meshtastic firmware to let me run some custom code? It’ll save on power and weight to not have a Pi.
- Test freeze the payload for a long time. Maybe even with dry ice to get it really cold (this flight recorded south of -20C).
- Or do something with more batteries for a higher voltage, a heating element, something to avoid the reboot loops.
- Log debug messages for later analysis? This might be an overwhelming amount of data.
- Downlink a message for every new node we see, and it’s lat/lon. Request lat/lon from ground payloads first, and then send it?
- Write a tracker application which listens to MQTT and feeds data into Amateur Sondehub.
- Fly a RAK node? The community consensus seems to be that Heltec nodes are the cheapest, and while I’m glad to see (and you’ll later be glad to see) that it’s a Heltec that flew on this fateful flight, maybe a better tracker is worth it?
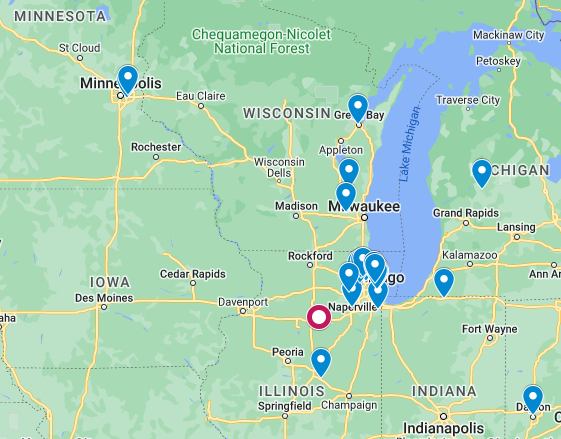
My ground station “BLUE” which was in the car with me received a lot of positions from Meshtastic nodes that the “🎈” node hit, but not all of them. Here’s a list from BLUE, with some rows added for manual reports that I’ve received as well. If you want to contribute your position, drop me a message and I’ll add you to that spreadsheet. Here’s the list as a map:
Verdict: this gathered the most community interest, so it’s definitely worth doing again!
Re-flown tracker: EAGLE
This is the first tracker I built, way back in like 2016-2017 which first flew in 2018 and has three flights – and an inconsistent track record:
- Flight 1: died during descent, presumably due to voltage regulator issues. Replaced regulator after Flight 1.
- Flight 2: Worked somewhat reliably! First instance of issues with the bme280, which I actually may have found before flight 4.
- Flight 3: Worked well other than batteries coming out on landing. Removed Canon A810 camera to keep it simple.
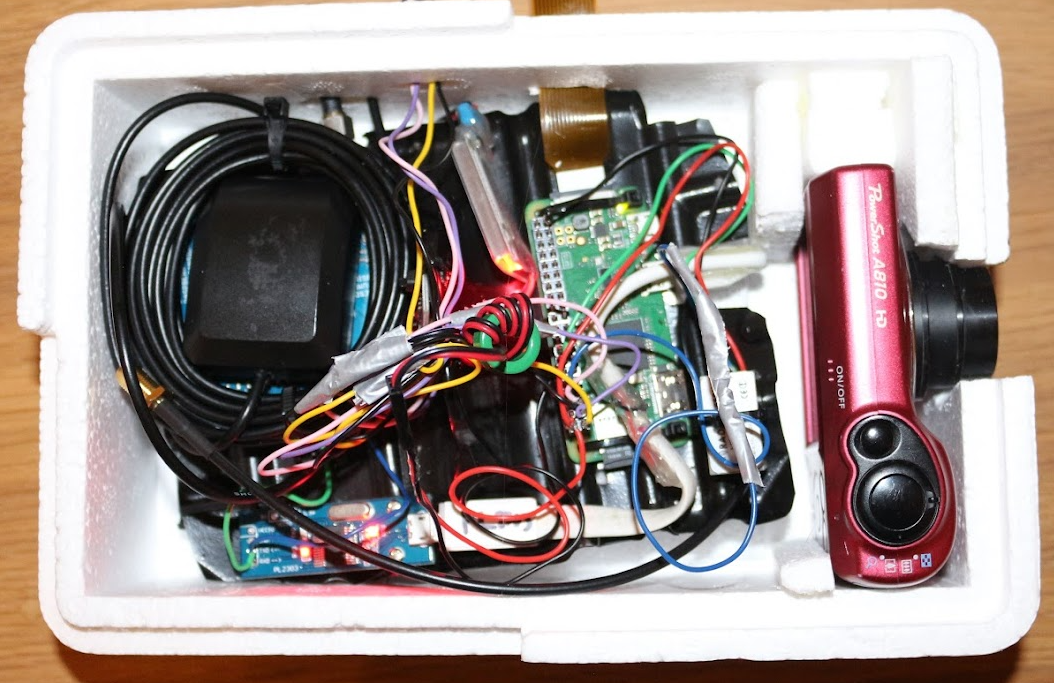
For Flight 4, I added a GoPro Hero+ in the same spot that the Canon camera was in. It’s a very old GoPro that I’ve had for nearly ten years; it records video for ~2 hours on a charge.
I had lots of problems with this tracker leading up to flight which I tracked down to I2C bus problems. Either the INA219 voltage & current sensor was the culprit, or the bme280 sensor was the fault, or the GPS board was doing something weird on I2C (it wasn’t even in use, as I ended up doing GPS via UART and never used the I2C bus connections). I found a dry soldered pin on the bme280, which caused one if not both of the two failure modes, but the ina219 was also reporting negative current values which led me to believe that I shouldn’t trust it. I simply disconnected the ina219, re-soldered the bme280, disconnected the GPS I2C, stress tested, and called it “good enough”.
How did it fly?
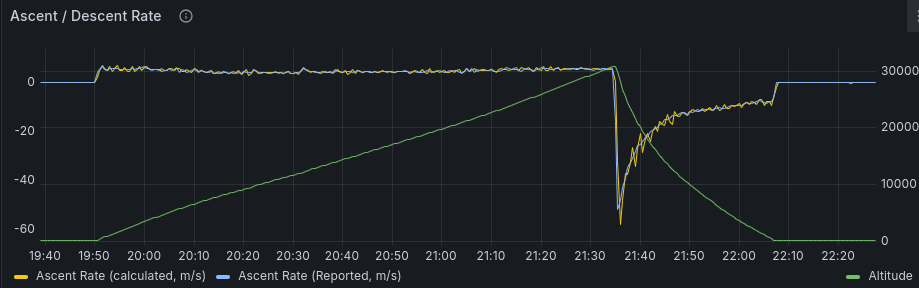
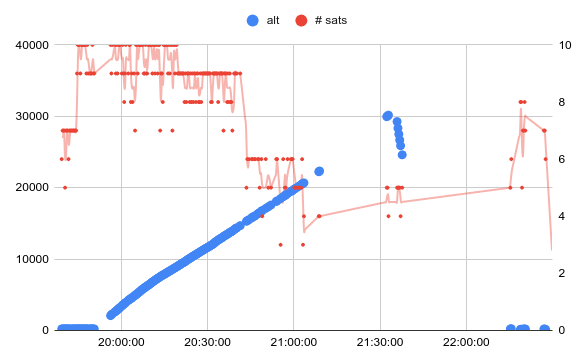
During flight, EAGLE had problems different than it had had before. Go figure. It looks like the environmental sensors performed fine, but the GPS had issues. As the flight ascended, the number of GNSS satellites used for the fix decreased to around 3 or 4 around 20km altitude, after which EAGLE started transmitting “NOFIX” telemetry strings, where it continues sending me data over RTTY but instead of a lat/lon/altitude it sends these unparseable strings. These strings don’t get uploaded to Sondehub Amateur, so they only exist on the receiving modem. Unfortunately my RTTY modem didn’t do any logging, so while I saw these NOFIX strings on my console while chasing, I have no log of them!
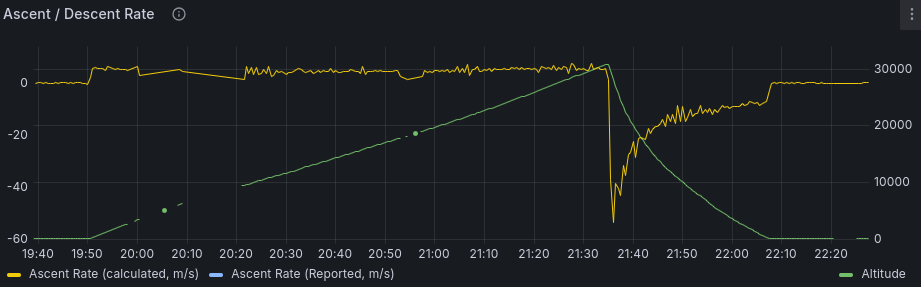
But it’s obvious enough to me on this graph that the GPS had issues:
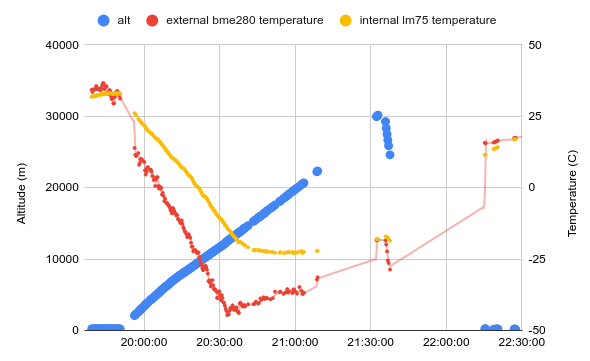
But the bme280 and lm75 sensors performed great, so we get some good graphs despite gaps up over 20km:
Also interesting is that the frame number continued to increment throughout the flight. It looks like it reset back to 0 on landing, indicating that the batteries didn’t quite stay still on impact – but it got a GPS fix and transmitted a location shortly thereafter.
Here’s a link to a breakout of all the telemetry strings that the Sondehub database has if you want to fool around with the data yourself.
Data link on Sondehub Grafana.
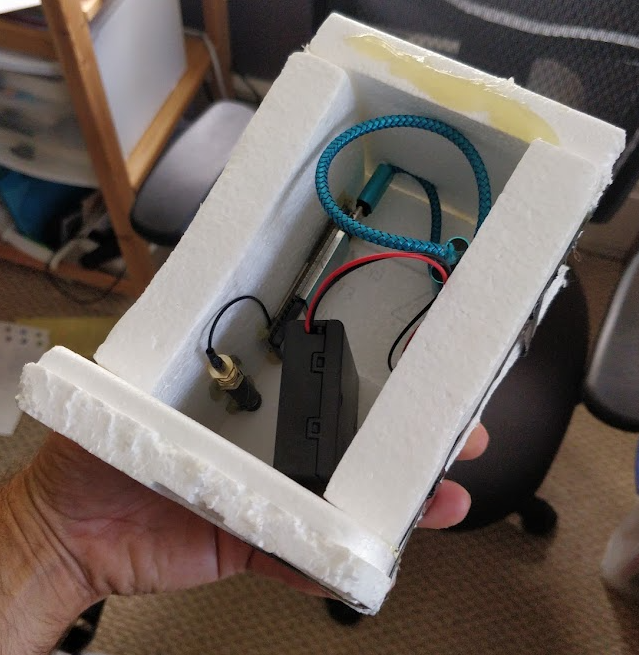
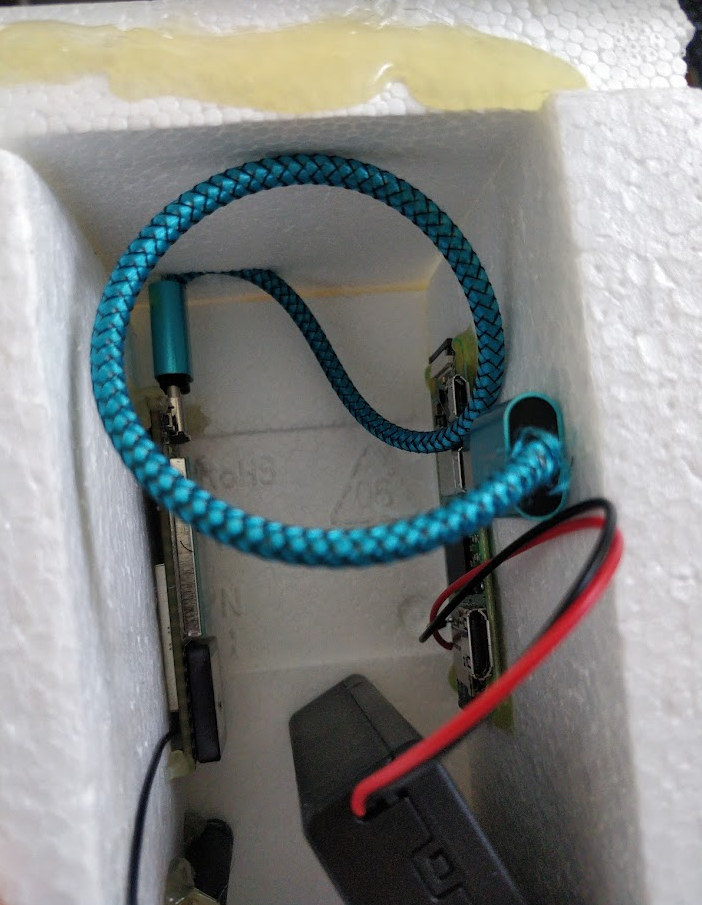
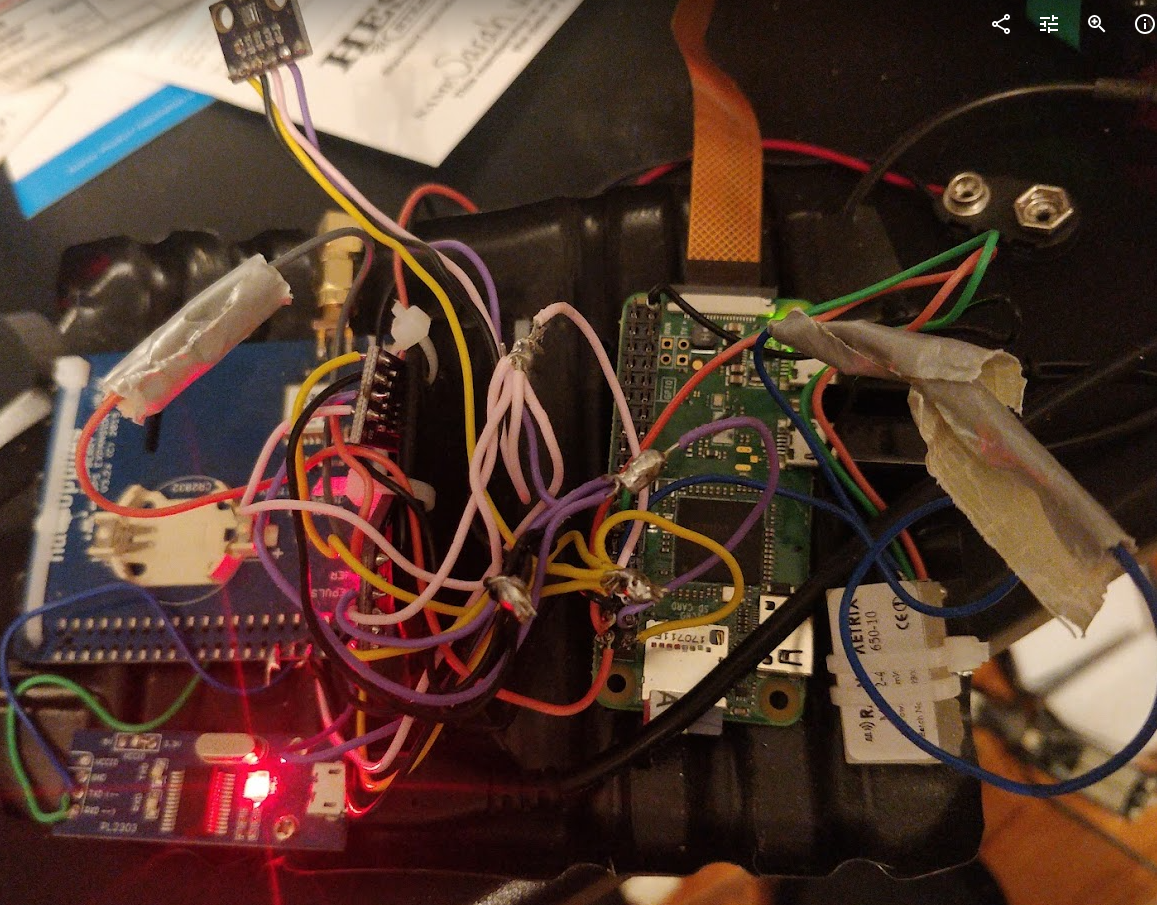
EAGLE internals from a few days before flight:
Old photo from 2017 with the old Canon camera; this flight had a GoPro there:
The EAGLE has indeed landed. Probably for the last time.
Re-flown tracker: hatTrick aka KD9PRC-2
This payload has flown once, and flew beautifully save for it’s batteries coming out on landing. The goal this time was to fly it as-is, the only software change being to use my ham radio callsign in the payload name because I wasn’t quite sure how to configure the tracker software to send it somewhere else as a comment. I didn’t even update the tracker software to the latest version, as “if it ain’t broke don’t fix it”.
I made one hardware change – after a bunch of battery pack drop testing, I tried out zip ties around the battery pack to hold the batteries in upon impact. This seemed to work really well, and a lot more reusable than soldering batteries together, so I went with it.
How did it fly?
The telemetry was amazing, competing for latency with the DFM17 (KD9PRC-4FSK-1). However my mention of zip ties was fateful. Minutes before launch reading my checklist I realized that I had forgotten the zip tie on the battery pack. I decided to disassemble the payload which was already tied in on the payload line and covered in duct tape, which required cutting it open. Not the best idea when you’re sunburnt from holding a balloon for 2+ hours after an unexpected launch delay. When doing this, we must have removed the RaspberryPi camera CSI cable – a very easy thing to do and not notice. Upon reassembly, I checked that we were still receiving telemetry and we were, so tape’d the payload back up, re-did the string, and we launched minutes later. Only to then realize that the SSDV feed had ceased. We took 29 pictures of grass at the launch site – that’s it.
The payload flew great and reported telemetry without fail during the entire flight. I managed to get a second listener, a little TTGO LoRa board running Dave Akerman’s LoraBluetooth code, to receive some packets too and upload them using a quick hack I wrote a couple weeks before launch. For a future launch, I’ll leave a tracker like this at home plugged into one of my rooftop antennas so I’m receiving LoRa from multiple locations. In the haste of a bundle of wires in the car at my feet, I pulled the SMA connector off the rooftop antenna that I was trying to use for this payload and spent about 20 minutes of the chase drive trying to re-connect with duct tape by hand with no tools. I didn’t end up needing the extra receiver, I really just wanted to see that it worked (and it did! 823 packets when the lora-gateway with it’s very nice antenna received 3441)
Data link on Sondehub Grafana.
Q&A
Q: Does the payload use a parachute?
A: Yes – we want a controlled and rather slow descent, and don’t want the falling payload to be much of a risk of hurting anyone/anything.
This flight used a Spherachute 24″ parachute bought many years ago from Random Engineering for my first HAB flights and with three flights already to it’s record. With 838 grams of payload, estimates a descent rate of about 6.8m/s (15mph) at ground level.
Most fascinating part of a balloon flight is what happens to the parachute upon balloon burst. The chute does almost nothing! The atmosphere at 30km altitude is <1% of ground level density, so the payload is almost in free fall. On this flight it looks like it took about 45 seconds for the payload to reach terminal velocity upon burst, with the maximum speed recorded of 58m/s (over 100mph). Imagine the chaos!
Q: Meshtastic – why wasn’t the node set to ROUTER mode?
A: Good idea – but router mode disables all local interfaces (serial, bluetooth). I was recording telemetry locally to a Raspberry Pi over BLE during the flight; in router mode this would not be possible. If there’s a better mode to use next flight which accomplishes the same prioritization, let me know!
Q: What kind of balloon was used?
A: Hwoyee HY-800, an 800 gram latex weather balloon. It’s huge; about 1m diameter when inflated for flight.
Q: Why was a heltec was chosen as the Meshtastic node, and not a RAK?
Community member MrBeef sums up my thoughts on the subject quite succinctly:

Heltecs are cheap, and I have used several of them so I figured it would be “good enough.”
Q: How much does this cost?
A: It depends on how much stuff you fly, and how high you try to fly it. A lighter payload with a less ambitious altitude can use a cheaper & lighter balloon with much less helium and top out at 20km altitude. This flight cost me about $600 – including the $220 helium mistake, so we can iron that out for the next flight with a more reliable supply. That doesn’t include the cost of a lot of the payload I flew, which was old & reused stuff, including a well worn but still not worthless old GoPro camera :tear:
Q: What is the story about the cat?
A: That’s a good question which I’ll tell over a beer off the record :)
Finally
Thanks for reading! Want to get in touch about a future balloon flight? Get in touch with me here.
As an Amazon Associate I earn from qualifying purchases. Thanks in advance if you end up buying any of these parts for your own project!